

USER GUIDE > Operating System> Safari
Safari
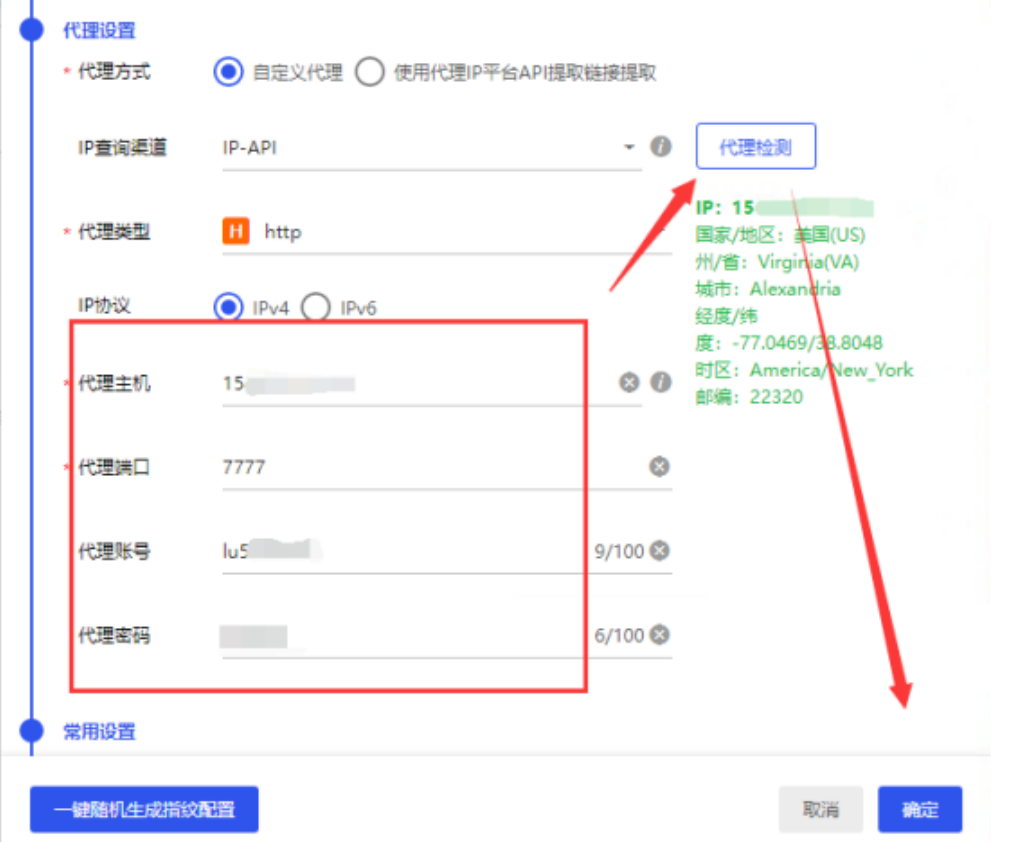
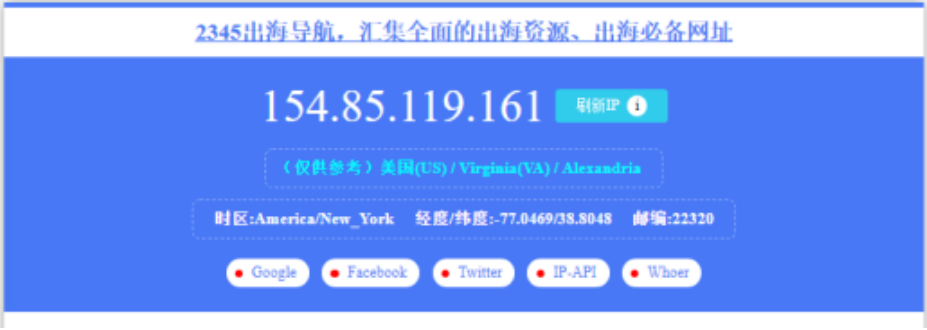
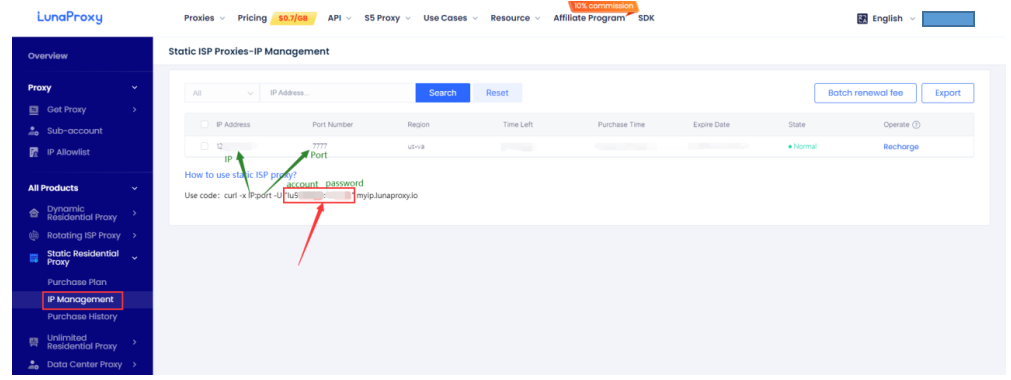
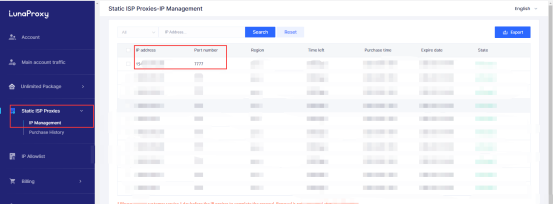
Before configuring, please obtain the IP first
Please refer to the tutorial: [How to obtain IP after purchase]
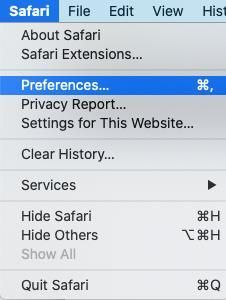
1. Open the Safari and select Set Preferences from the menu
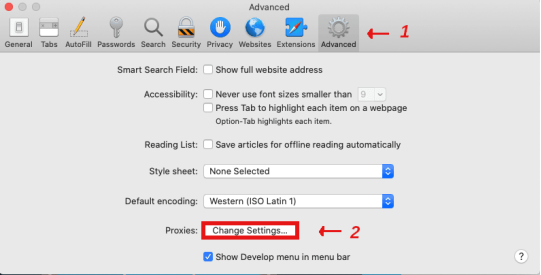
2.Click the advanced button on the right of the navigation bar, at the bottom of the window, click the change setting next to the proxy
3.After jumping to the proxy Settings window, enter the specific setting information provided by the administrator or proxy service. Normally, you will use the HTTP or the HTTPS proxy, as shown in the figure below, but the specific setting should depend on your specific proxy.
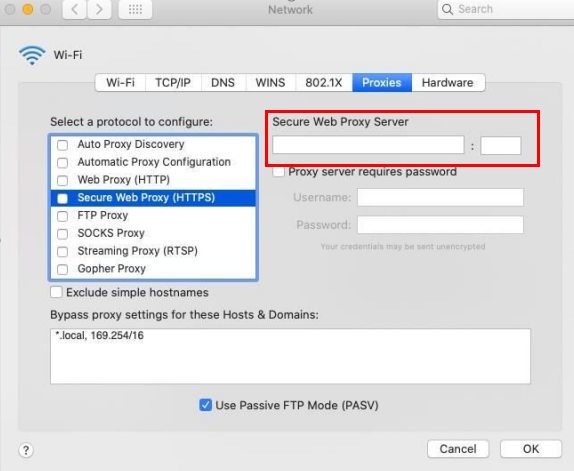
4.After entering the information needed by the proxy, click OK to save the changes. Your Safari proxy settings will take effect immediately, and you do not need to restart the application
USER GUIDE > Operating System> iPhone
iPhone
Before configuring, please obtain the IP first
Please refer to the tutorial: [How to obtain IP after purchase]
1. Open the settings and click wireless LAN
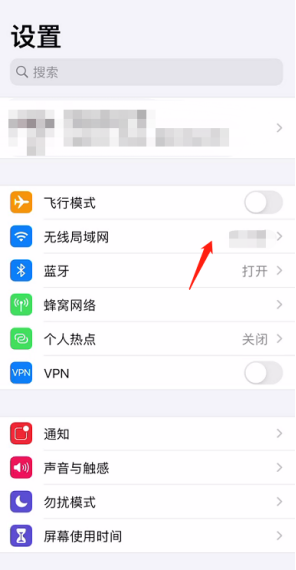
2. Find the connected wifi and click the small icon on the right to enter the configuration proxy interface
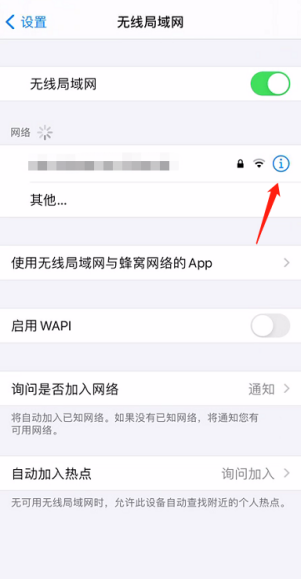
3. Click on the Configure proxy
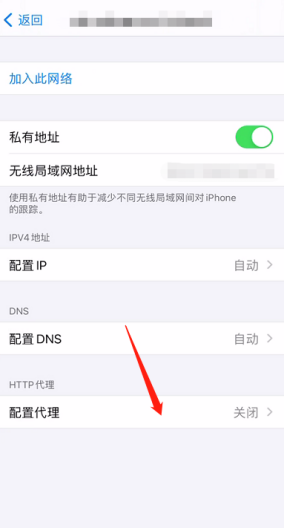
4. Select the manual operation and fill in the server and port
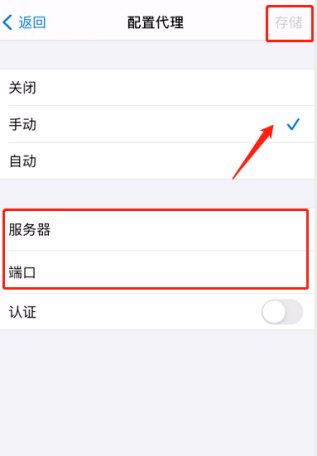
5. Open the authentication button and fill in the user name and password. Click on Storage in the upper right corner, and the configuration is complete
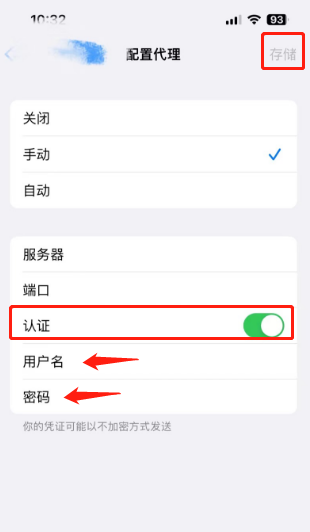
6. In the browser, if the query result and the proxy IP are consistent, the proxy is set successfully.
USER GUIDE > Operating System> Android
Android
Before configuring, please obtain the IP first
Please refer to the tutorial: [How to obtain IP after purchase]
1、Open the Settings and click on WLAN
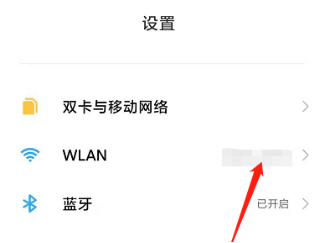
2、Select the connected WIFI network and click the arrow on the right to enter the Settings page
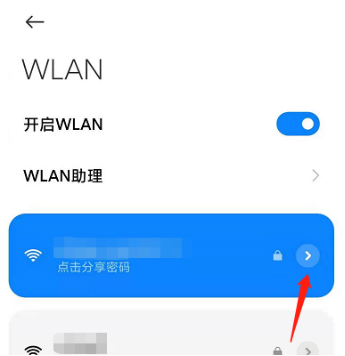
3、Set the proxy to "manual", fill in the host name, port information, click on the upper right corner to save, the configuration is complete
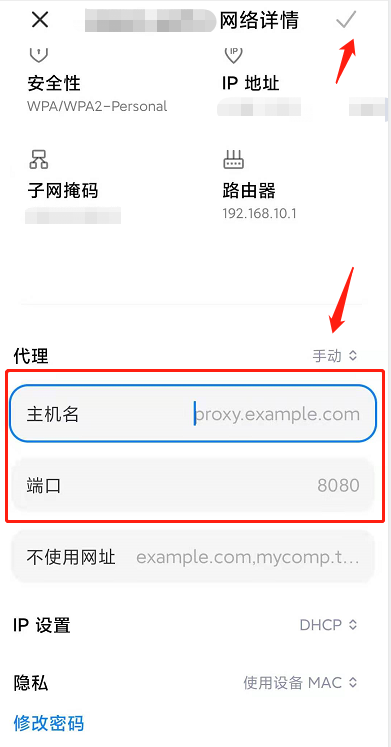
4、Open the mobile phone browser and enter the user name and password
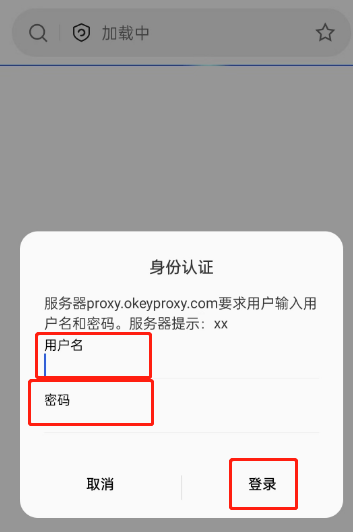
5、Open the mobile browser search IP address query, if the query results and set the proxy IP consistent, the proxy set success.
USER GUIDE > Operating System> Mac
Mac
Before configuring, please obtain the IP first
Please refer to the tutorial: [How to obtain IP after purchase]
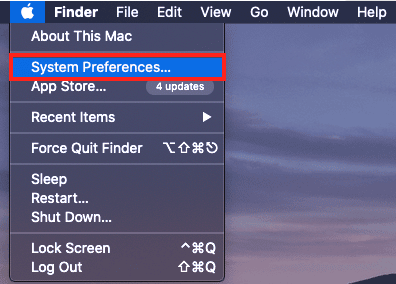
1.Click on the upper left corner icon- -system preferences
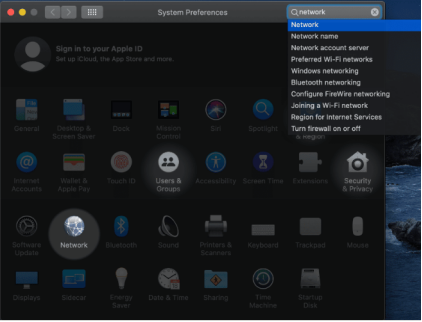
2. Click on the Network Settings
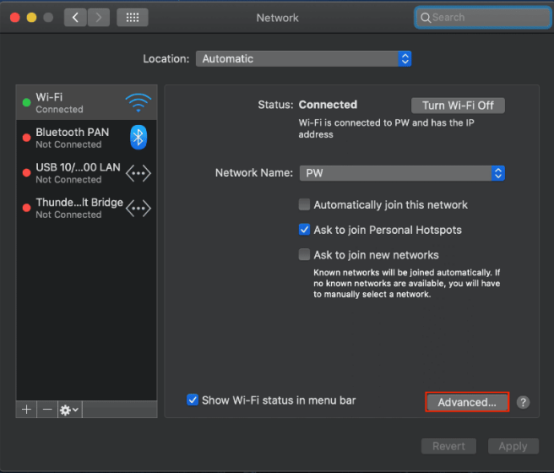
3.Click on the advanced button in the lower right corner of the window
4.Click on the proxy, and enter your proxy settings
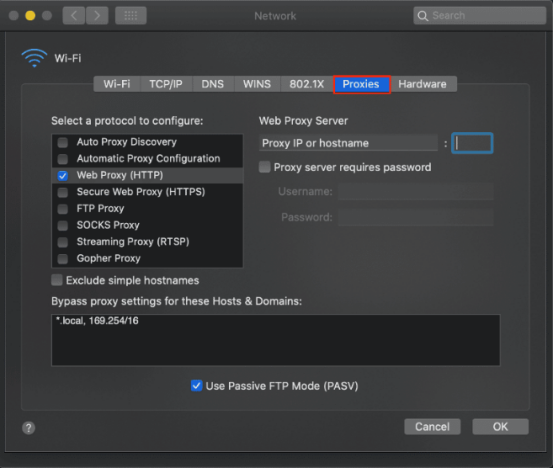
5. Finally, click OK, and the configuration is complete.
6. Enter the IP address in the browser to query consistent with the configured address
USER GUIDE > Operating System> Windows 10
Windows 10
Before configuring, please obtain the IP first
Please refer to the tutorial: [How to obtain IP after purchase]
1.Click the left bottom left icon-set
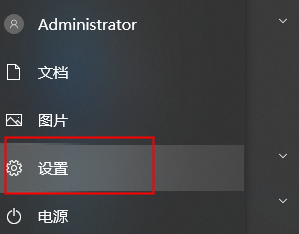
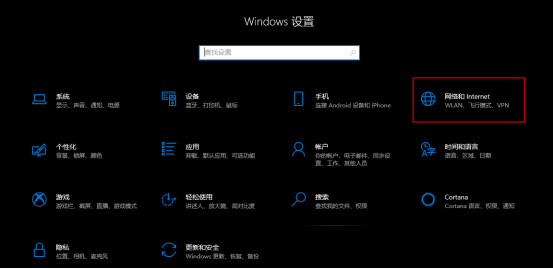
2.Click on the network and on the Internet
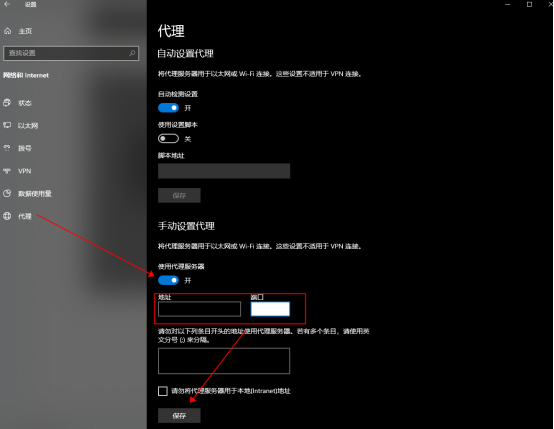
3.Click the left navigation bar proxy, select use the proxy server, enter IP and port, click OK, configuration complete
4.Search the ip address in the browser to check consistent with the configuration address
USER GUIDE > Browser> Google
Before configuring, please obtain the IP first
Please refer to the tutorial: [How to obtain IP after purchase]
Add proxy settings
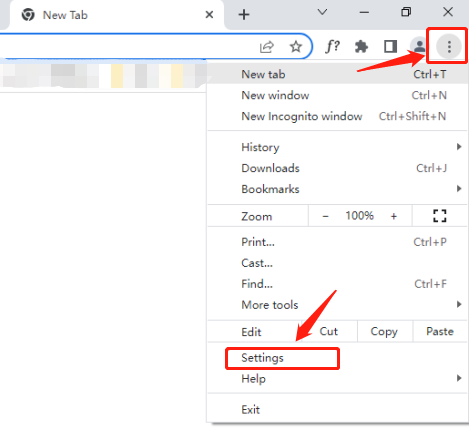
Settings > System > Open your computer's proxy settings > Operating system settings
1.Click the drop-down box in the upper right corner of the browser to open the settings.
2.Select System from the left list in Settings.
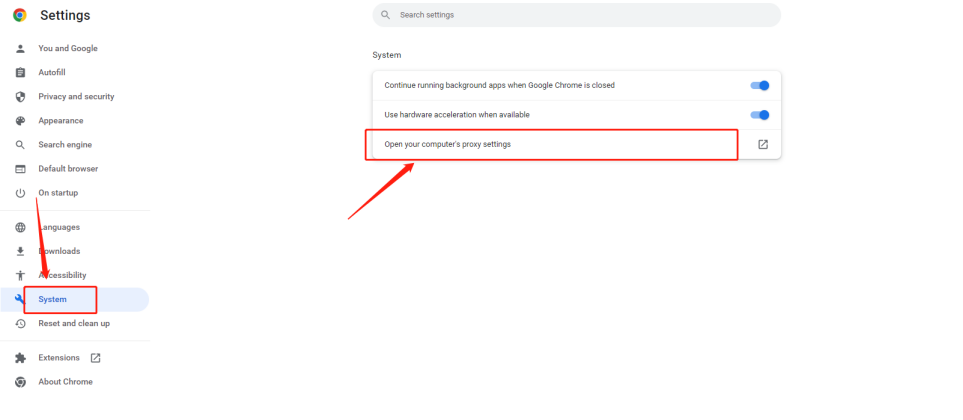
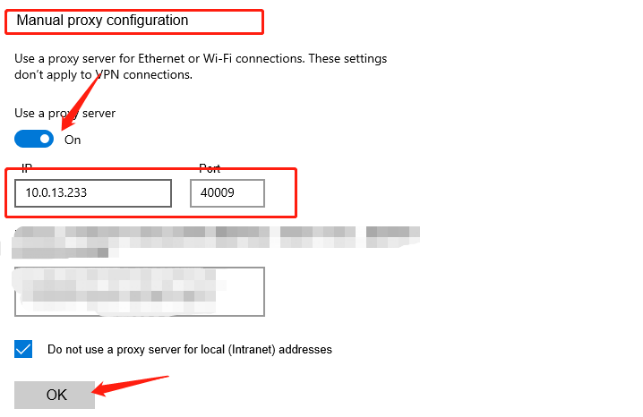
3.Click to open your computer's proxy settings.
Select the IP address that you extracted before, enter the IP and port, and click Save.
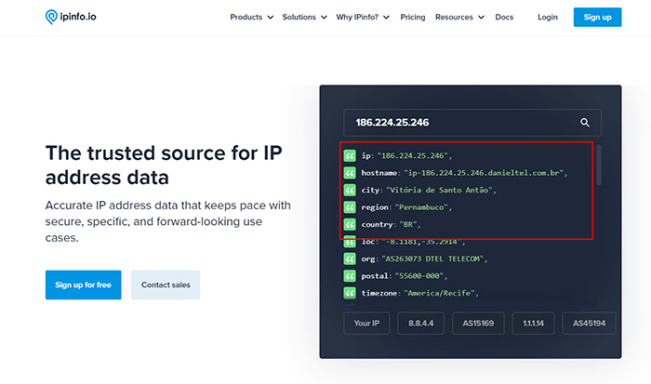
4.Open a new window to check the IP, you can see that it is the assigned proxy.
USER GUIDE > Browser> Edge browser
Edge browser
Before configuring, please obtain the IP first
Please refer to the tutorial: [How to obtain IP after purchase]
1. Launch Microsoft Edge.
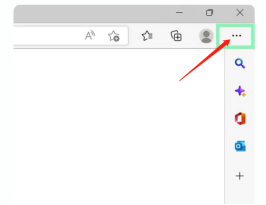
2.Click on the three dots in the top right corner.
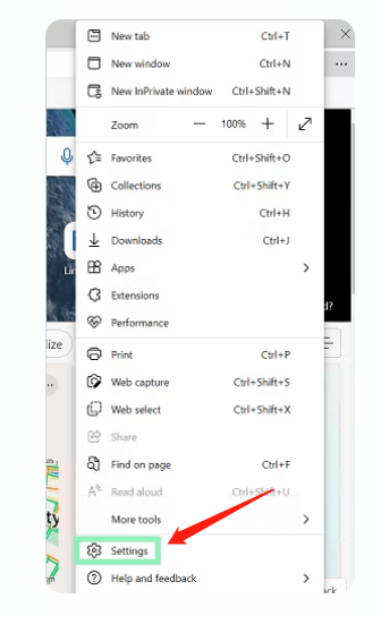
3.You’ll be presented with your profile and many other configuration options. Within the search bar, write “proxy”.
4.Afterwards, click on Open your computer’s proxy settings.
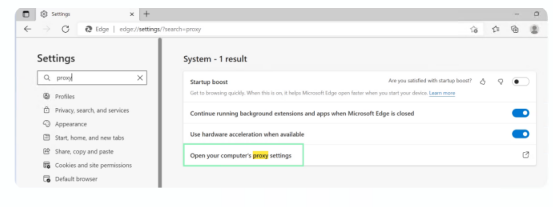
5.Step 5 will redirect you to Windows proxy settings; therefore, please follow this https://www.lunaproxy.com/helpcenter/?par=16_70 for further integration steps.
USER GUIDE > Browser> SwitchyOmega
SwitchyOmega
Before configuring, please obtain the IP first
Please refer to the tutorial: [How to obtain IP after purchase]
1. Open SwitchyOmega's Options.
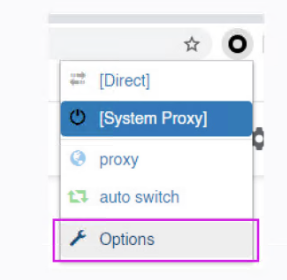
2. Click on New profile.
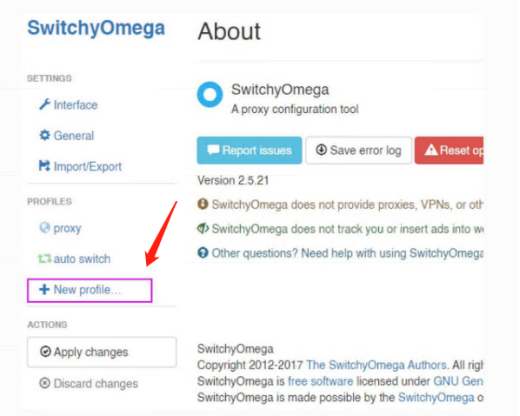
3. Type in a Profile name.
4. Choose Proxy Profile type and click Create.
5. Change the protocol to HTTP.
6. Under Serserver, enter the code for the data center proxy you purchased from us. Fill in the proxy IP or hostname. Under the proxy port, enter 12233.
7. Next, click the Lock button on the right.
8. After that, fill in your Username and Password. For Residential Proxies, don't forget to add customer-before your given username.
9. Click Save changes.
10. Click Apply changes.
11. For the final step, click on the SwitchyOmega extension icon and choose your newly configured proxy.
USER GUIDE > Browser> Insomniac
Insomniac
Before configuring, please obtain the IP first
Please refer to the tutorial: [How to obtain IP after purchase]
1. Open the Insomniac Browser and click on Insomniac Proxy Per Tab > Manage Proxy List.

2. In the new tab, select Add Bulk Proxies.
3. First, you will need to generate a CSV file. Select Export Sample File to download a template.
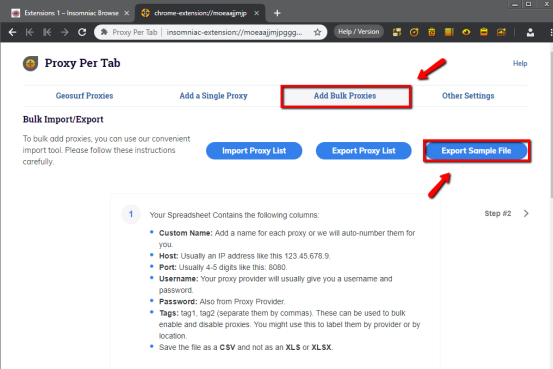
4. Fill in proxy list as per the example below:
a) With a proxy sub-user authentication username and password.
b) With a allowlist IP.
5. Once your CSV file is ready, import it into the Insomniac Browser.
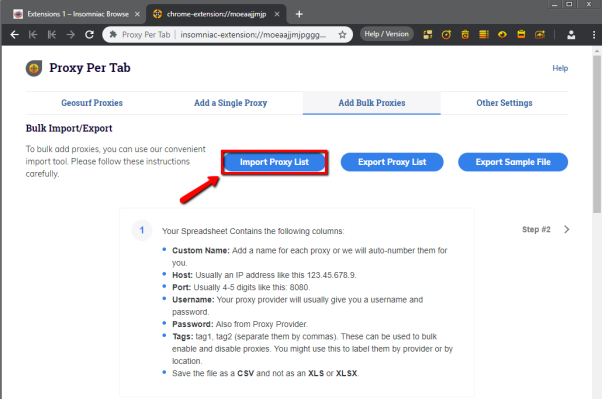
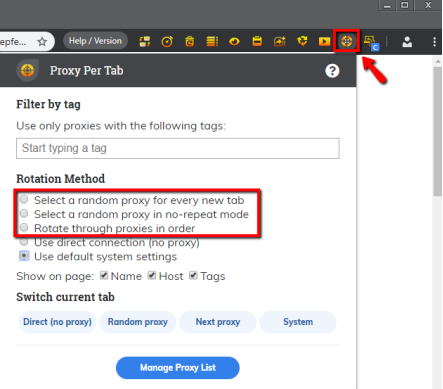
6. Apply relevant settings to assign proxies for tabs.
7. To see if the proxy is working, check your IP on https://ipinfo.io/
USER GUIDE > Browser> Opera
Opera
Before configuring, please obtain the IP first
Please refer to the tutorial: [How to obtain IP after purchase]
1. Open Opera on your computer.
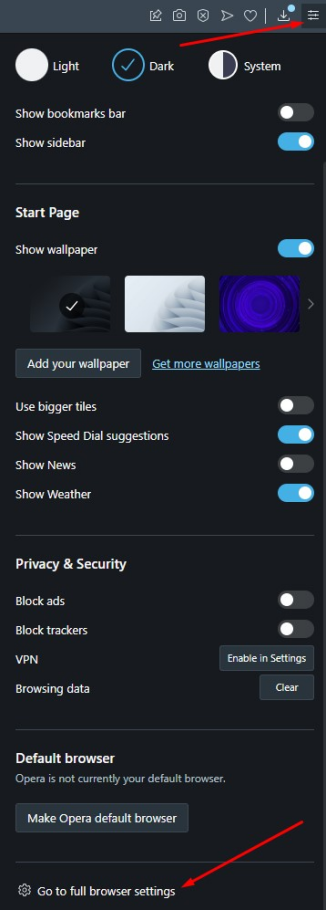
2.Click on Settings☰ icon, scroll down, click Go to full browser settings.
3. Scroll down, and click on the Advanced button.
4. Scroll down to System, and click on Open your computer's proxy settings.
5. Edit your proxy settings. This step is different because it depends on your operating system: Windows or macOS
6. Turn on the Use a proxy server slider.
7.Check Don't use the proxy server for your local (intranet) network under Proxy server.
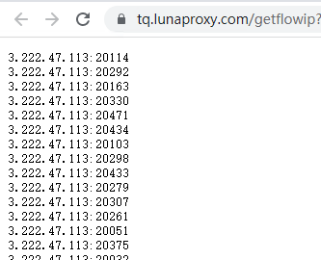
8. Add endpoint in the Address section (e.g.3.222.47.113 ).
9. Add port in the Port section (e.g.20114).
10. Click Save.
USER GUIDE > Browser> IE
IE
Before configuring, please obtain the IP first
Please refer to the tutorial: [How to obtain IP after purchase]
1. Open Internet Explorer
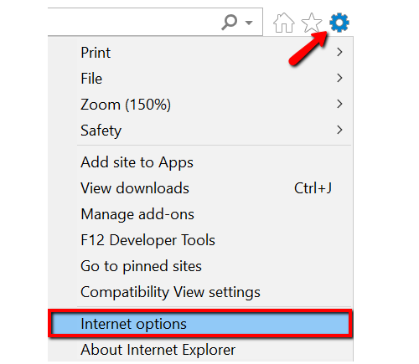
2. Click on the Gear> Internet option.
3. Click the LAN Settings in the Connections tab of the Internet property.
4. Check Use a proxy server for your LAN under Proxy server.
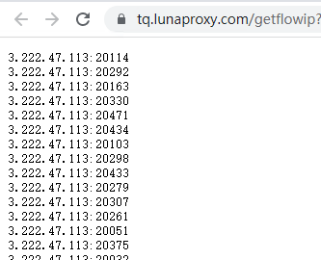
Add endpoint in the Address section (e.g. 3.222.47.113).
Add port in the Port section (e.g. 20114)
5. Click OK and Apply to save your proxy settings.
6. To see if the proxy is working, check the IP on https://www.iplocation.net/.
You will be asked for your proxy user credentials when trying to open a website for the first time if not using a allowlist IP.
USER GUIDE > Browser> Firefox
Firefox
Before configuring, please obtain the IP first
Please refer to the tutorial: [How to obtain IP after purchase]
1.Open the Firefox
2. Click Set ☰ icon> Settings (or Preferences on macOS).
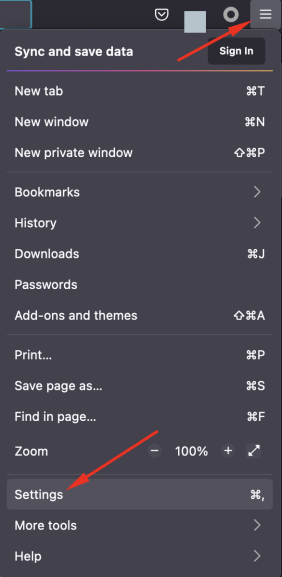
3. Click on the General tab.
4. Scroll down to the Network Proxy section, and then click Settings.

5. Select the manual proxy configuration box.
6. Add the endpoints (e.p: 3.222.47.113) and the ports (e.p: 20114) to the HTTP proxy field. Select to also use this proxy for the FTP and HTTPS check boxes.
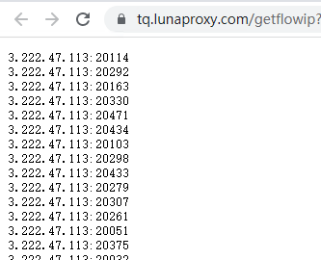
7. Click OK.
8. To see if the proxy is working properly, check the IP on the https://www.iplocation.net/.
USER GUIDE > Browser> Chrome
Chrome
Before configuring, please obtain the IP first
Please refer to the tutorial: [How to obtain IP after purchase]
YouTube Tutorial:https://www.youtube.com/watch?v=WJ4onojL-LI
1.Download the Chrome extension, unzip it and find the Chrome folder
2.Open Chrome and click on the three dots on the top right corner . Find More Tools - Extentions
3.Then turn the Developer Mode on in the top right corner and drag the unzipped Chrome folder onto the page directly
4.Once installed, click on the Extensions icon on the top right corner, and pin IP. Click the icon then click Set IP first to fill in all required information. Note: click on ' proxy' to turn on proxy and 'Direct link' to turn off proxy.
5.Username: lunaproxy username
Password: lunaproxy proxy password
Country: Fill in the country code
Time (minutes): Fill in the time required for IP rotation [1-30 minutes]
selfip (optional): If you need to fill in the specified IP
Accurate: Choose to access as a specific country or IP
Protocol: Select the protocol
Click "Get IP", click "Apply Change" after success to save and enable IP
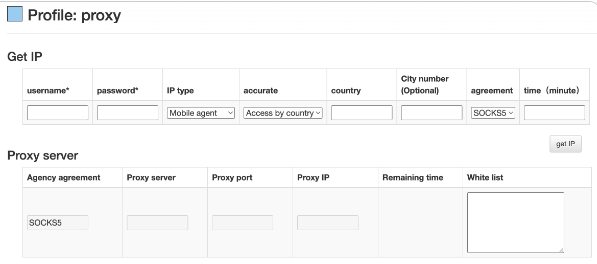
6.use https://en.ipip.net to check your IP to see if the proxy is successful
USER GUIDE > Fingerprint browser> Nstbrowser
Nstbrowser
1.Open the browser and click Create Configuration
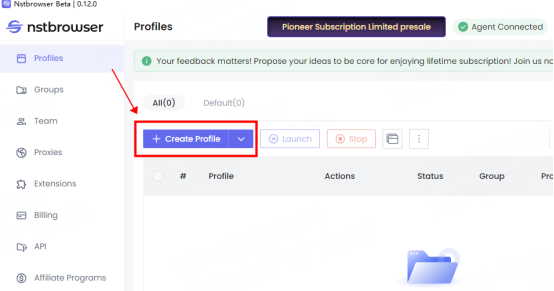
2. Click Proxy and select Custom
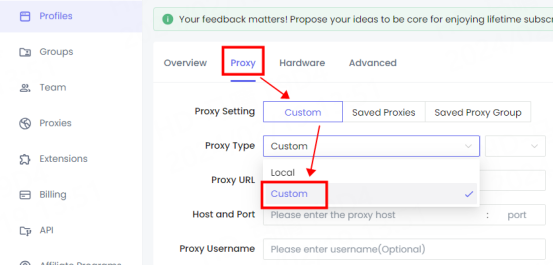
3. Enter the IP, port, and select the protocol type you want to use. The proxy URL is automatically generated after filling in the IP port and selecting the protocol. No manual input is required.
4. Select IPINFO for IP detection, and then click Check Proxy. After the detection is successful, click Create Configuration.
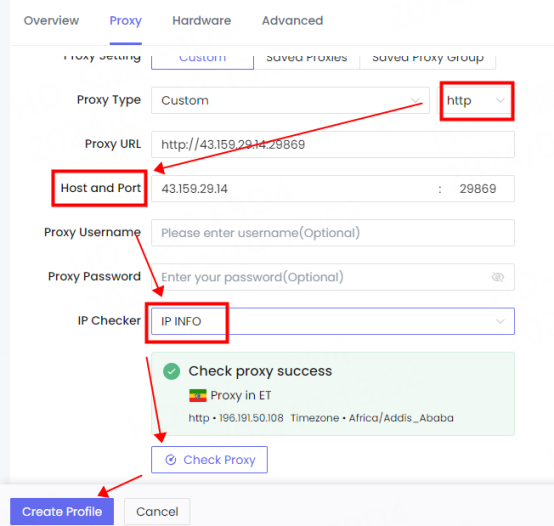
If the detection fails, please refer to the tutorial: [Proxy cannot connect] for testing.
Note:
① API extraction needs to add a whitelist. Please refer to the tutorial for adding: [IP Whitelist Tutorial]
②To use account password extraction, you need to fill in the agent account number and password
USER GUIDE > Fingerprint browser> TigerAI browser
TigerAI browser
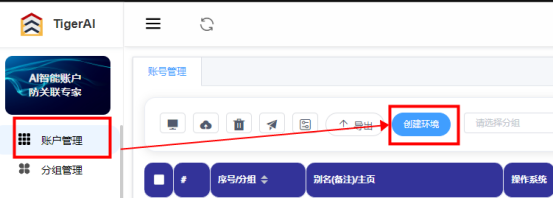
1. Open the TigerAI browser and click Account Management—Create Environment
2. Enter the environment name "lunaproxy", select custom proxy, enter the proxy host, proxy port, and then select the proxy method
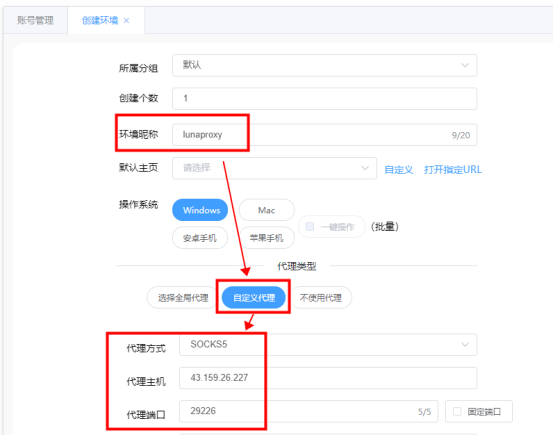
3. After the input is completed, click test proxy. If the test is successful, click Create
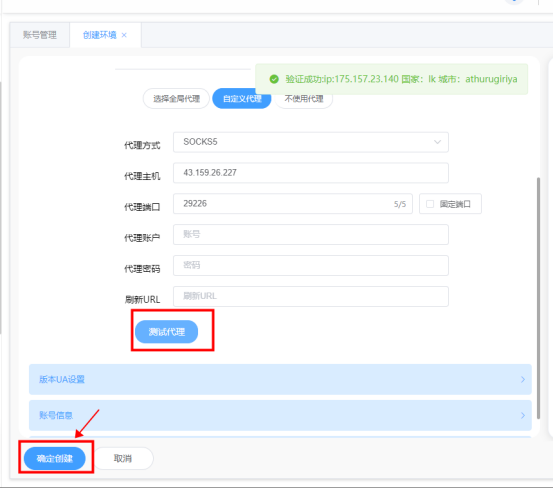
4. After successful creation, you can view and use it in the account management interface.

USER GUIDE > Fingerprint browser> YunLark
YunLark
1. Open the browser and click New

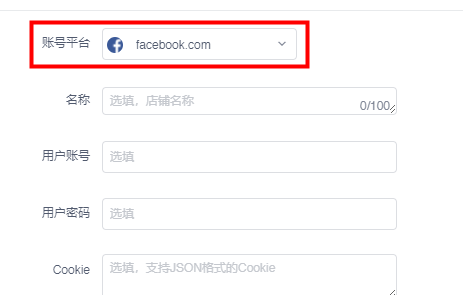
2. Select the platform you want to use. Platform account password and other information are optional.
3. Select the proxy type you want to use. Here we take socks5 as an example. Fill in the proxy host and port. If you are using a static proxy, you need to fill in the proxy account and password. You can see your account and password in the IP management interface, and then Click Check Proxy. If the connection test is successful, click OK.
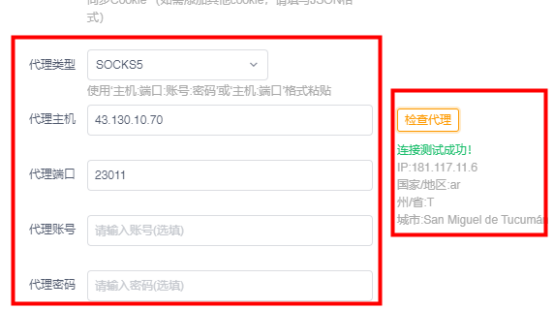
4. You can see the successfully configured proxy in your store management interface. Click to open it to use it.

USER GUIDE > Fingerprint browser> YangTaoBrowser
YangTaoBrowser
1. Open the browser and click New Environment

2. Enter the environment name and platform (the platform is selected according to its own needs)

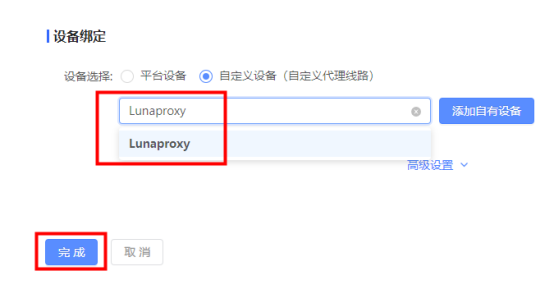
3. Select the custom device in the device binding area and click Add your own device

4. Enter the device name, select the proxy type, fill in the IP address and port, and then click Detect. If you are using a static IP, you need to fill in the account and password. Before configuring the dynamic IP, you need to add the local IP to the IP allowed list in the personal center. , click OK after the detection is successful.
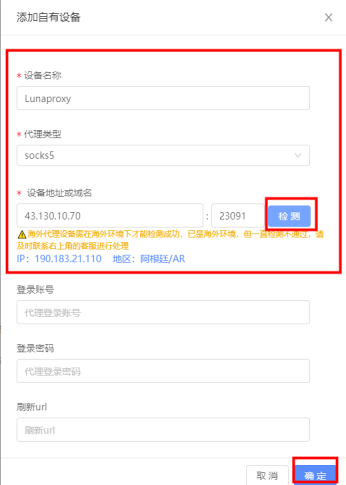
5. Finally, select the proxy you just set and click Finish. You will see the successfully configured browser in the environment management interface. Click to open it to use.

USER GUIDE > Fingerprint browser> Ximera
Ximera
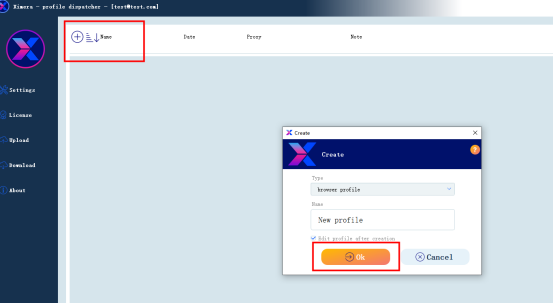
1. Open ximera, click "+", select browser configuration, and click OK
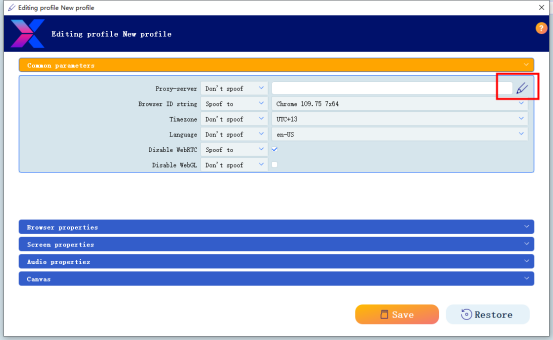
2. Click the pen icon on the right side of the proxy server
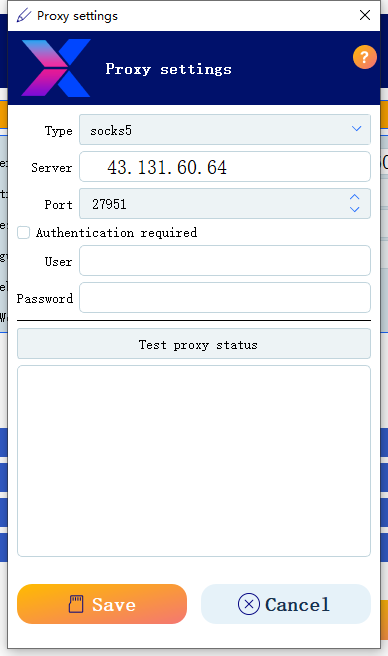
3. Select the proxy type, fill in the IP and port, if it is a static IP, fill in the account and password, then click Save, and finally click the browser icon to open it for use.
USER GUIDE > Fingerprint browser> Surfinite
Surfinite
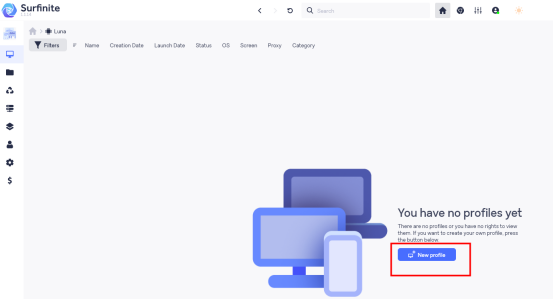
1. Open surfinite and click New Configuration
2. Fill in your user name on the left, then click Proxy on the right, select Manual, select the proxy protocol, and fill in the IP address and port.
Before using dynamic IP, you need to add your local IP to the IP allowed list. To use static IP, you need to fill in the account and password during configuration, and then click to detect the proxy. After the detection is successful, you can click to save.
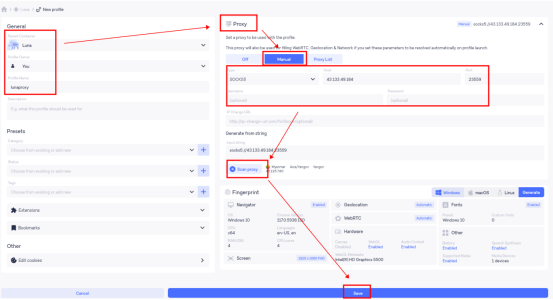
3. After the configuration is successful, click Start to use it.

USER GUIDE > Fingerprint browser> OctoBrowser
OctoBrowser
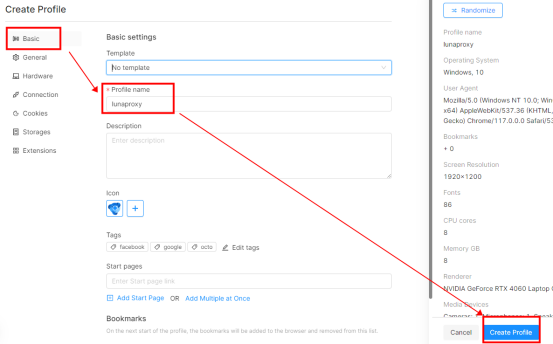
1. Open OctoBrowser and click Create Configuration

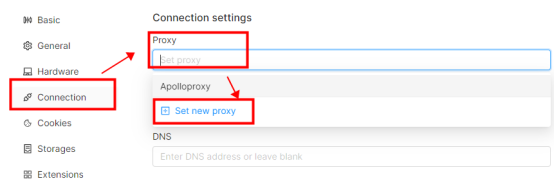
2. Click Connect and select Set a new proxy in the proxy drop-down box.
3. Select the proxy type in the pop-up window, fill in the IP and port. If you are using a static IP, you need to fill in the account and password, then click to detect the proxy. After the detection is successful, click OK.
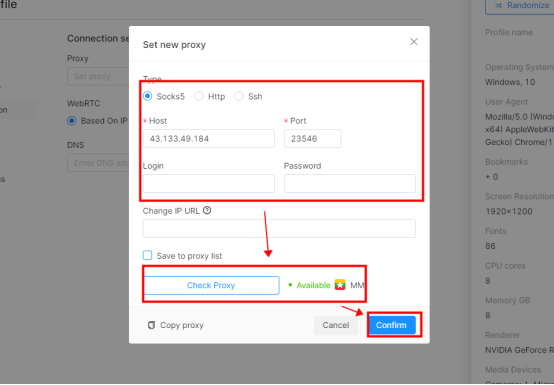
4. After configuring the agent, click Basic Information, fill in the configuration name, and then click Create Configuration. After the creation is successful, click Start to use it.

USER GUIDE > Fingerprint browser> Alayu
Alayu
1.Open Ala browser and click Environment Management- -new browser
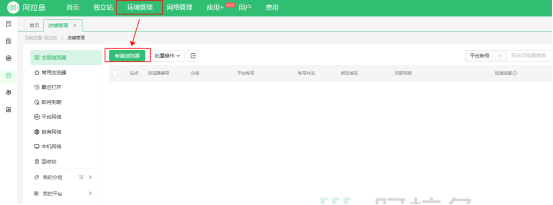
2. Click on your own network- -add a new network, select the proxy type, fill in the IP, port, account number and password, and then click OK
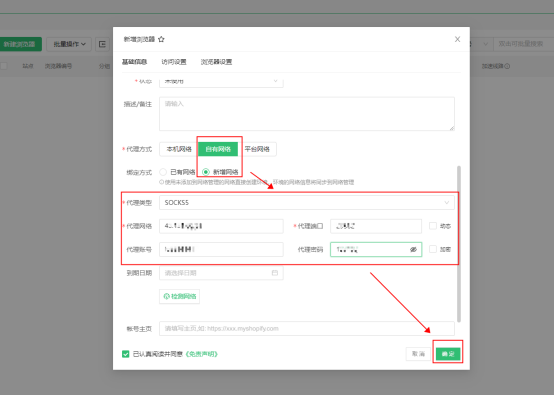
3.After the configuration is completed, click Start to use it

USER GUIDE > Fingerprint browser> Antik
Antik
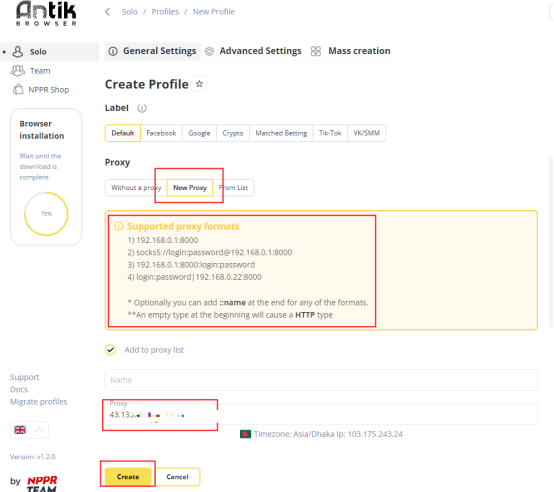
1.Open Antil, click on profile -Create

2.Click the new proxy and fill in the IP, port, proxy account and password in the proxy office according to the prompt information format
3.Finally, click Create to complete the configuration
USER GUIDE > Fingerprint browser> Undetectable
Undetectable
1.Open Undetectable, click New Configuration, enter name, select proxy type and enter IP and port number
2.Click Save, the configuration is complete, you can click in the left list
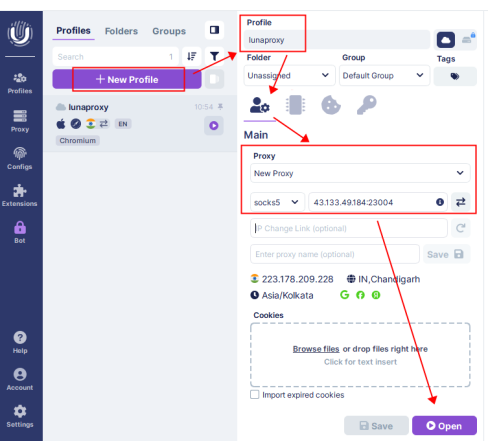
USER GUIDE > Fingerprint browser> Indigo
Indigo
1.Download indigo from the official website, install and run it.
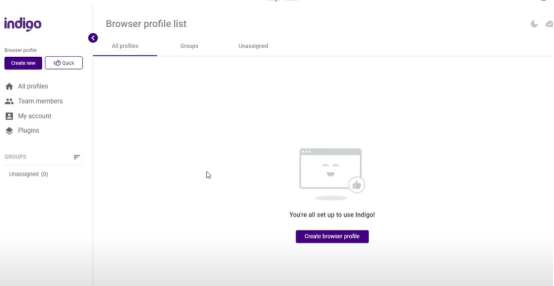
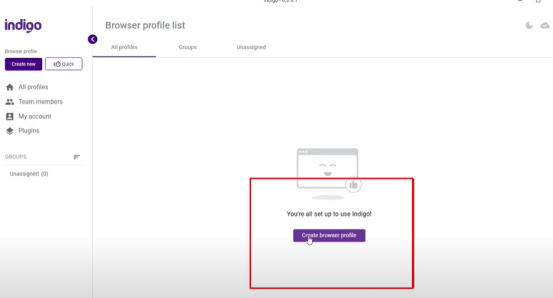
2. Click "Create browser profile" to create a new browser page
3. Enter the browser page name
4. Click "Edit proxy settings" to set the proxy
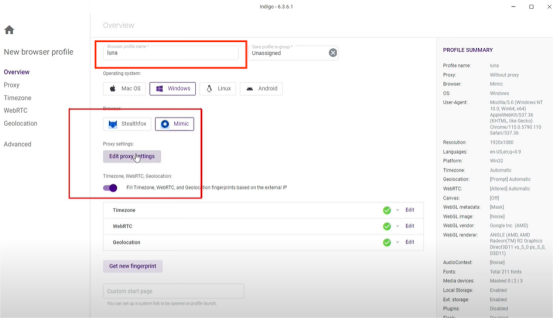
5. Select the proxy protocol, enter the IP host and port
6. Click "check proxy" to detect the proxy
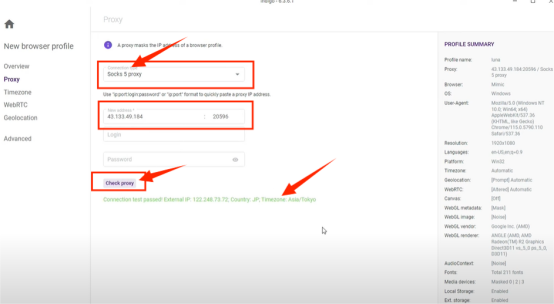
7. After clicking Save Settings, you can open and use it
USER GUIDE > Fingerprint browser> IXBrowser
IXBrowser
1.Download IXBrowser from the official website, install and run it.
2. Click "create profile" to create a page
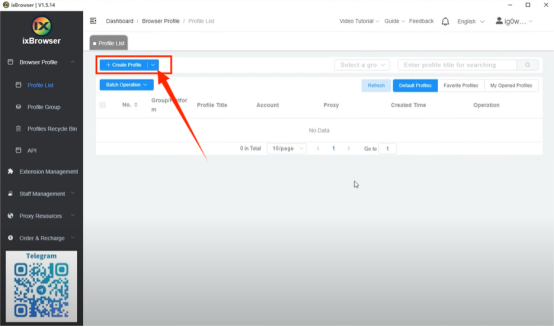
3. Fill in the basic information that needs to be entered to create a browser page
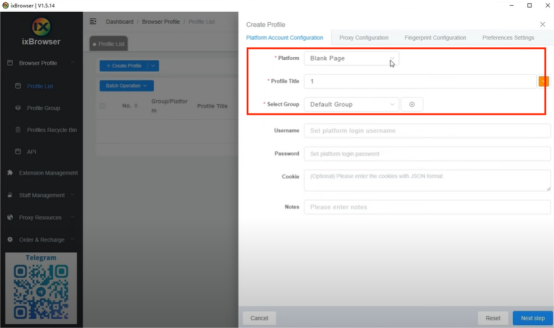
4. Select the "proxy configuration" page
5. Select the proxy category, here select socks5
6. Enter the IP host and port
7. Click Proxy Detection to detect proxy
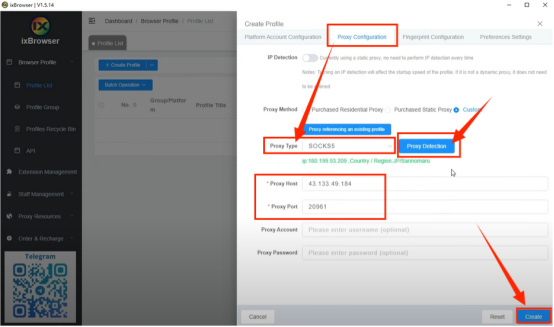
8. After saving the settings, you can open it and use it
USER GUIDE > Fingerprint browser> Genlogin
Genlogin
1.Download Genlogin from the official website, install and run it.
2. Click "create profile" to create a new browser page
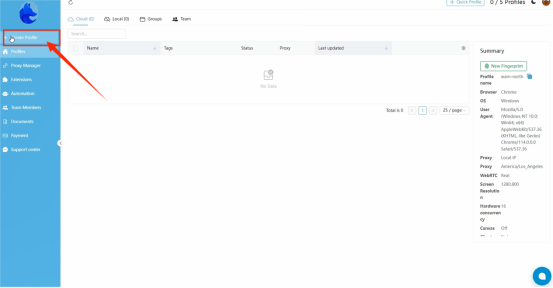
3. Select the proxy protocol, here I choose socks5
4. Fill in the corresponding location with the extracted IP host and port
5. Click "check proxy" to detect the proxy
6. Click "create" to complete the creation
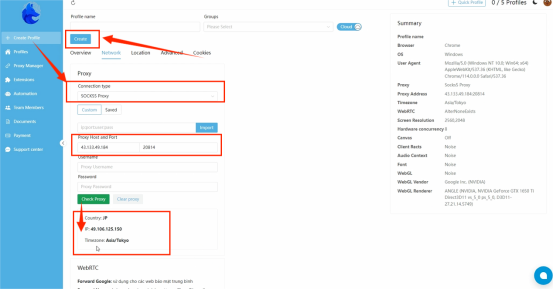
7. After saving the settings, you can open and use it.
USER GUIDE > Fingerprint browser> Hidemyacc
Hidemyacc
1.Download Hidemyacc from the official website, install and run it.
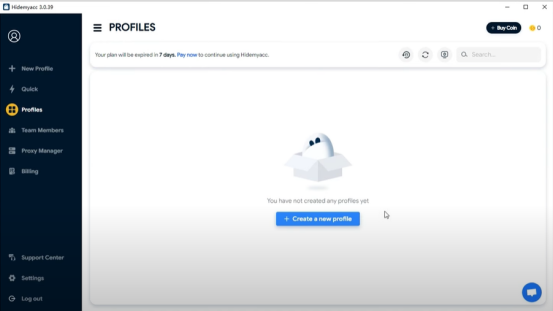
2. Click "Create a new profile" to create a new browser page
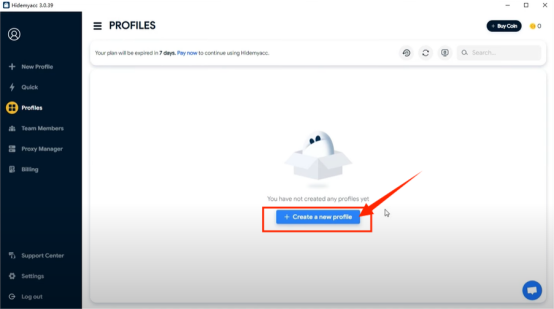
3. Select proxy page
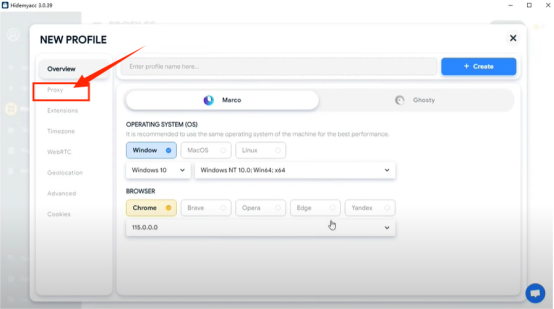
4. Select "Your Proxy"
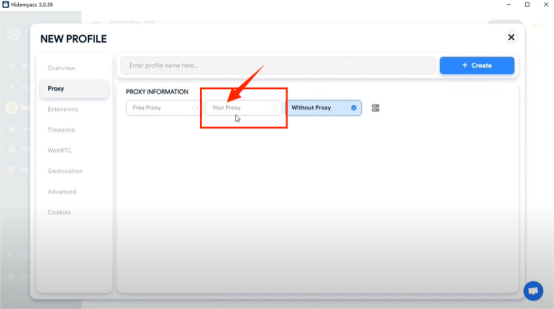
5. Choose proxy agreement
6. Enter the IP host and port
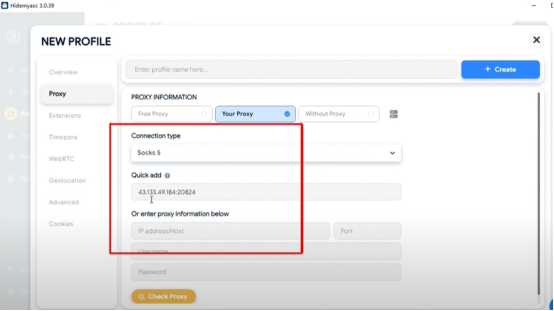
7. Click "Check Proxy" to detect the proxy
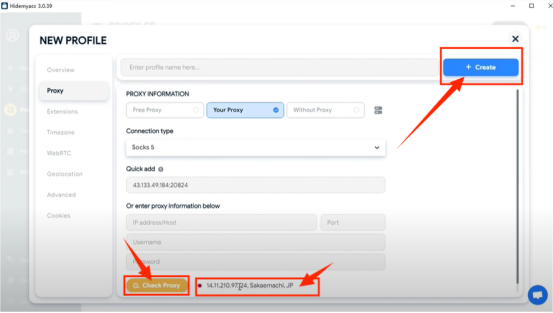
8. After saving the settings, you can open it and use it
USER GUIDE > Fingerprint browser> Nestbrowser
Nestbrowser
1. Download Nestbrowser from the official website, install and run it.
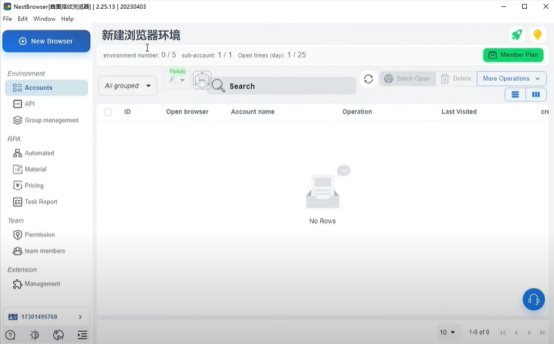
2. Click "New Browser" to create a new browser page
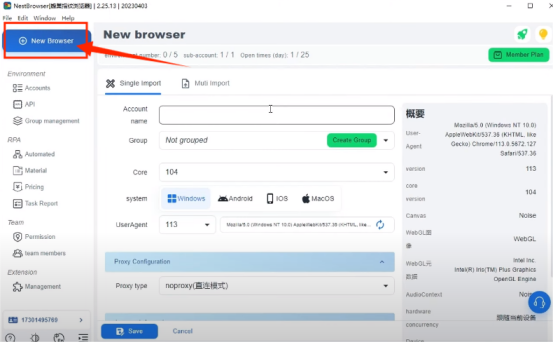
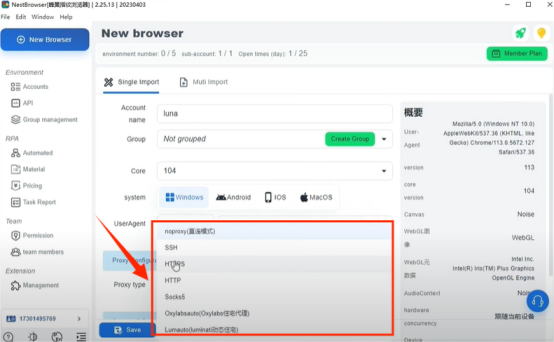
3. Choose proxy agreement
4. Enter the proxy IP host and port
5. Click the detection proxy to detect
6. Click "save" to complete the configuration
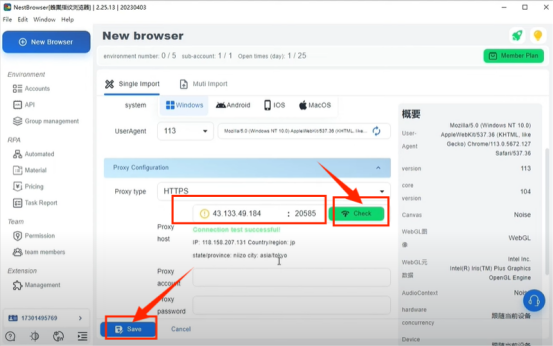
7. After saving the settings, you can open it and use it
USER GUIDE > Fingerprint browser> Hidemium
Hidemium
Hidemium: https://hidemium.io/
1.Download Hidemium from the official website, install and run it.
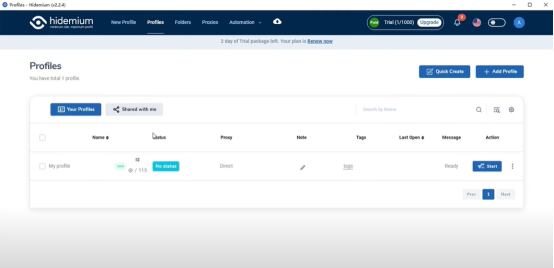
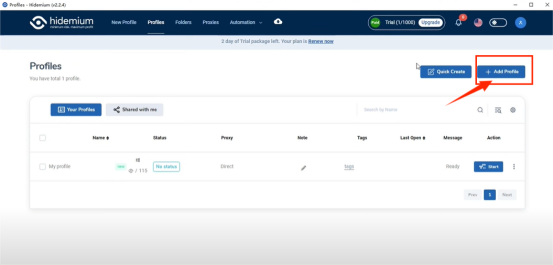
2. Click "Add Profile" to create a new browser page
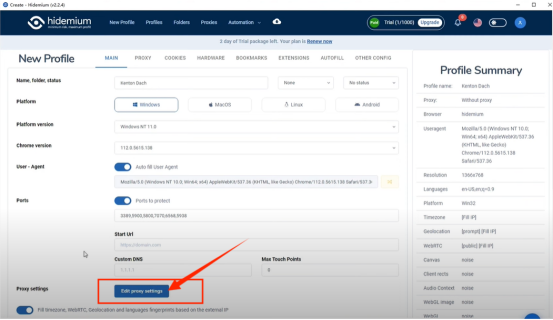
3. Click "Edit Proxy Settings" to edit the proxy settings
4. Choose proxy agreement
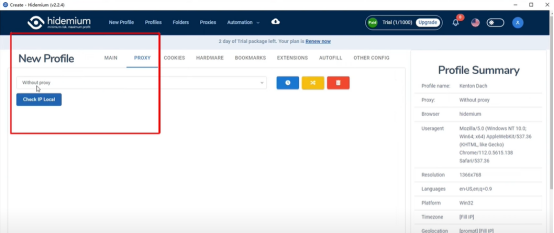
5. Enter the proxy IP host and port
6. Click the detection proxy to detect
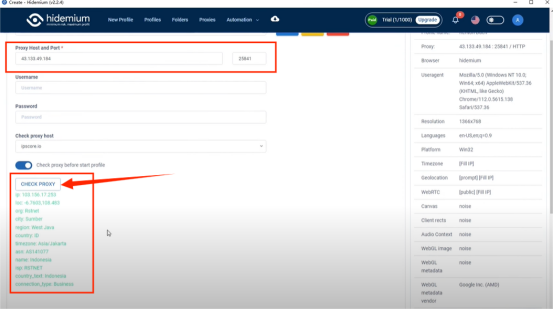
7. After clicking Save Settings, you can open and use it
USER GUIDE > Fingerprint browser> YunLogin
YunLogin
1. Open Yundeng browser, click on own proxy - add proxy
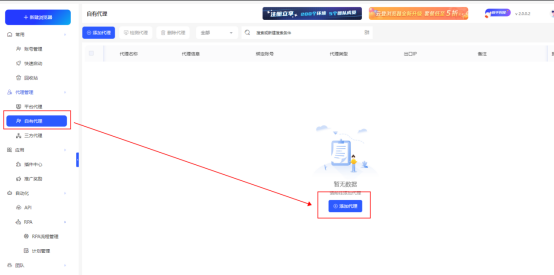
2. Fill in the proxy name, IP and port, proxy account and password, and click Test
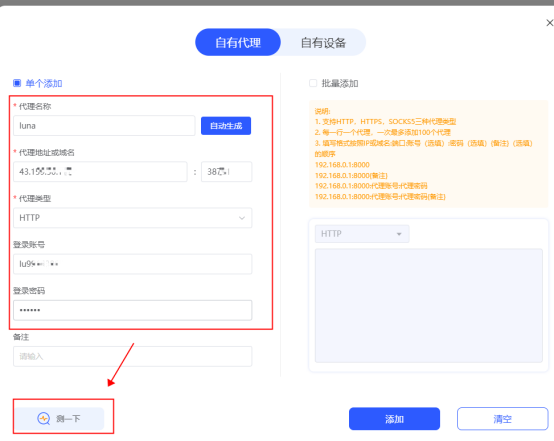
3. If the detection is successful, click Add
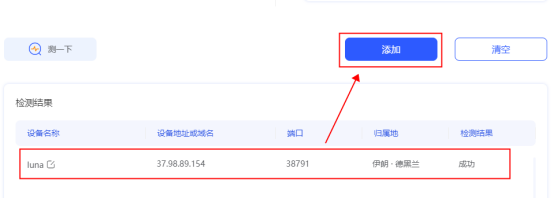
4. Click Account Management and create a new browser
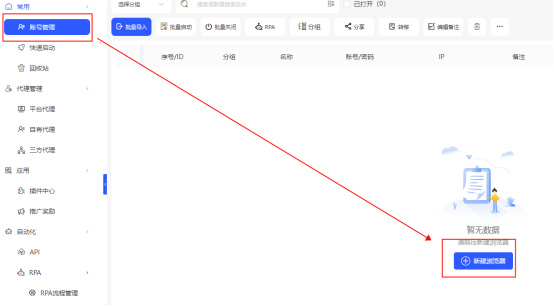
5. Select your own proxy as the proxy type, then check the proxy you just added and click OK.
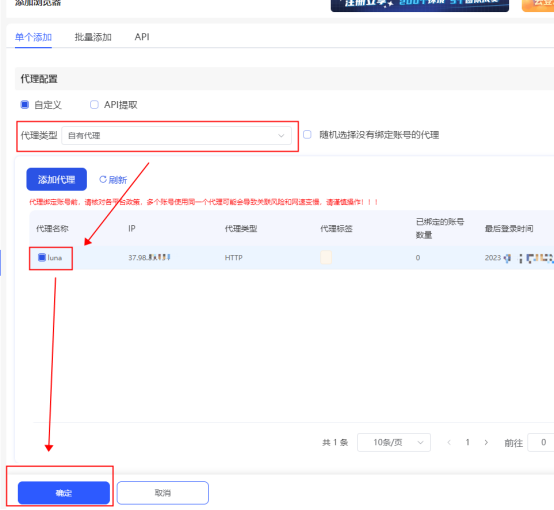
6. If the addition is successful, you can see the browser in which you configured the proxy in the account management interface. Click Start to use it.

USER GUIDE > Fingerprint browser> Lalimao
Lalimao
Lunaproxy:www.lunaproxy.com/?utm-source=lalimao&utm-keyword=?01
lalimao:https://www.lalimao.com/
1. Download Lalimao from their official website, install, and run it.
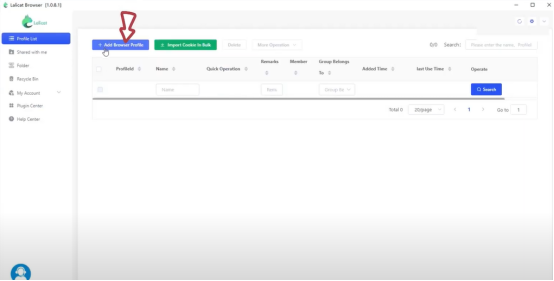
2. After opening the tool, click Add browser.
3. Fill in the name (can be customized according to your needs) here I write is Lunaproxy.
4. Select proxy agreement, Lunaproxy supports SOCKS5 and HTTP (S) (I choose SOCKS5)
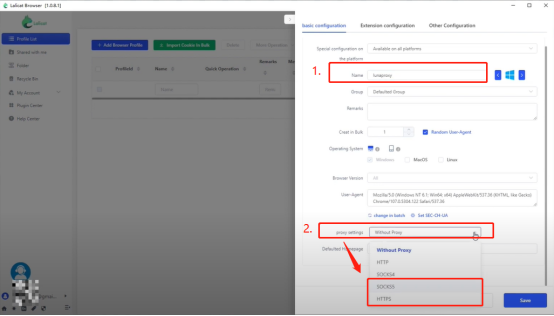
5. Enter the proxy host, port, account number, and password extracted through the Lunaproxy
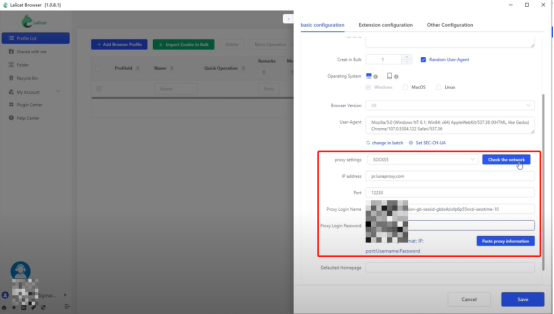
6. Click Check the proxy when the enter is completed
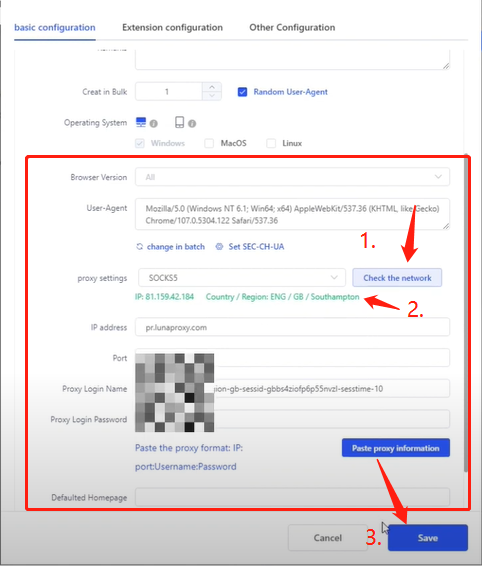
7. If the green IP appears, the test is successful, you can click save to start to use!
USER GUIDE > Fingerprint browser> XLogin
XLogin
YouTube video tutorial:https://www.youtube.com/watch?v=z3N9Bhq9Y48
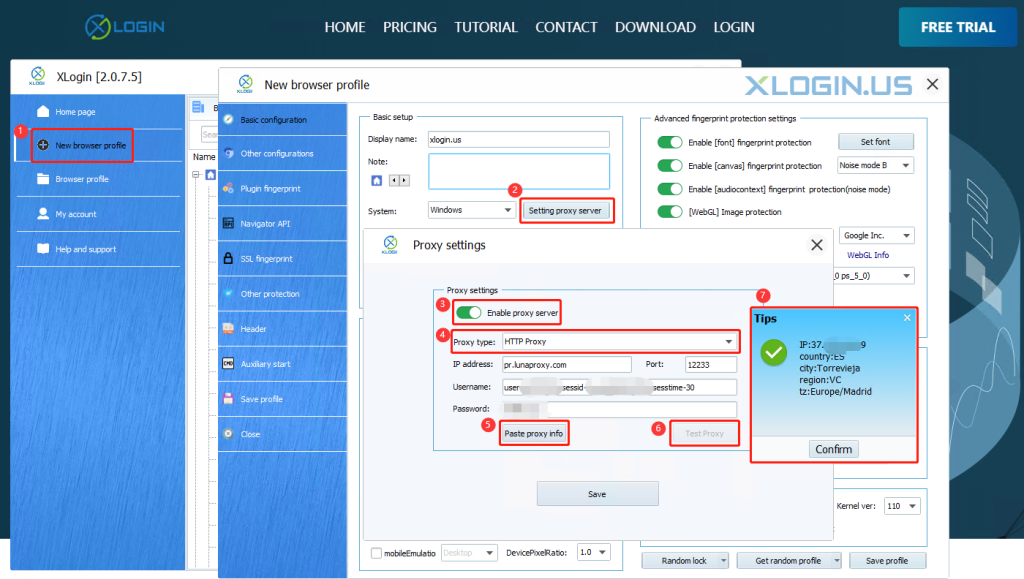
Open XLogin client -> New browser profile -> Setting proxy server -> Enable proxy server -> Select proxy type -> Paste proxy info -> Test Proxy -> Confirm.
Once the proxy test is successful, you are ready to start using it.
USER GUIDE > Fingerprint browser> MoreLogin
MoreLogin
YouTube video tutorial:https://www.youtube.com/watch?v=yRiWJDCd0lg
1.Open the MoreLogin application and press the "New Profile" button to enter the profile settings page.
2.Select the proxy type
3.Fill in the proxy information, and then click "Detection", after the detection is successful, click "OK"
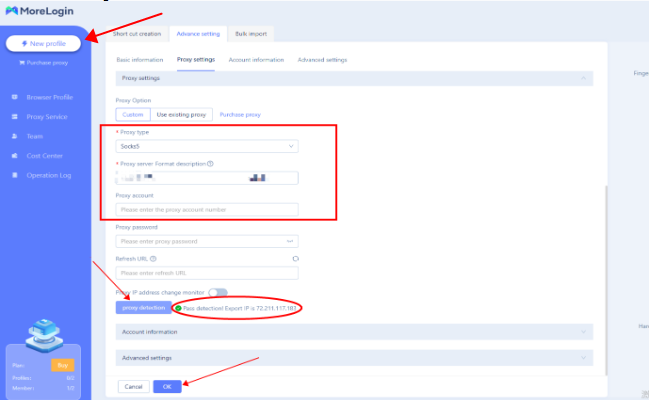
4.Click the "Start" button to launch the profile and check how it works
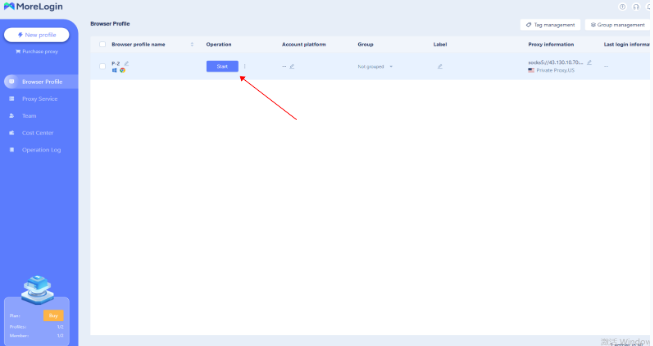
Now you can get to work!
USER GUIDE > Fingerprint browser> linken sphere
linken sphere
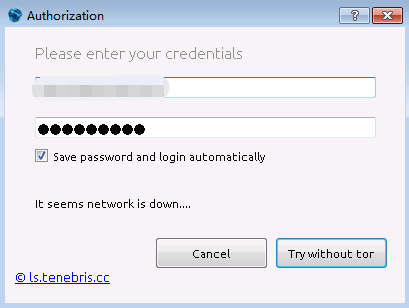
1. Then open the Lincoln ball and enter any account password:
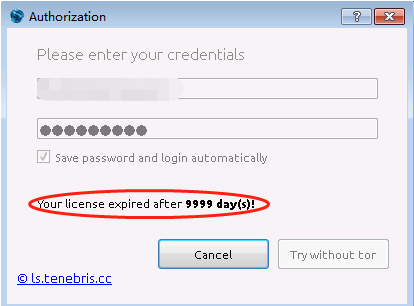
2. After a successful landing, the remaining days are displayed as: 9999
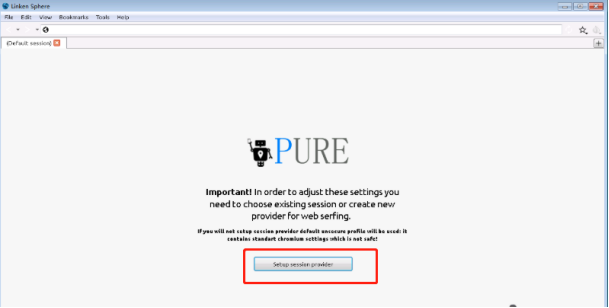
3. The main interface of the Lincoln method ball is as follows. Click Setup session provider to enter the Settings.
4. Check the Enable fake webRTC leak, the other options can be customized according to your needs, the resolution, the country code, and the language are set according to the specific requirements, and the session name.
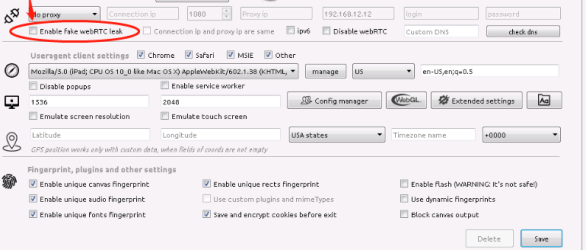
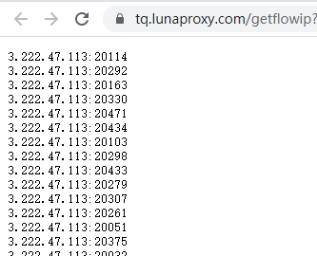
5. Remember to use the luna proxy tool to connect to an IP that requires a proxy, like what I connect here is to a US proxy IP. Add an endpoint in the address section (the IP address you just extracted) for example: 3.222.47.113 Add a port in the port section (the IP port you just extracted) for example: 20114
6. After opening, you can go to the fingerprint detection website to see whether the camouflage is successful, and the default will automatically access the https://whoer.net/zh
USER GUIDE > Fingerprint browser> Clonbrowser
Clonbrowser
LunaProxy:https://www.lunaproxy.com/?utm-source=Clonbrowser&utm-keyword=?01
Clonbrowser:https://www.clonbrowser.com/?p=lunaproxy
1. Go to the browser website → https://www.clonbrowser.com/?qd=lunaproxy
2. After registration is completed Hover over the download button and click on your operating system.
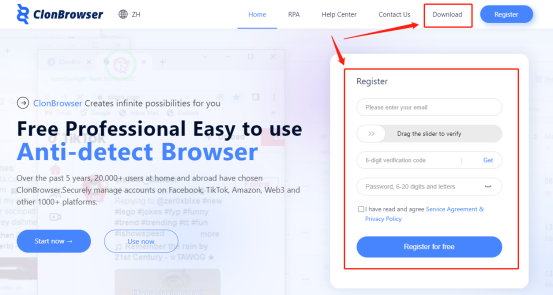
3. Open the setup file and follow the steps. The installation process is no different from any other software.
4. Click on the Add button in the upper navigation bar
5. Click on the proxy option in the left navigation bar
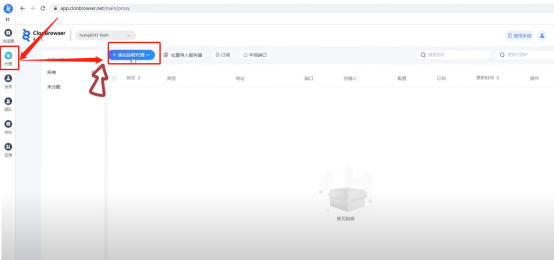
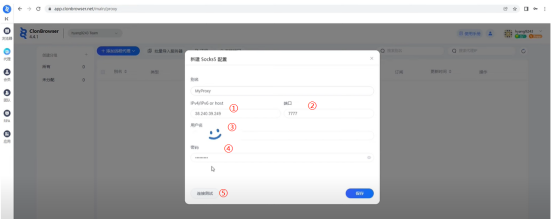
6. Select the ocks protocol proxy mode and the following screen appears
(1) proxy ip or address:pr.lunaproxy.com
(2) Proxy port number:12233
(3) The user name that you displayed in the API extraction
(4) Your account password
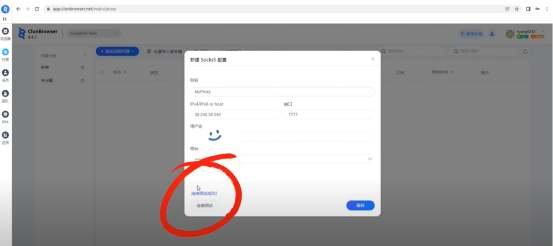
(5) Connect the test button to check that your proxy is configured
Test that the connection is successful, please start using your proxy!
USER GUIDE > Fingerprint browser> Purple Bird Browser
Purple Bird Browser
1.Open the Purple Bird browser
5. Click "Add account" and fill in the account password corresponding to Lunaproxy.

USER GUIDE > Fingerprint browser> adsvirgin browser
adsvirgin browser
1.open the adsvirgin browser
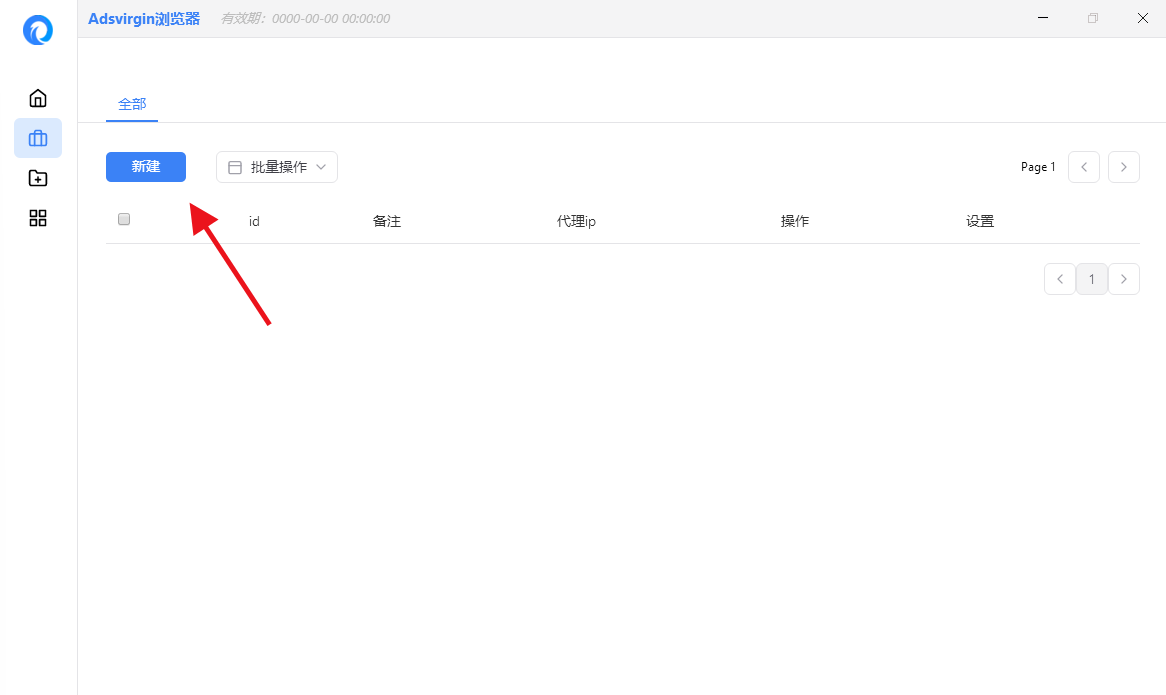
2. Click New
3.Select the device and system selection in the device settings, take windows computer as an example.
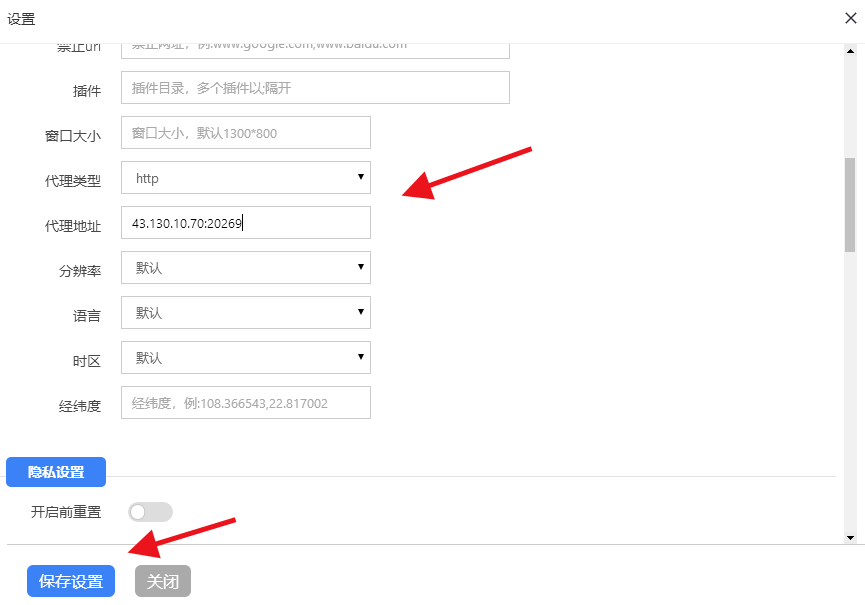
4.Proxy type: http
5.Fill in the proxy address just copied
6.Click "Save Settings" to complete the settings.
USER GUIDE > Fingerprint browser> Lalicat
Lalicat
1.First, navigate to the official Lalicat home page
2.Download Settings.
3.Run the installation setup and follow the instructions.
4.Configuring Proxy
5.When the setup are complete, start the application, create a new account and then log in.
6.On the home screen, press Browser list, and then click + Add Browser to configure a new browser instance.
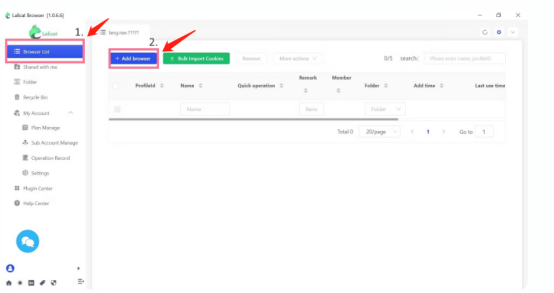
Fill in the profile name and select the analog OS and other settings considered necessary for the upcoming task.
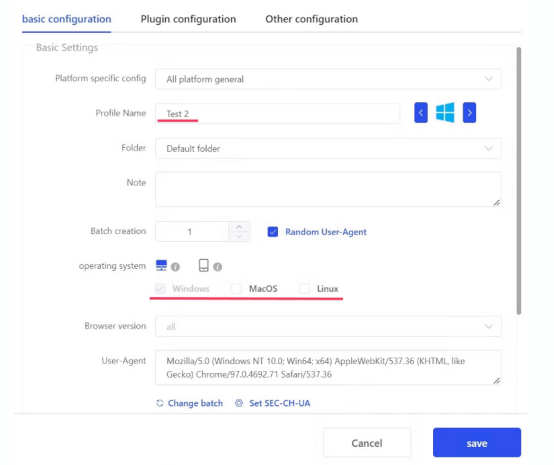
Choose HTTP or SOCKS5 and fill in the following information based on your proxies
Proxy type: HTTP
IP address: pr.lunaproxy.com
Port: 12233
7.Enter the user name and password for your lunaproxy subuser. You can create and manage your proxy sub-users using our all-in-one dashboard.
8.By clicking on the advanced settings below, you can customize the wider range of options to fully personalize your browser fingerprint for this particular instance.
9.Check the proxy by pressing to ensure that your agent is running correctly and that the dedicated location is as expected.
10.Finally, click Save to complete the configuration and run the browser
USER GUIDE > Fingerprint browser> Sphere
Sphere
How do you set up a proxy with the Sphere?
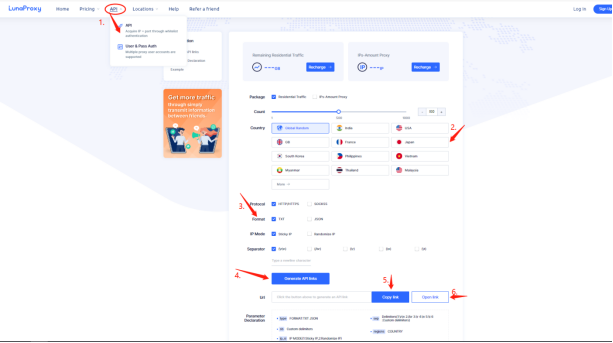
1.Select the way the lunaproxy API is extracted
2.Select any country or a designated country, and here I choose "America"
3.You can select the protocol format IP mode splitter default options as required
4.Check the build API link
5.Click to copy the link
6.You can also open the link to open the link to view the extracted IP details
7.Open your Lunaproxy Personal Control Center

8.Open the IP allowlist to add your current IP in.

9.Navigate to the official website and download the Sphere browser.
10.Uncompress the downloaded files to the preferred location.
11.Click on Sphere.exe and run the program
12.Log up your account using password only.
13.Now, let's configure a new identity. When entering the home screen, click New Identity.
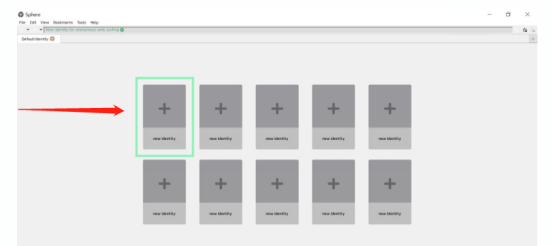
14.In the Session Settings window, fill in the identity name and select your connection type, such as the Tor, HTTP, SOCKS5, or SSH tunnel.
15.In this case, select the HTTP or SOCKS5 connection based on your proxy purchase and enter the following:
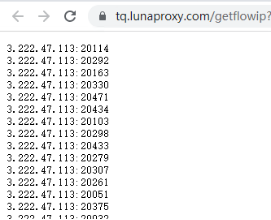
Add an endpoint to the address section (the IP address that you just extracted), for example: 3.222.47.113
Add ports in the port section (the IP port you just extracted) for example: 20487
16.Enter your lunaproxy username and password.
17.Details the time zone and language settings and click Save.
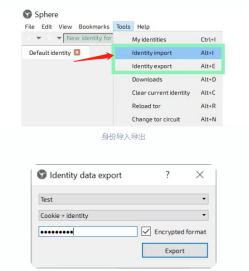
18.The new identity is now being set up. Remember that you can import and export your identity by clicking on Identity Import / Identity Export under the tool
.
It's just how it is. You can handle multiple tasks at a time without having to worry about being disturbed or blocked
USER GUIDE > Fingerprint browser> MuLogin
MuLogin
LunaProxy:http://www.lunaproxy.com/
MuLogin:https://www.mulogin.com/?ref=luna
1. Download MuLogin from their official website, install, and run it.
2. After opening the tool, click Add browser.
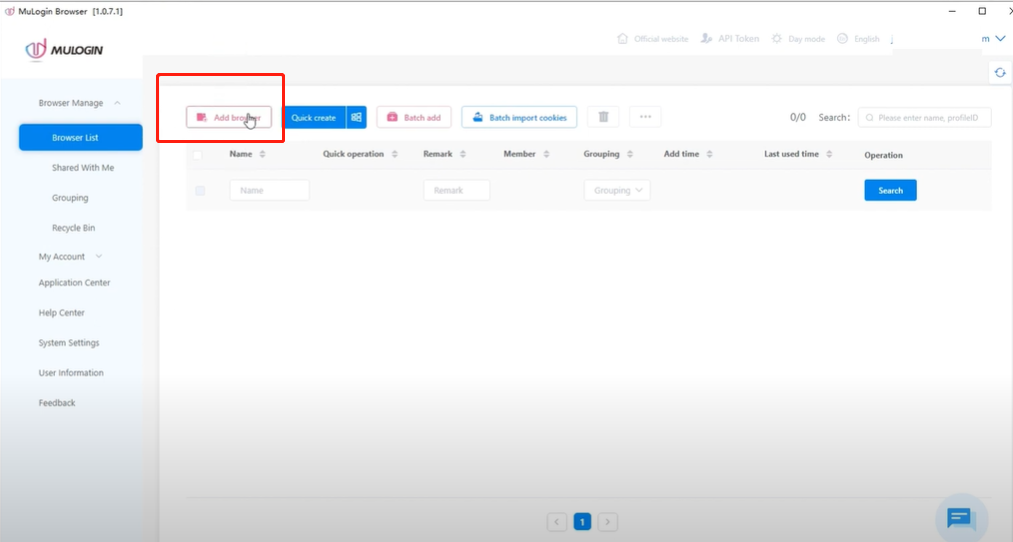
8. You’ll be placed in the Basic configuration section. Scroll down and click on Proxy settings.
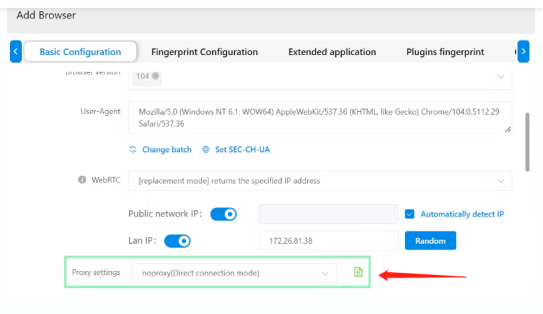
9. Choose HTTP or SOCKS5 and fill in the following information based on your proxies.
Proxy type: HTTP
IP address: pr.lunaproxy.com
Port: 12233
Login user: customer-custom information
Login password:The lunaproxy user password
10. After entering your information, you can check the network to see if the process works. Detailed IP and country information should be displayed.
11. Lastly, after filling out your proxy information, choose a Display name, scroll down and click save.
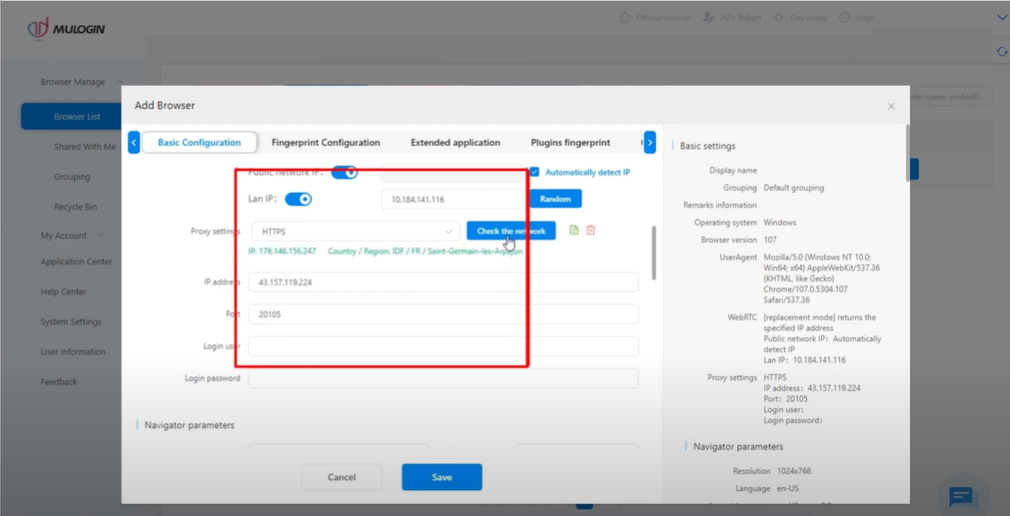
And that's it! Your setup is done.
USER GUIDE > Fingerprint browser> GoLogin
GoLogin
1. Select the way the lunaproxy AIP is extracted
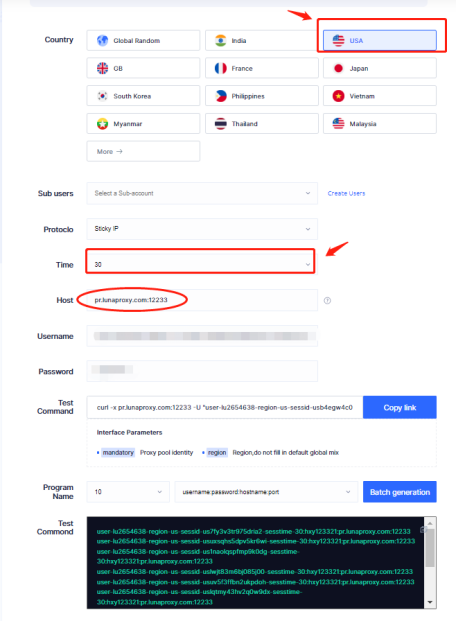
2. Select any country or a designated country, and here I choose "America"
3. Time can choose: 1min, 5min, 30min ", here I choose 30min
4. You can select the protocol format IP mode splitter default options as required
5. Open the GoLogin application.
6. Click Create your first profile.

7. In the following window, enter the desired proxy information. Under Profile Name, fill in the lunaproxy.
8. In the following window, enter the desired proxy information. Under Profile Name, fill in the lunaproxy.
9. Under the proxy host and port, enter pr.lunaproxy.com and 12233.
10. Then, enter your account and password under the user name and password.
11. Finally, click Create Profile.
12. All is in order! Now, click Run and wait for the browser to load.
USER GUIDE > Fingerprint browser> Kameleo
Kameleo
1. Download and install the Kameleo app from its official website.
2. Open the app.
3. Click the button Application Settings.
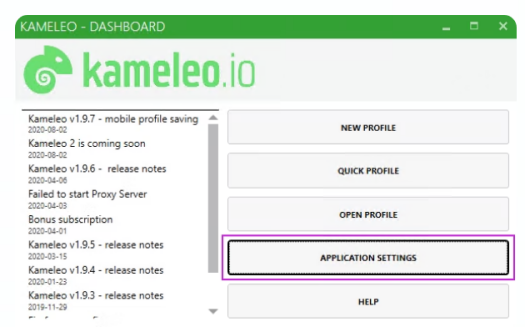
4. In the following window, enter the required proxy information under Global proxy settings. For Upstream Proxy Type, choose Http. If you want to use Residential Proxies, fill in Proxy IP hostname Under Proxy Port enter 12233.
5. Finally, enter your login credentials under Username and Password.
6. Close the window to save settings.
7. That’s it. You’re ready to go! Either create a New Profile or click Quick Profile to launch the browser,
8. The browser is now proxy-enabled.
USER GUIDE > Fingerprint browser> Easycop
Easycop
1. Select the way the lunaproxy API is extracted
2. Select any country or a designated country, and here I choose "America"
3. You can select the protocol format IP mode splitter default options as required
4. Check the build API link
5. Click to copy the link
6. You can also open the link to open the link to view the extracted IP details
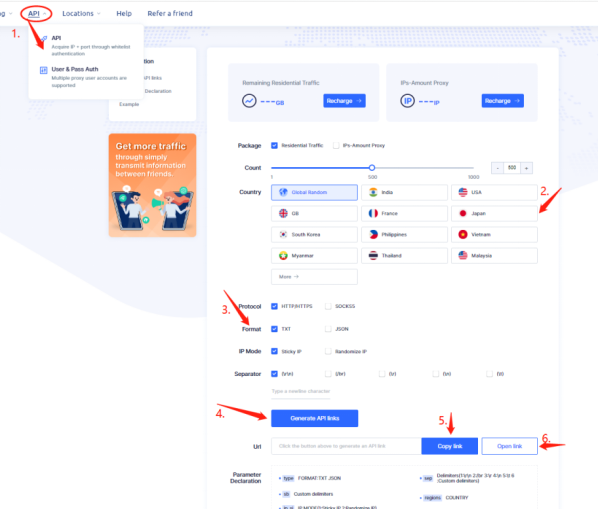
Configure the proxy on the Easycop
7. Click Tools, and then select the proxy list.
8. Paste the generated list of proxy endpoints, and then click Save.
9. Click Import, and verify that the agent is enabled.
10. Click Save.
USER GUIDE > Fingerprint browser> Ghost
Ghost
1.Select the way the lunaproxy API is extracted
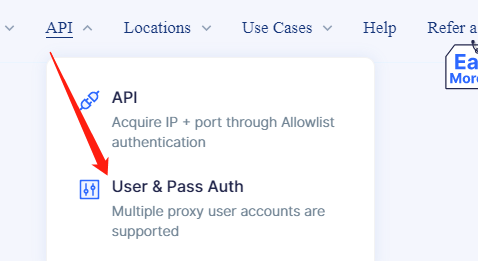
2.Select any country or a designated country, and here I choose "America"
3.Time can choose: 1min, 5min, 30min ", here I choose 30min
4.You can select the protocol format IP mode splitter default options as required
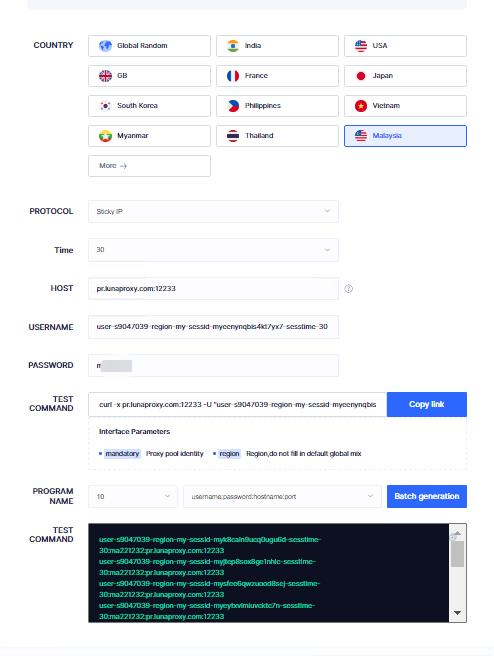
How to set up a proxy on the Ghost browser
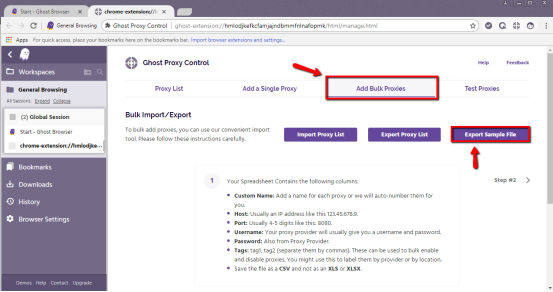
5.Open Ghost Browser and click Ghost Proxy Control > Add/Edit Proxies。
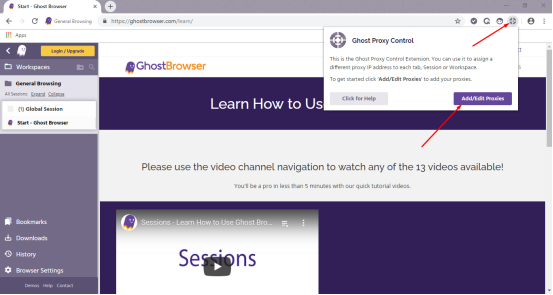
6. In the new tab, select Add Bulk Proxies.
7.First you need to generate a CSV file-select the export sample file to download the template.
8. Follow the following example to complete the proxy list
9. Use using proxy subuser authentication username and password.
10.Use the allowlisted IP.
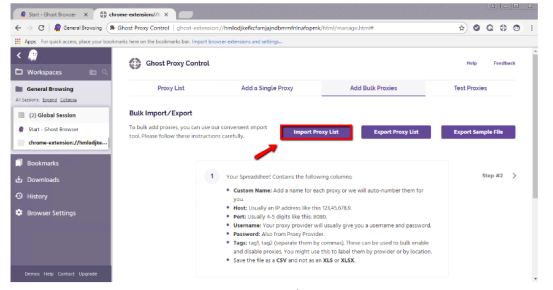
11. Once you prepare the CSV file, import it into the Ghost browser
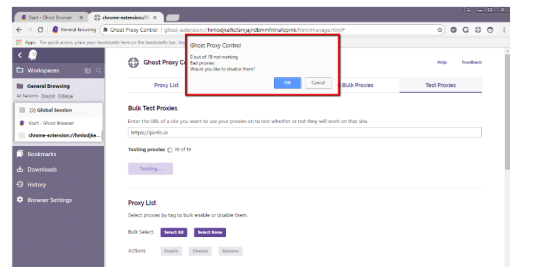
12. You can test your proxy in the Test proxy section. Add the target URL and click Test.
13. The result appears in the popup window. If this is the case, all proxy have been successfully set up and can be used.
USER GUIDE > Fingerprint browser> Bitbrowser
Bitbrowser
LunaProxy:https://www.lunaproxy.com/register/
Bitbrowser:https://www.bitbrowser.cn/
Step 1 - Proxy preparation
Before starting the integration, we need to choose a plan in lunaproxy.com and prepare a proxy.
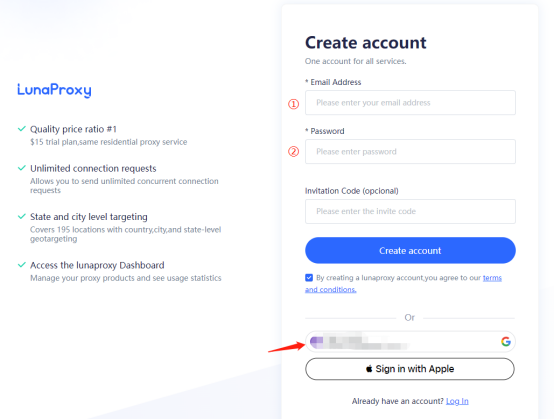
1. Register an account (if you haven't already)/1. Enter a mailbox 2.Enter your password. (you can also choose Google)
2. Go to dashboard.
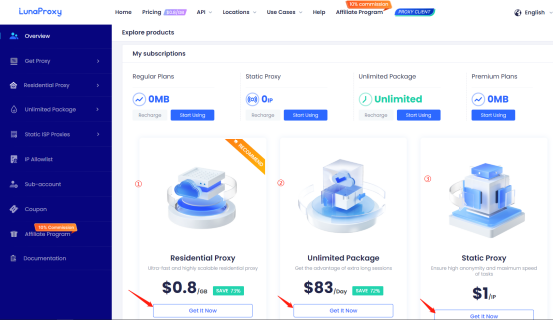
3. If you are visiting the dashboard for the first time, you will be prompted to select a plan based on your needs.
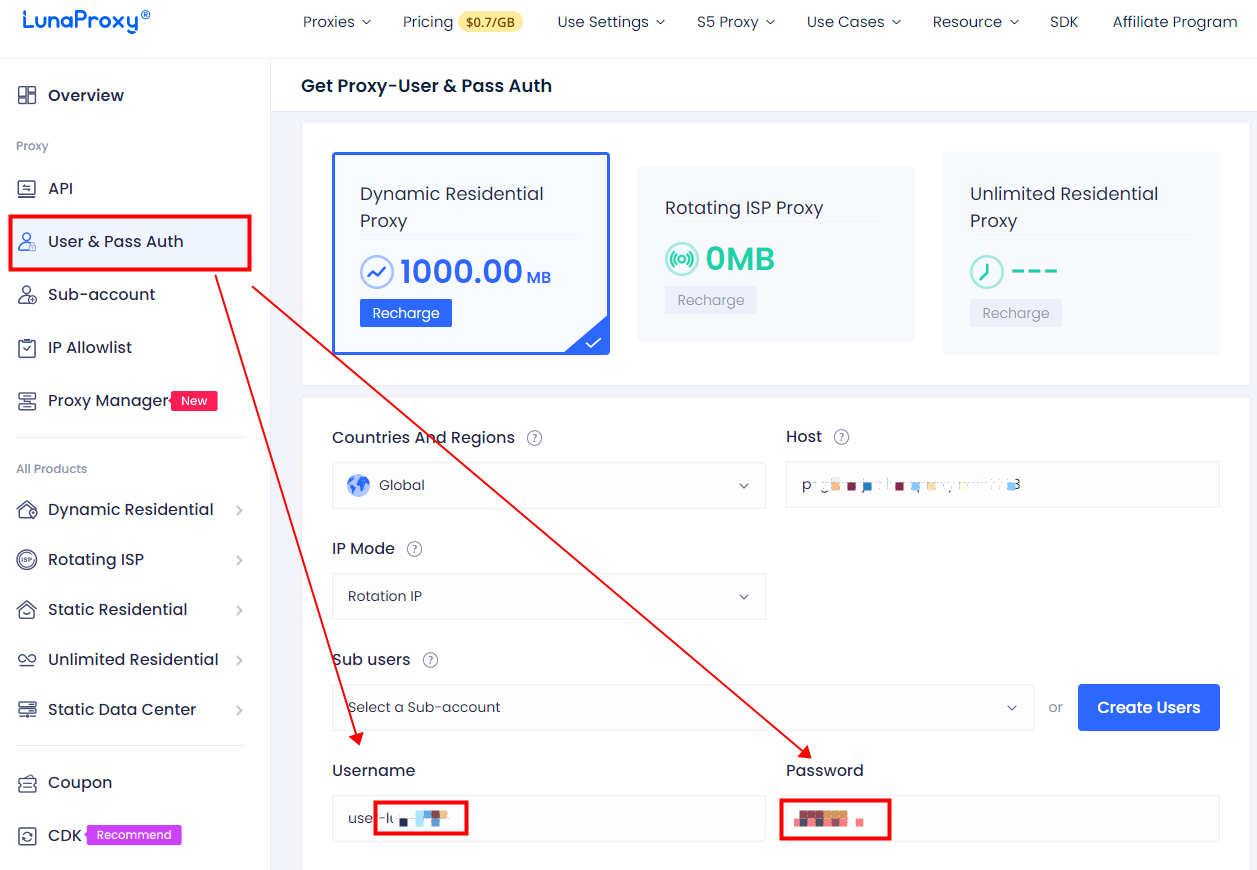
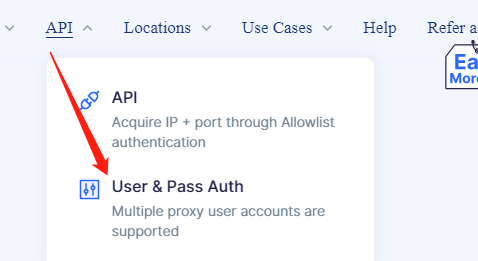
4. After you have chosen a plan, go to the get proxy menu → User & Pass Auth, to select the desired proxies.
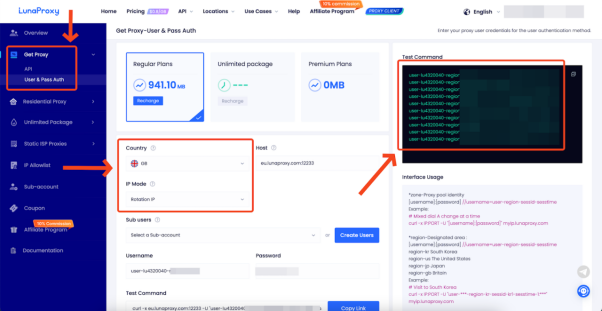
5. Choose the country you want, Proxy type, here I choose is the UK and rotation IP
6. Copy the generated host, port, login and password of the proxy.
7. To get the URL link for proxy management, go to the API tab.
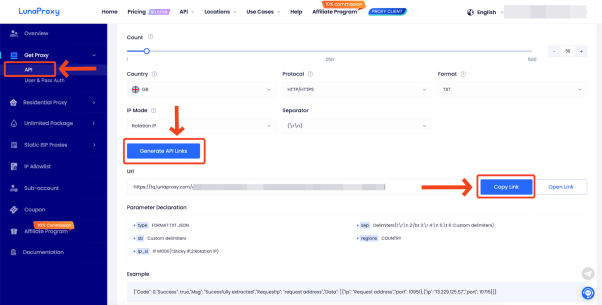
8. The proxies are ready to be configured.
Step 2- Bitbrowser Integration with LunaProxy
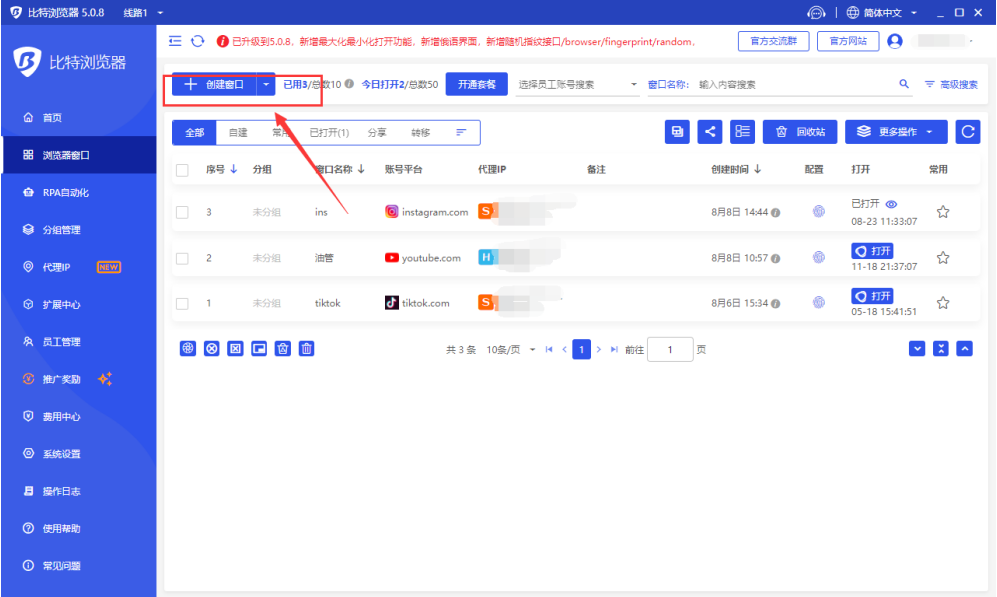
9. Next we open bitbrowser and click Create Window.
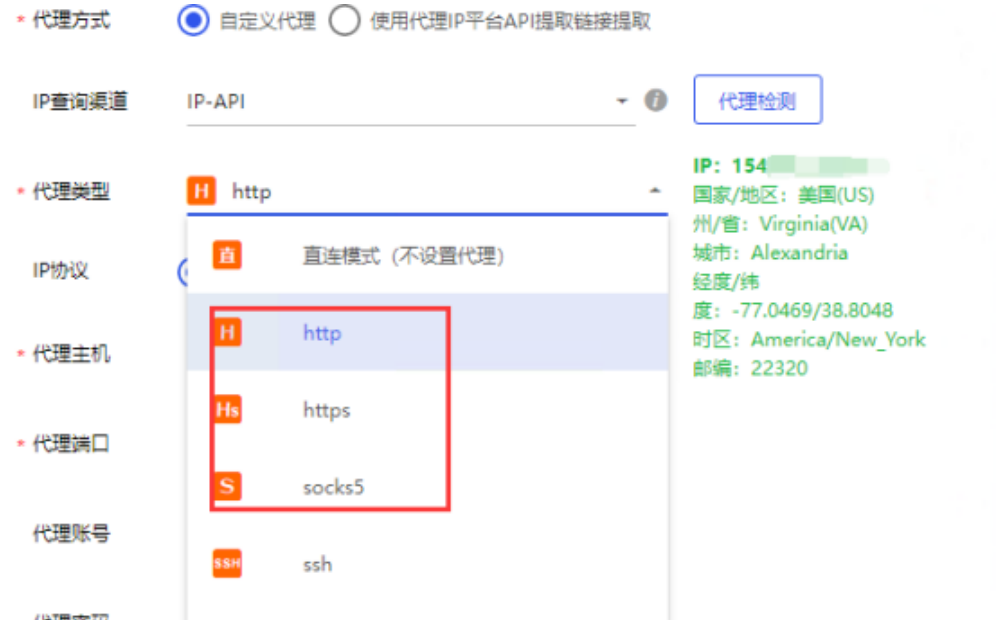
10. Proxy mode selection: socks5, http, https, here I choose socks5.IP protocol selection: ipv4.
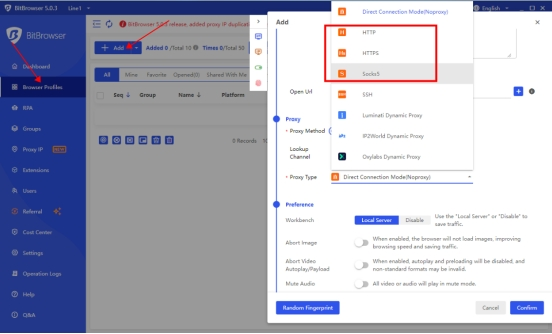
11. Fill in the corresponding information of the proxy: ip: port, account number and password.
12. After completing the configuration
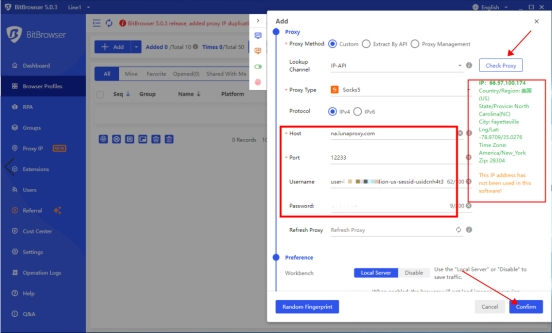
Click "Check Proxy" to check whether the proxy can connect successfully.click "Confirm".
USER GUIDE > Fingerprint browser> MASKFOG
MASKFOG
Step-by-step guide for Luna Proxy integration with MASKFOG:
YouTube Tutorial:https://www.youtube.com/watch?v=d08Yr25RRwI&t=9s
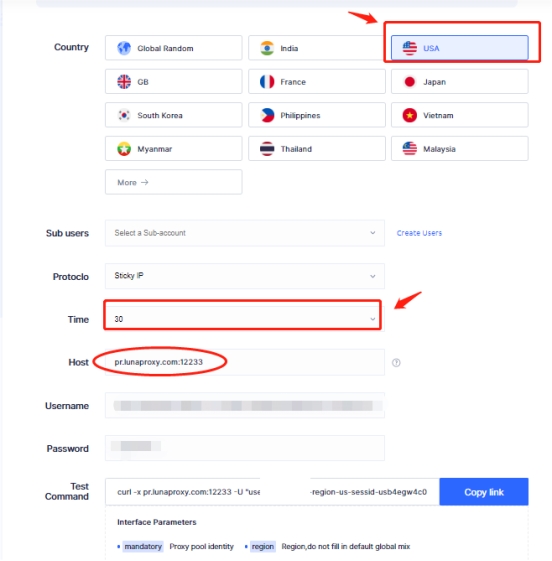
(1) Select any country or specify a country, here I choose "United States"
(2) The time can be selected: 1min, 5min, 30min", here I choose 30min
(3) Host, USERNAME, PASSWORD are all fixed.
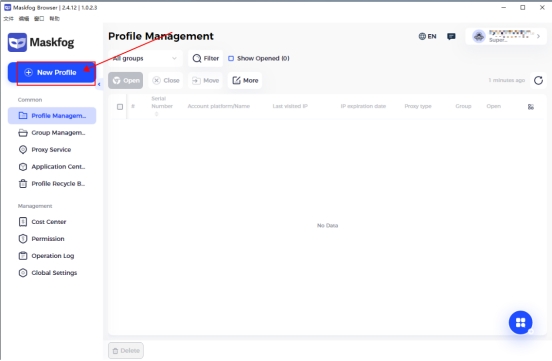
(4) Next we open MASKFOG
(5) Click New Project
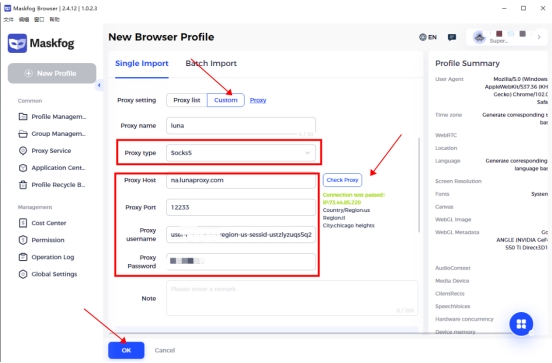
(6) Click "custom" - "Add proxy".
(7) Write a proxy name arbitrarily, and select the proxy type "socks5" or "http(s)"
(8) Fill in the lunaproxy proxy host: pr.lunaproxy.com; proxy port: 12233,Fill in the proxy account and password.
(9) Finally check the proxy, we can see that it is the IP after the proxy is successful
USER GUIDE > Fingerprint browser> Dolphin{anty}
Dolphin{anty}
Hello! Here we will tell you how to integrate and easily manage LunaProxy proxies in anti-detect browser Dolphin{anty}.
Step 1 - Proxy preparation
Before starting the integration, we need to choose a plan in lunaproxy.com and prepare a proxy.
1. Register an account (if you haven't already)
2. Go to dashboard.
3. If you are visiting the dashboard for the first time, you will be prompted to select a plan based on your needs.
4. After you have chosen a plan, go to the get proxy menu → User & Pass Auth, to select the desired proxies.
5. We have chosen GB rotation proxies.
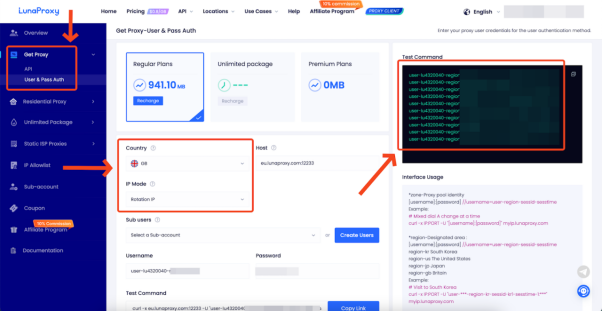
6. Copy the generated host, port, login and password of the proxy.
7. To get the URL link for proxy management, go to the API tab.
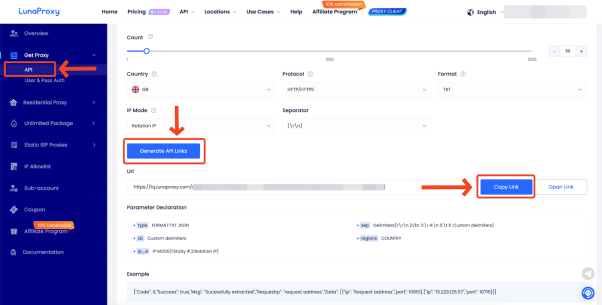
8. The proxies are ready to be configured.
Step 2 - Download and Install
1. Go to the browser website → anty.dolphin.ru.com.
2. Hover over the download button and click on your operating system.
3. Register an account by clicking the Sign up button. Enter the promo code → LUNAPROXY and get a 20% discount on your first subscription payment.

4. Open the setup file and follow the steps. The installation process is no different from any other software.
Step 2 - Creating a browser profile with a proxy
1. Open the Dolphin{anty} browser client.
2. Click the Create Profile button.
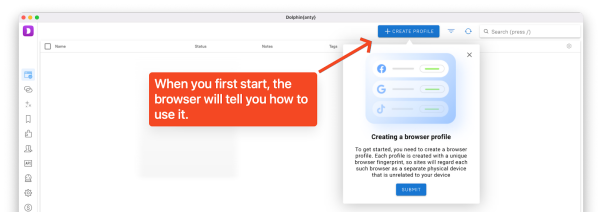
3. In the window that appears, configure the desired browser profile settings: name, OS, purpose of use, and status and tag as desired.
4. Go to your proxyluna personal account and copy the required proxies.
5. In the Dolphin{anty} profile creation window, select New proxy → connection type (http, socks) → insert proxy data in the hostname:port:username:password format.
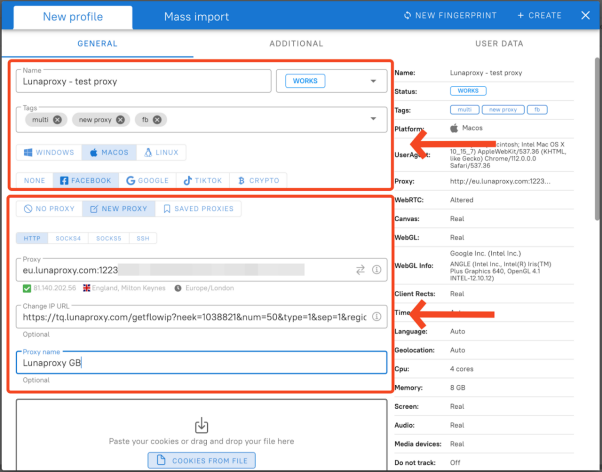
6. If you are using a rotary proxy, you can paste the URL link to manually change the IP on click.
7. Give the proxy a name so you can quickly find it in the future.
8. Proxies are set up. Click the create button in the upper right corner to complete the profile creation.
9. The profile is ready to go.

Step 3 — Managing and Bulk Importing Proxies
We figured out how to set up one proxy in a new profile. Now consider the case where you need to manage a large number of proxies.
Dolphin{anty} has a separate function for managing existing proxies, here you can view a list of all previously added proxies, check their performance, edit or delete them altogether.
Click on the Proxy button in the left column to go to the proxy manager.

Here you can notice a list of all your proxies. They can be managed in bulk by ticking the appropriate checkboxes.
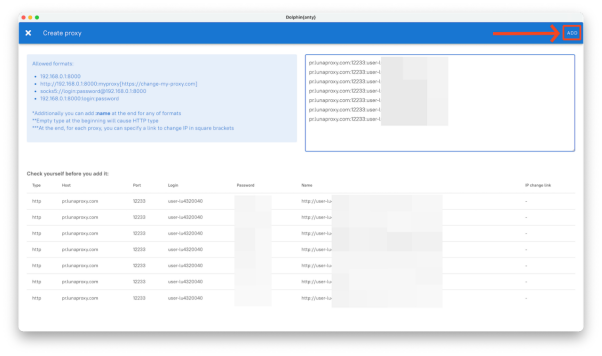
1. Click the Create Proxy button to add a proxy in bulk.

2. You will see a window for importing a proxy. On the left you can see in what format to insert proxy data. Once pasted, click the add button in the top right corner.
Your proxies are added and ready to go. Have a nice work!
✅Sign up for Dolphin{anty} with the LUNAPROXY promo code right now and get 10 browser profiles for free forever!
USER GUIDE > Fingerprint browser> Hubstudio
Hubstudio
![]()
Hubstudio (updated)
Get lunaproxy proxy information
Before starting the integration, we need to select a plan and prepare a proxy in lunaproxy.com.
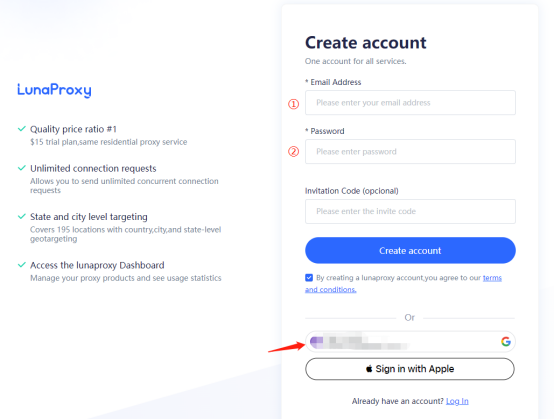
1. Register an account (if you don’t have one yet) / 1. Enter your email address 2. Enter your password (you can also choose Google)
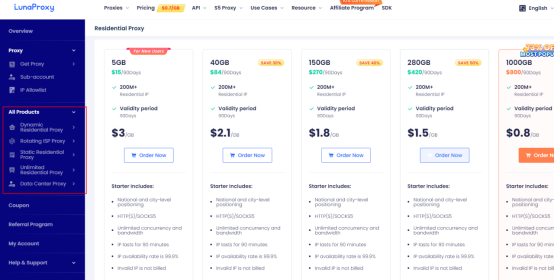
2. Go to the dashboard.
3. If this is your first time accessing the dashboard, you will be prompted to select a plan if required.
4. After selecting the plan, enter the Get Proxy menu → User & Pass Auth and select the required proxy.
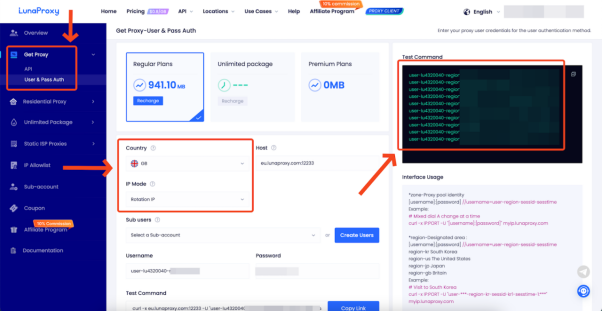
5. Select the country and proxy type you want. Here I choose the UK and rotating IP.
6. Copy the generated agent's host, port, login name, and password.
7. To obtain the proxy management URL link, go to the API tab.
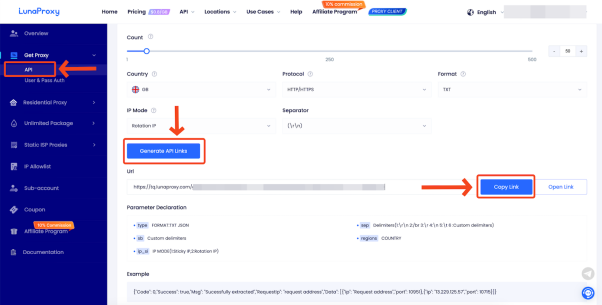
8. The agent is ready to be configured.
Configuration import
1. Click New Environment to enter the proxy configuration interface
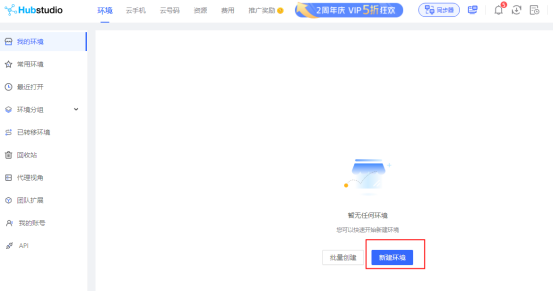
2. Select the custom proxy method - select the proxy type, usage method - fill in the IP and port in the corresponding position
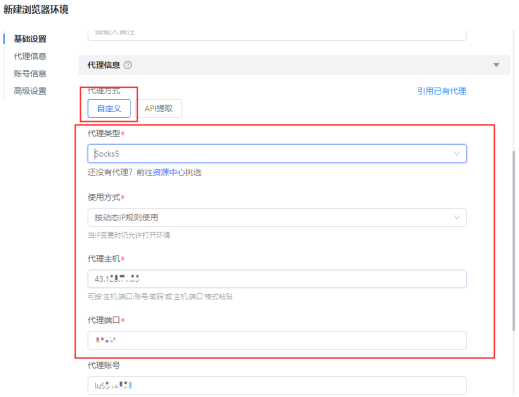
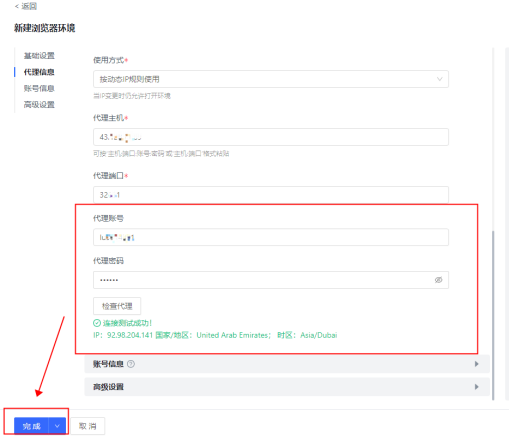
3. Fill in the agent account and password, click Check Agent, confirm that the connection is successful, click Finish, and the configuration is successful.
USER GUIDE > Fingerprint browser> VMMask
VMMask
![]()
YouTube Tutorial:https://www.youtube.com/watch?v=yvX618iy7ws
Vmmask
Get the lunaproxy proxy information
Before starting the integration, we need to select a scheme in the lunaproxy.com and prepare an proxy.
1. Register an account (if you don't have) / 1. Enter email 2. Enter your password (or Google)
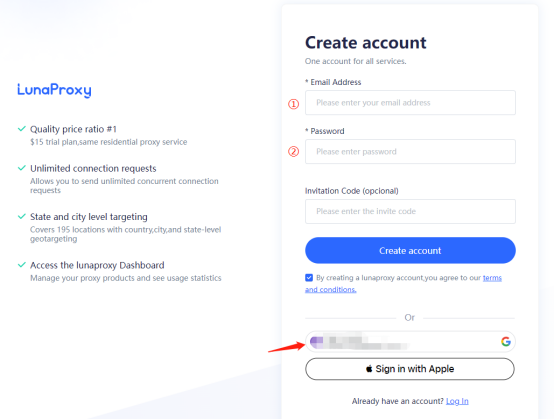
2.Go to the dashboard.
3.If you are visiting the dashboard for the first time, you are prompted to choose a plan as needed.
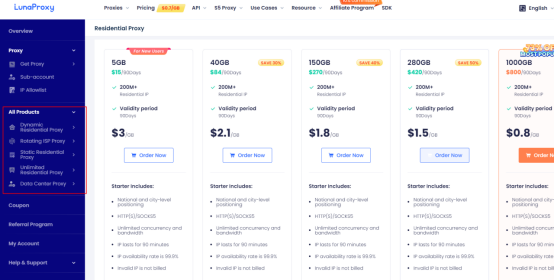
4. After selecting the scheme, enter the Get proxy menu User & Pass Auth and select the desired proxy.
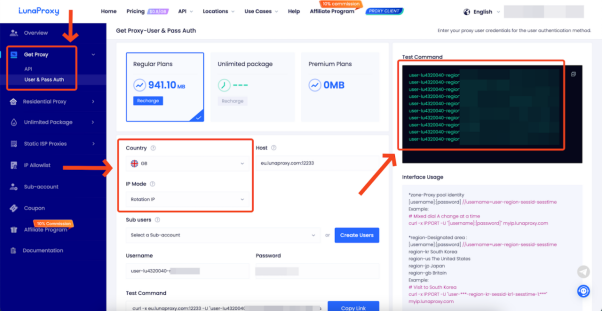
5. Choose the country you want, the type of proxy, here I choose the UK and rotation IP
6. The host, port, login name, and password of the copy-generated proxy.
7. To get the proxy-managed URL link, go to the API tab.
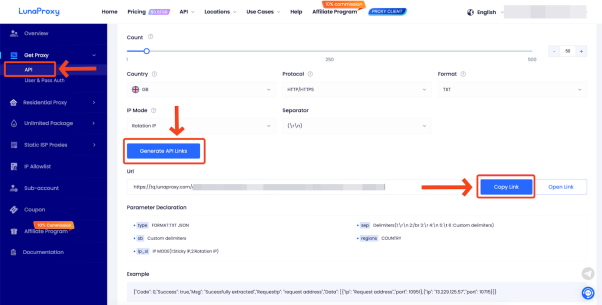
8. The proxy is ready to configure.
Configuration Import
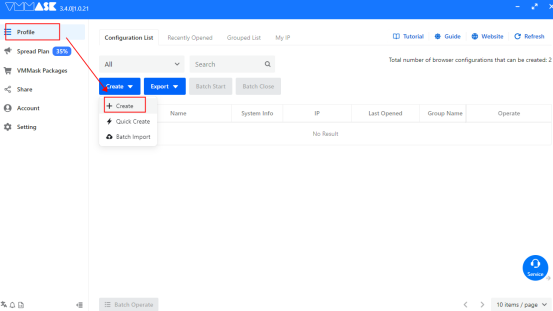
1.Open VMMask, click the home page- -Configure- -Create, and enter the configuration proxy interface
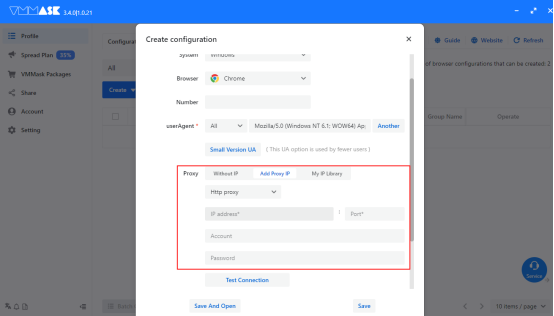
2.Click Add proxy, select proxy type, fill in the IP and port, proxy account and password, and click Test connection
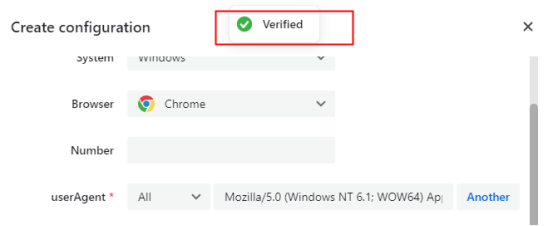
3.Test verification is successful, click Save, and the configuration is successful
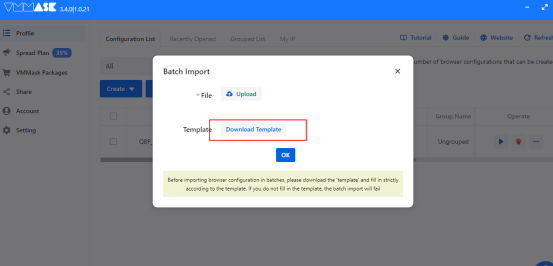
Batch import
1. On the home page of VMMask, click Configure- -Create- -mass Import
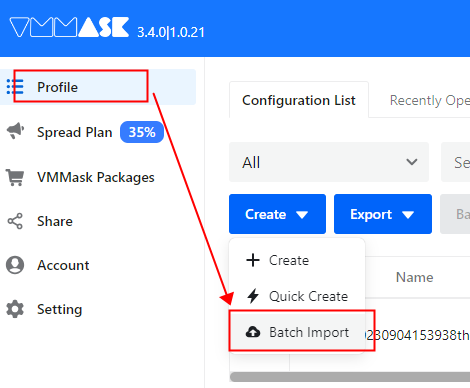
2. Download the excel template and open it. Select the proxy type according to your own needs, and fill in the IP address, port port, account number and password saving according to the requirements of the download file. Click Batch Import again, select the file, and import the completed file directly

USER GUIDE > Fingerprint browser> MBBrowser
MBBrowser
YouTube Tutorial:https://www.youtube.com/watch?v=bkvibxU8Phg
A step-by-step guide to integrating Luna Proxy with MBBrowser :
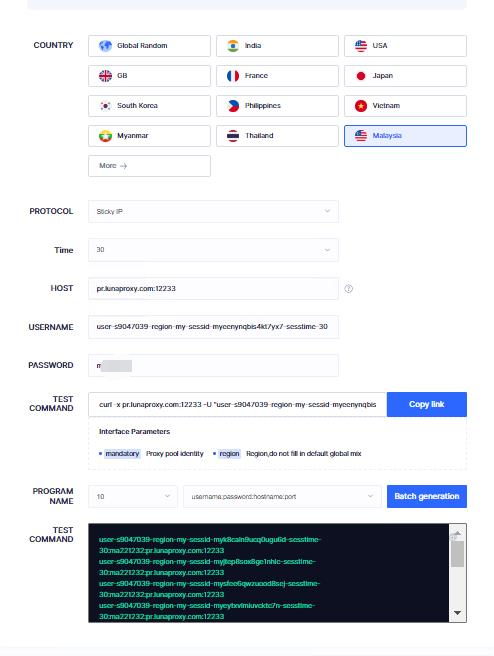
1. Select any country or specify a country, here I choose "United States"
2. The time can be selected: 1min, 5min, 30min", here I choose 30min
3. Host, USERNAME, PASSWORD are all fixed.
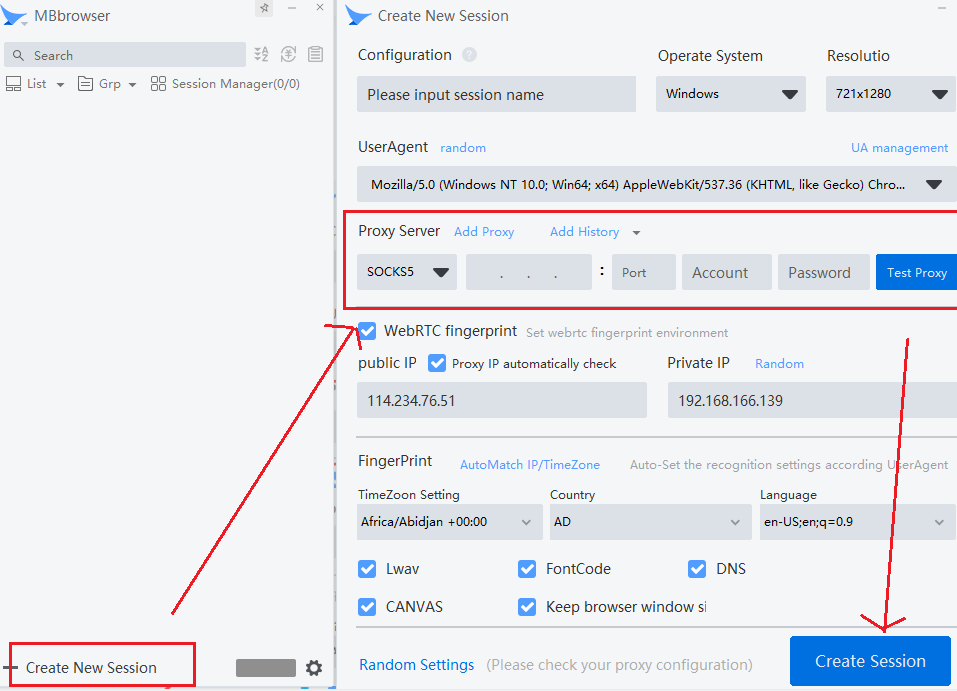
4. Next we open MBBrowser
5. Click New Environment Configuration
6. Select the proxy type "socks5" or "http(s)"
7. Fill in the lunaproxy proxy host: pr.lunaproxy.com; proxy port: 12233
8. Fill in the proxy account and proxy password.
9. Finally check the proxy, we can see that it is the IP after the proxy is successful
USER GUIDE > Fingerprint browser> SessionBox
SessionBox
Step-by-step guide to integrating Luna Proxy with SessionBox :
1.Set up and log into the SessionBox extension on your browser.
2.In the extension, click one of the symbols near the site name to create a new session.
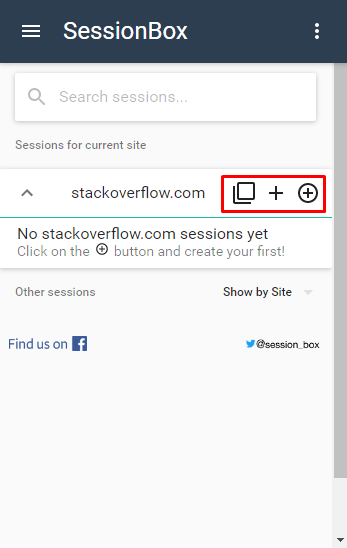
3.Select the website where you created the new session and go to the session settings (click the three dots, then the settings menu symbol).
4.Choose another tab. In the Proxy drop-down menu, select Add new.
5.In the Add Proxy menu:
Enter any name you want.
For Type, choose HTTP.
In the Address and Port fields, enter the endpoint of your choice and its port.
In the Username and Password fields, enter the credentials of the proxy user accordingly. You can skip these fields if you are using a allowlist IP address.
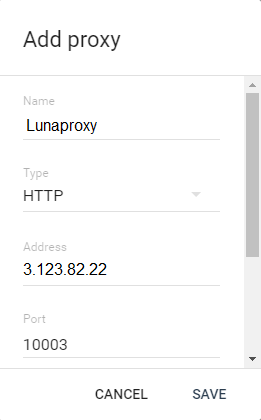
6.Click Save.
The proxy will be active for the duration of the session you set for it. You can check that the proxy is working by creating a session for the IP check website and setting up a proxy for it.
USER GUIDE > Fingerprint browser> Multilogin
Multilogin

Step-by-step guide to integrating Luna Proxy with Multilogin:
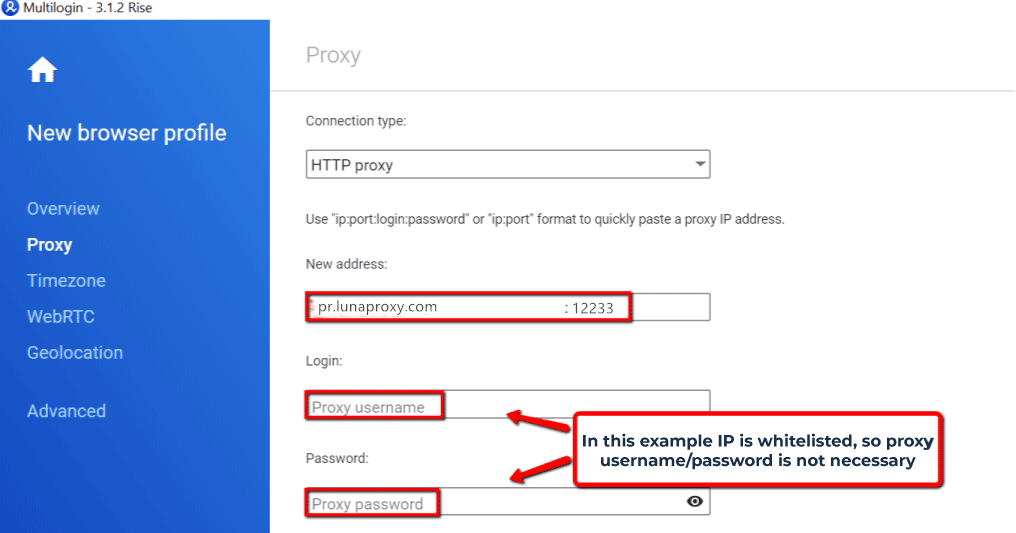
1.Open the Multilogin app, and select New browser profile.
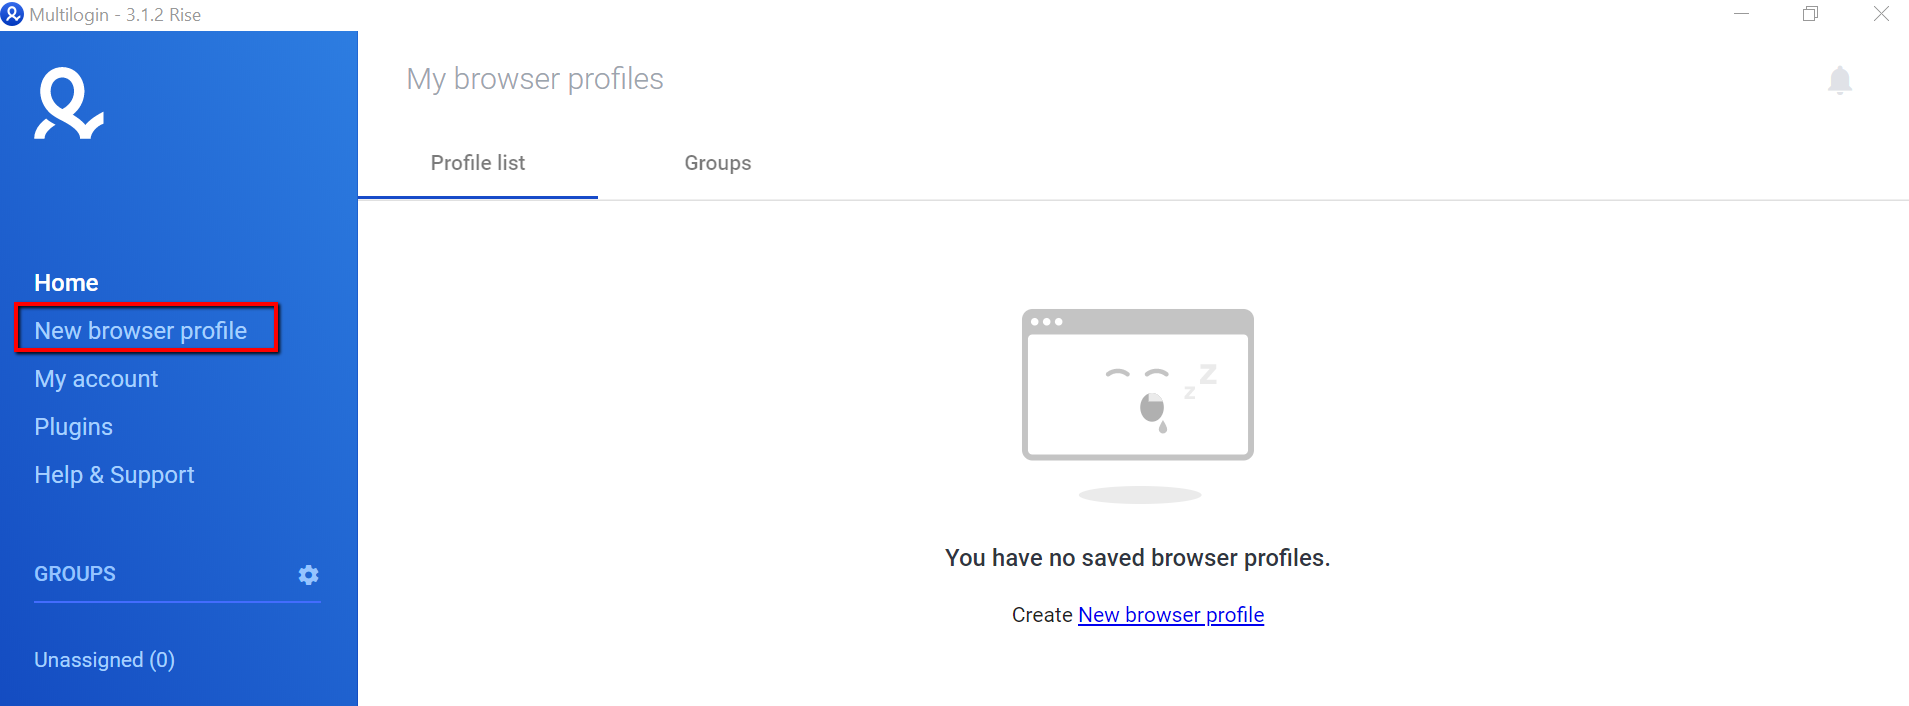
2.Click on Edit proxy settings.
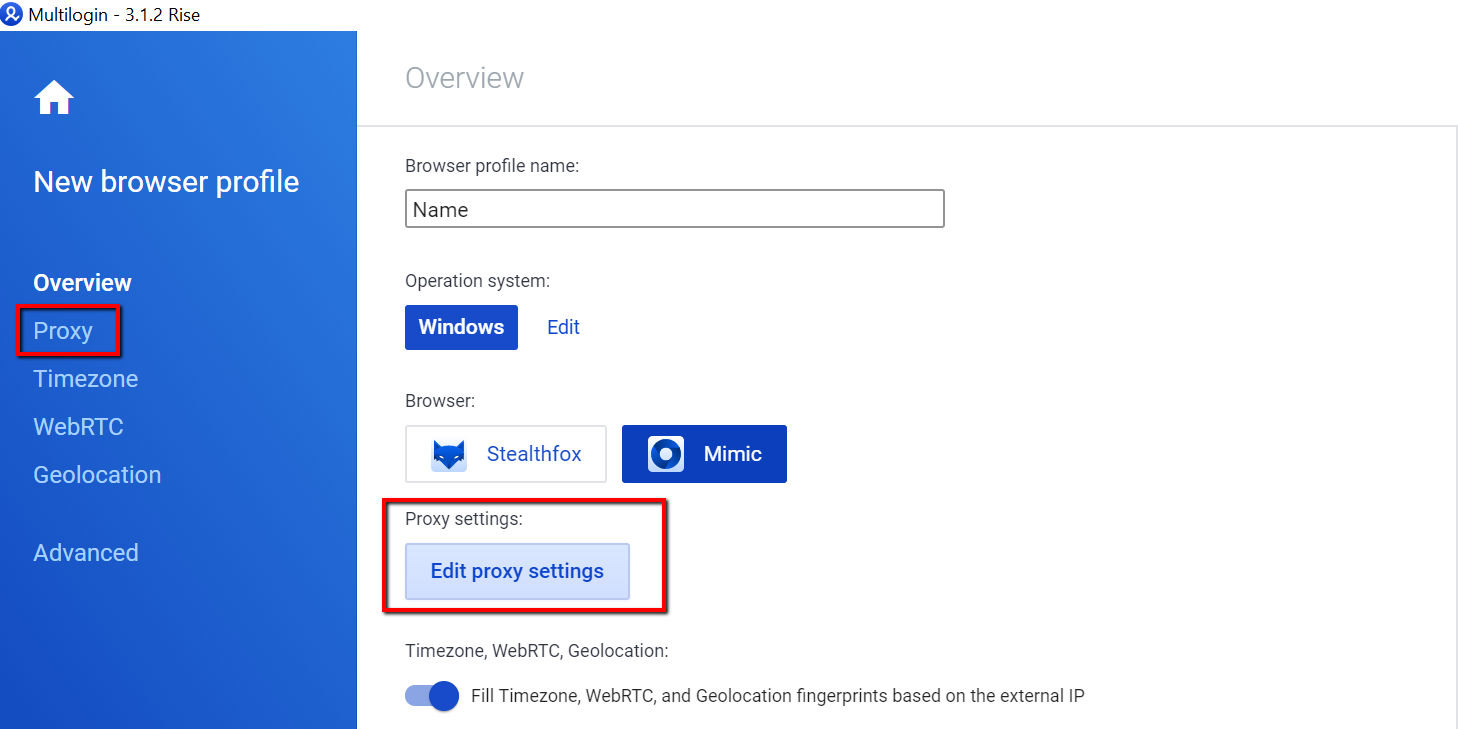
3.From the dropdown menu select HTTP proxy.
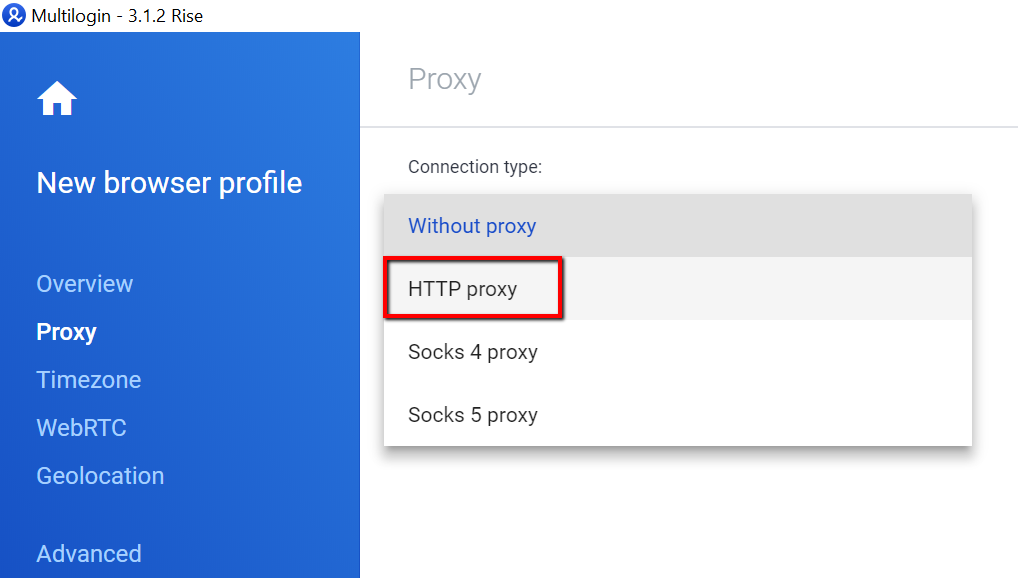
4.Enter the proxy details, e.g. pr.lunaproxy.com:12233 and your sub-user username/password. If the IP is allowlist, you don't need to enter username/password as per the example below.
5.You can then click on Check proxy to see if setup is successful.
USER GUIDE > Fingerprint browser> Incogniton
Incogniton

Step-by-step guide to integrating Luna Proxy with Incognition:
Address: https://incogniton.com/
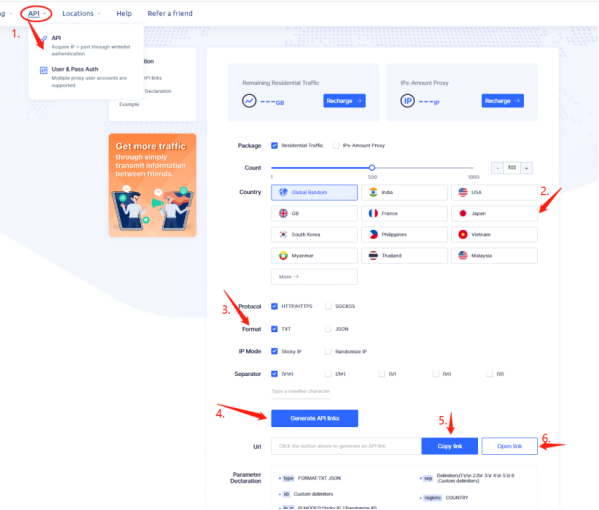
1. Select the way the lunaproxy API is extracted
2. Select any country or a designated country, and here I choose "America"
3. You can select the protocol format IP mode splitter default options as required
4. Check the build API link
5. Click to copy the link
6.You can also open the link to open the link to view the extracted IP details
7.Open the Incogniton app. Navigate to Profile Management, then select New profile.

8.Go to the Proxy section and choose HTTP proxy under connection type.
9.Enter the proxy details, e.g. pr.lunaproxy.com:12233 under Proxy: (ip:port) and your sub-user username/password in the respective fields.
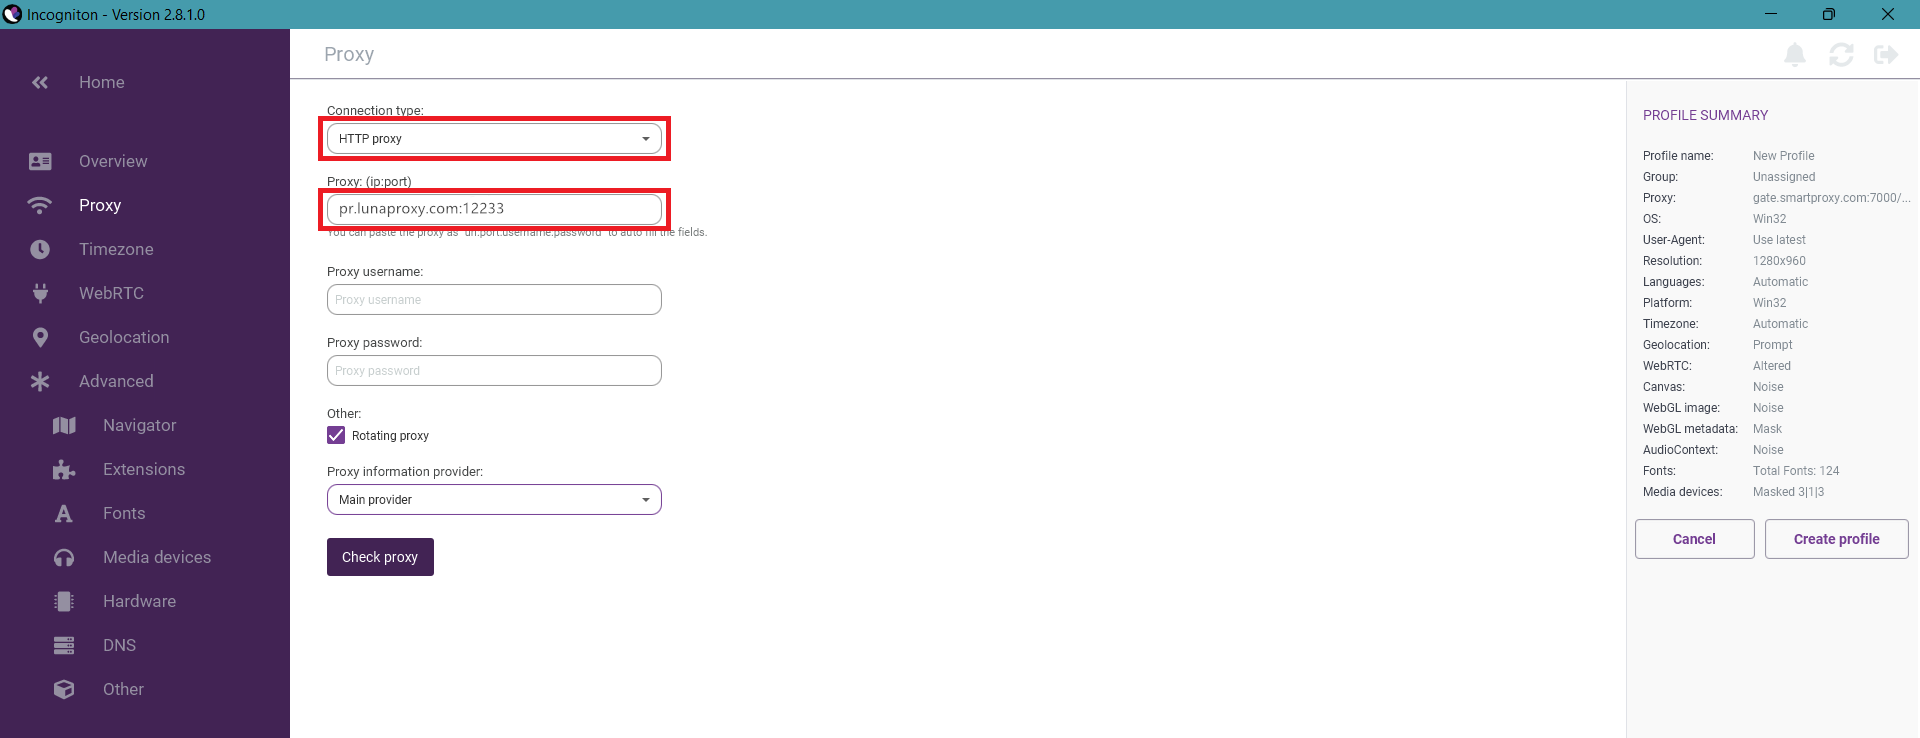
10.You can click on Check proxy to ensure that the setup is functional.
11.Configure any additional settings you might need (like naming your profile in Overview), and click Create profile.
USER GUIDE > Fingerprint browser> VMLogin
VMLogin
Register and manage multiple online accounts using physical devices with VMLogin's virtual browsing profiles which helps enable anti-association capabilities as well as fingerprint protection
Manage multiple online accounts using physical devices with VMLogin’s virtual browsing profiles which helps enable anti-association capabilities as well as fingerprint protection.
Step-by-step guide to integrating Luna Proxy with VMLogin :
YouTube Tutorial:https://www.youtube.com/watch?v=5xhJvoa5CiM
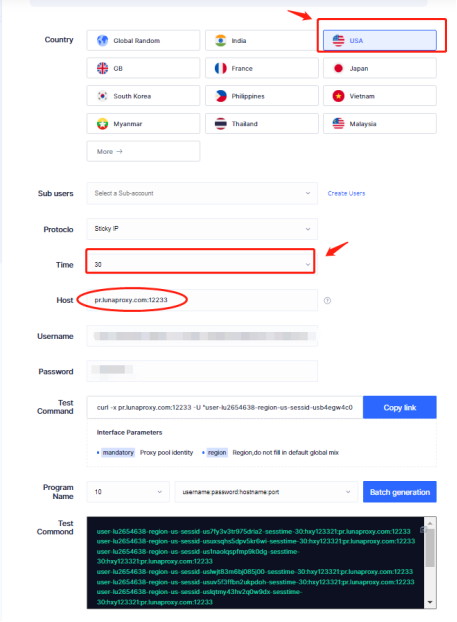
1.Select the way the lunaproxy API is extracted
2.Select any country or a designated country, and here I choose "America"
3.Time can choose: 1min, 5min, 30min ", here I choose 30min
4.You can select the protocol format IP mode splitter default options as required
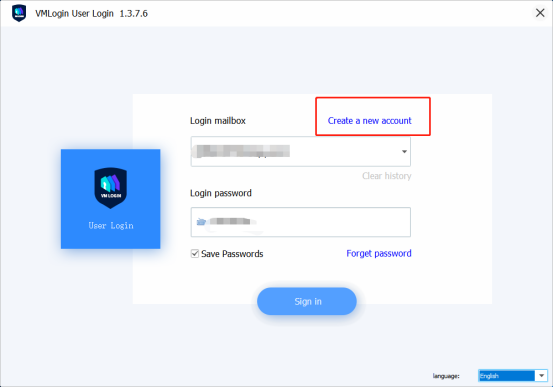
5.Then open the Lincoln method ball, enter your account number and password (if not, click to register a new account):
6.After successful login, click the new browser profile in the left navigation bar.
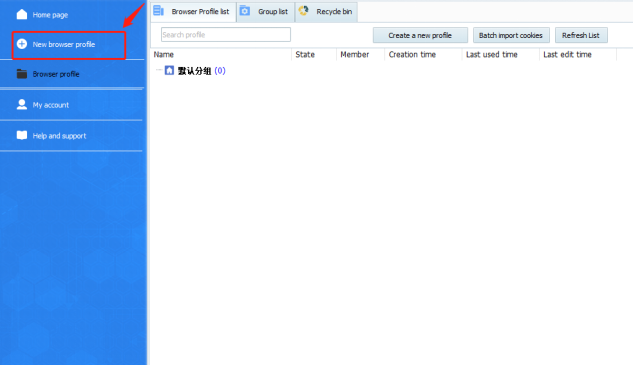
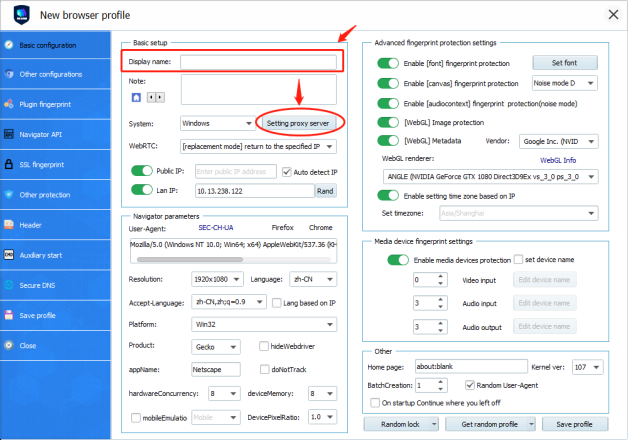
7. Add the display name that you want to the new browser profile page.
8. Click setting proxy server.
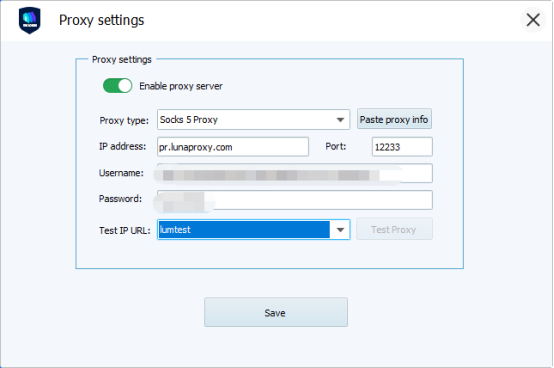
9.Check Enable proxy server , IP address and port to fill in the IP address you just extracted through lunaproxy. Here I use the account secret extraction, IP address: pr.lunaproxy.com, port 12233 (you can also use the IP address and port obtained through whitelist authentication) click to save.
10.Others can be customized according to your requirements, resolution, country code, and language set according to the specific requirements, session name.
11.Click on the lower right to save the configuration.
USER GUIDE > Fingerprint browser> AdsPower
AdsPower
lunaproxy exclusive discount code: lunapoxy
Can be used when purchasing adspower services
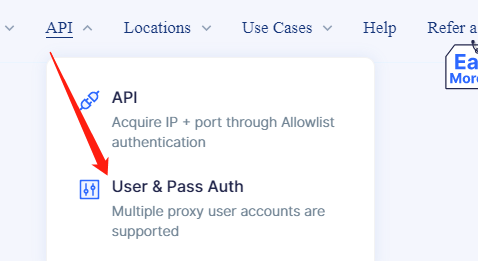
1. Select the way the lunaproxy API is extracted
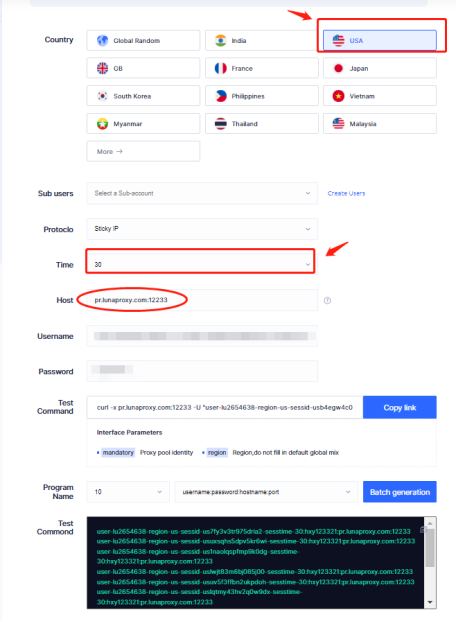
2. Select any country or a designated country, and here I choose "America"
3. Time can choose: 1min, 5min, 30min , here I choose 30min
4. You can select the protocol format IP mode splitter default options as required
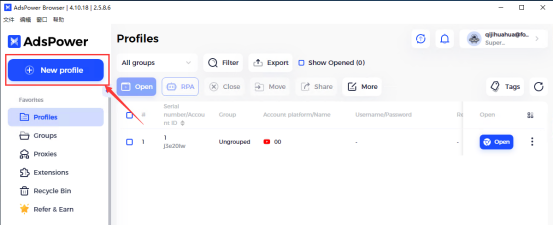
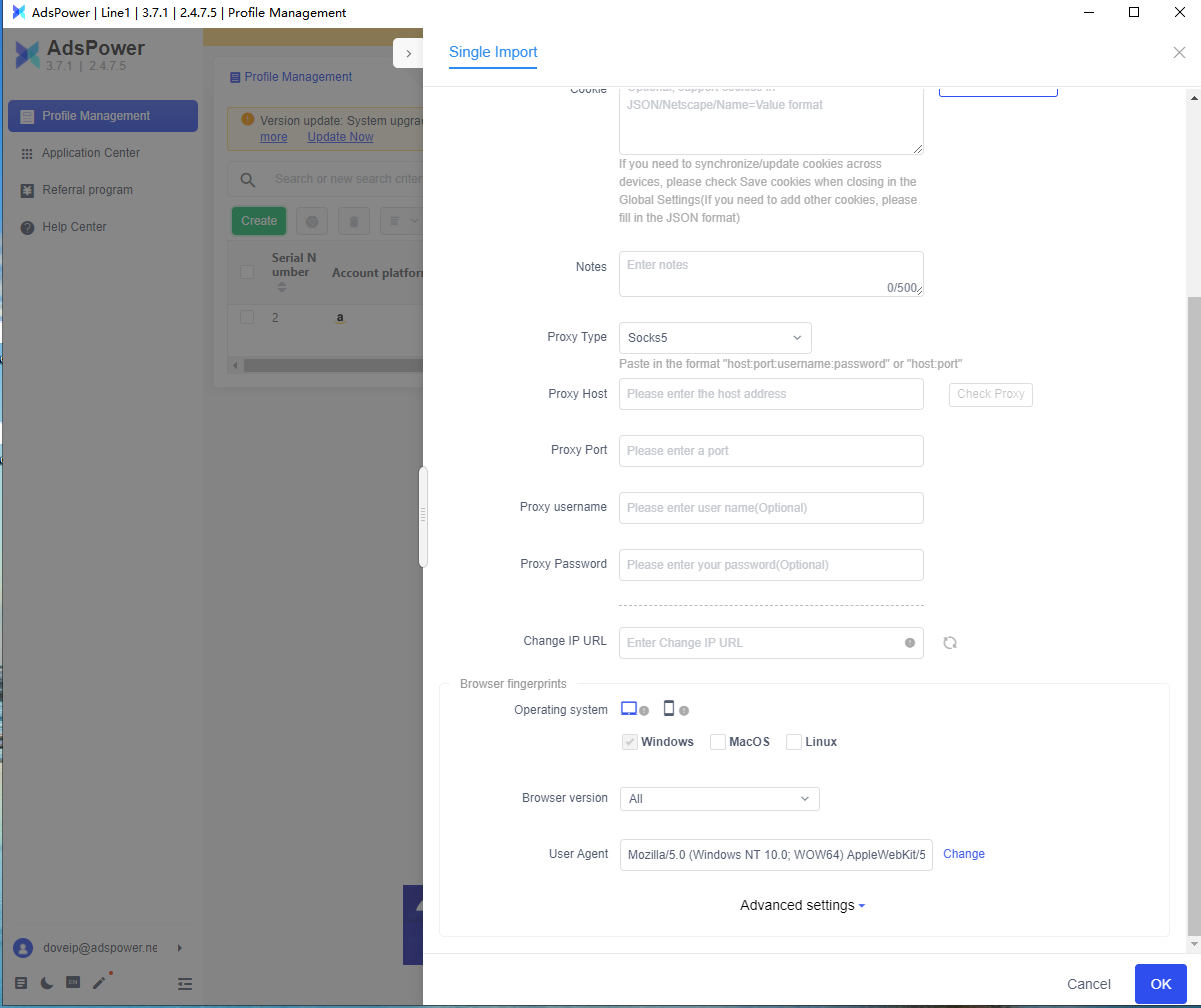
1.Download the AdsPowerBrowser App and log in to the registered account, then you can choose to use the free version or purchase the paid package as needed
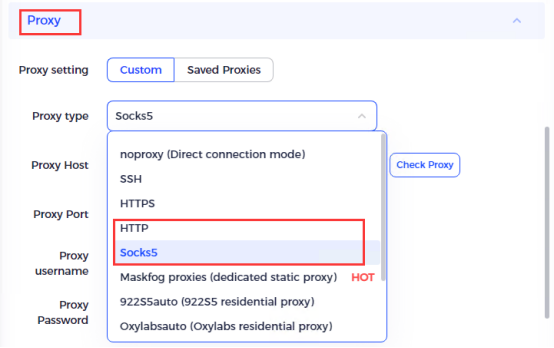
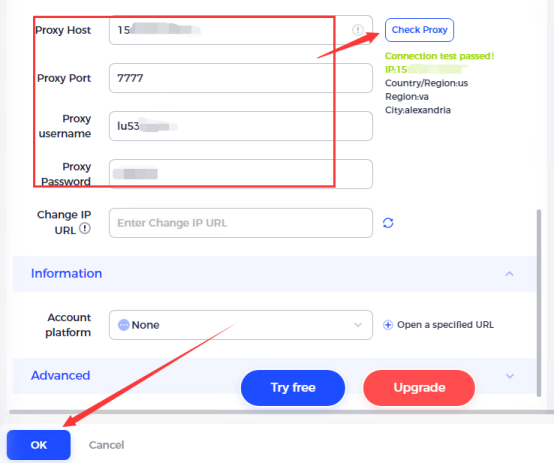
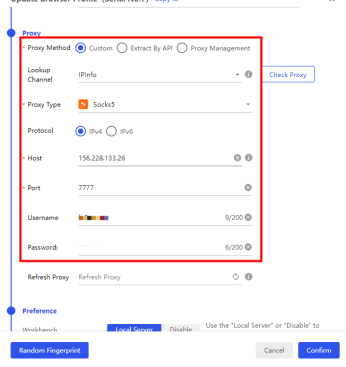
2.Click the single import button and fill in the blanks with information obtained. Example as below:
1)Proxy type: socks5
2)Proxy host: proxy server address obtained through channel
3)Proxy port: port number obtained through channel
4)Account: LunaProxy account
5)Proxy password: authentication password obtained through channel
3.After saving, click ''open'' to open the AdsPower Browser, and check the IP. If the IP address shifted, it means the proxy is set successfully.
USER GUIDE > Sneaker bots> NikeSlayer
NikeSlayer
Set proxy in NikeSlayer:
1. Select any country or specify a country, here I choose "Malaysia"
2. You can choose the time: 1 minute, 5 minutes, 30 minutes", here I choose 30 minutes
3. The host, user name, and password are all fixed.
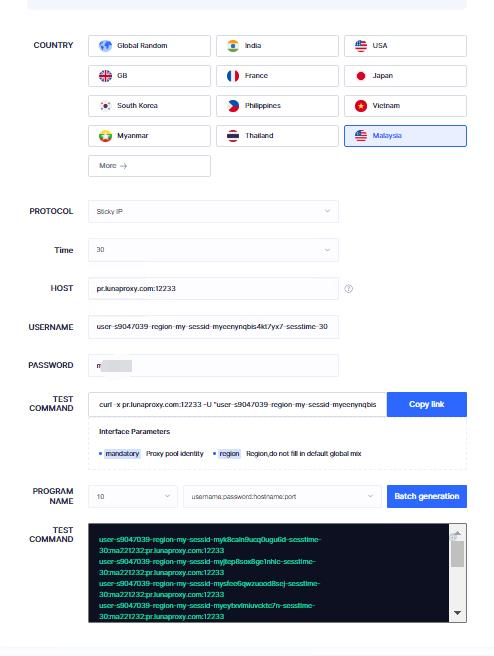
4.Click the Power of Attorney tab
5.In the lower left corner, click Add with a small server icon
6.Fill in your host, port details (eg pr.lunaproxy.com:12233), username and password
7.Adjust the number of agents to use for each task
8.After adding the agent, click Save to publish
9.You will be automatically taken to the homepage of the target website and ready for publishing
USER GUIDE > Sneaker bots> EasyCop bot
EasyCop bot
Set proxy in EasyCop bot:
1. Select any country or specify a country, here I choose "Malaysia"
2. You can choose the time: 1 minute, 5 minutes, 30 minutes", here I choose 30 minutes
3. The host, user name, and password are all fixed.
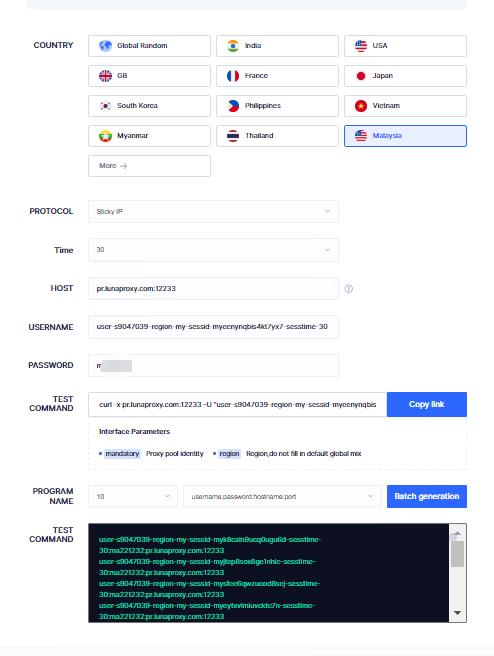
4.Click Tools, then select Proxy List
5.Enter the hostname and country port number (for example, pr.lunaproxy.com:12233) under "Host or IP address" and click "Save"
6.Click Import and verify that the proxy is enabled
7.Click Save
USER GUIDE > Sneaker bots> Better Nike Bot
Better Nike Bot
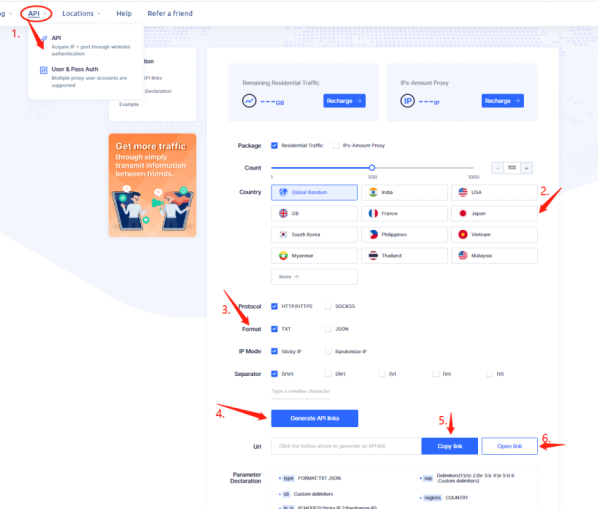
1. Select the way the lunaproxy API is extracted
2. Select any country or a designated country, and here I choose "America"
3. Time can choose: 1min, 5min, 30min ", here I choose 30min
4. You can select the protocol format IP mode splitter default options as required
5. Check the build API link
6. Click to copy the link
7. You can also open the link to open the link to view the extracted IP details
Configure the proxy on the Better Nike Bot
8. Click the Add / Edit Proxy.
9. Paste the generated list of proxy endpoints.
10. Check Do to assign real IP to any account, and click OK.
11. The Better Nike Bot automatically checks that the agent is successfully connected.
USER GUIDE > Sneaker bots> Another Nike Bot
Another Nike Bot
Getting the proxies
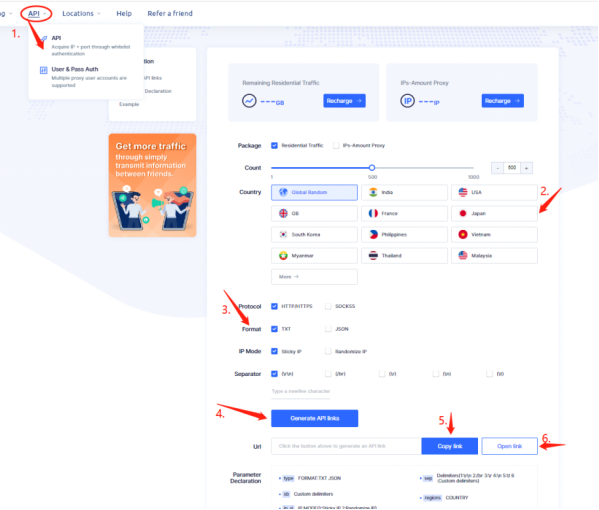
1. Select the way the lunaproxy API is extracted
2. Select any country or a designated country, and here I choose "America"
3. You can select the protocol format IP mode splitter default options as required
4. Check the build API link
5. Click to copy the link
6. You can also open the link to open the link to view the extracted IP details
Configure the proxy on another Nike robot
7. Navigation Configuration> Proxy.
8. Click New list, and then add the generated proxy list.
9. Select the Enable this proxy list.
10. Change the list type to the Normal proxy.
11. Select your target site from the drop-down menu.
12. Click Save.
13. Check that the proxy is working correctly by clicking on the Test Proxies.
USER GUIDE > Sneaker bots> AIO Bot v2
AIO Bot v2
Getting the proxies
1. Select the way the lunaproxy API is extracted
2. Select any country or a designated country, and here I choose "America"
3. Time can choose: 1min, 5min, 30min ", here I choose 30min
4. You can select the protocol format IP mode splitter default options as required
5. Check the build API link
6. Click to copy the link
7. You can also open the link to open the link to view the extracted IP details
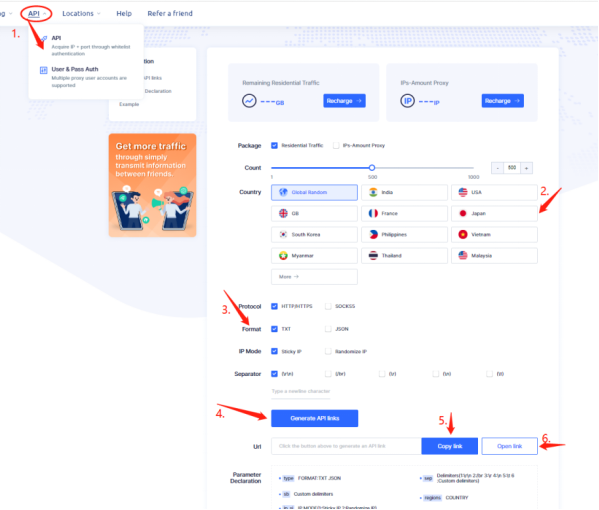
Configuring proxies on AIO Bot v2
1.To set up a proxy, select the Proxies tab and click + to add it.
2.Enter the name of your proxy list and check the Enabled box.
3.For copping, select Normal Proxies and paste the resulting list of proxy endpoints below.
a) If you are using allowlist IP authentication, the list will show:pr.lunaproxy.com:12233
b) If you use authentication, the list will show:pr.lunaproxy.com:12233:username:password
4.For monitoring, you can choose to monitor the proxy and use our rotation endpoint. This changes the IP every time.
Use either allowlist IPs authentication or username:password .
USER GUIDE > Social media tools> PVACreator
PVACreator
Step-by-step guide to integrating Luna Proxy with PVACreator:
1. Open PVACreator and click on Proxy. Then click Import to import the proxy.
2.Select your proxy list file.
Use proxy sub-user authentication/use allowlist IP.
3.Click Save after importing proxies.
4.Then, you will need to bind proxies to your campaign. We use Instagram campaign in the example.
5.Once you open the campaign, go to Proxy Table, click on the Proxy column to select it and then Bind proxy.
This will fill in the proxy table with the proxies that you've already imported. Alternatively, you can select Import from file (instead of Bind Proxy).
6.To save the changes, click Save.
USER GUIDE > Social media tools> Follow Liker
Follow Liker
Step-by-step guide to integrating Luna Proxy with Follow Liker:
1. Follow Liker app does not accept domain:port (eg pr.lunaproxy.com:12233), so you need to convert it to IP:port format first.
2. When you open the app, you have two options:
a) Enter the proxy list in the proxy manager.
b) Assign the proxy directly to the account.
If you use a proxy list, the application will automatically assign an unused proxy to the account.
To import the list, click Tools > Proxy Manager.
3. Right-click the table and select Import.
4. Select a proxy list (the format has to be IP:Port:Username:Password or if you use allowlist IP authentication – simply IP:Port).
Alternatively, you can assign proxies directly to accounts when adding or editing proxies.
USER GUIDE > Scrapers> SENukeTNG
SENukeTNG
Step-by-step guide to integrating Luna Proxy with SENukeTNG:
1. Open ProjectMaker for ZennoPoster app to create or edit your project.
2. If you already have a project, click the "Open" button. If you are creating a new project, click the "Record" button.
3. Once there, click on the Proxy tab.
4. You should now see the proxy settings available. To use a custom proxy on this application, check the Use proxy option.
5. Once the Use Proxies option is checked, the radio buttons should become visible. Click Custom Proxy Options.
6. Once this is done, you should have the option to click the Add Proxy List button.
7. If you are not using a allowlist IP, be sure to fill in your username and password fields.
8. Now you can add the proxy to the list. Depending on your needs, you can select a specific endpoint, or you can copy and paste the entire list from our website by clicking all available options in the "Endpoints" section on our dashboard.
9. When the list is ready, click the "Add Proxy List" button to continue the setup.
10. At this point, your proxy is ready to use. However, if you want to be sure, you can additionally run a check by clicking the Test Proxy button in the proxy settings.
11. When you have finished testing the proxy or general settings, click Save.
USER GUIDE > Scrapers> ScrapeBox
ScrapeBox
Step-by-step guide to integrating Luna Proxy with ScrapeBox:
1.Open the ScrapeBox application.
2.Check the Use Proxy field in Select Harvester and Proxy settings
3.Click the Edit button to start setting up your proxy.
4.Depending on the authentication method you want to use, enter the information for proxy authentication, as shown in the following example:
pr.lunaproxy.com:12233:myusername:mypassword
pr.lunaproxy.com:12233
5.When done, click Save to save the proxy settings. You should now see your proxy in the Select Harvester and Proxies box.
6.Select all the proxies you entered and click the Modify button.
7.Click the option to mark all proxies as non-sock proxies. If done correctly, you should see the letter N under each entered proxy in the S field of the proxy table.
8.You can configure the rest of ScrapeBox's settings as needed. To test if you are using a proxy, just check if the Harvester Status indicates Proxies Enabled.
USER GUIDE > Scrapers> Octoparse
Octoparse
Step-by-step guide to integrating Luna Proxy with Octoparse:
1. Open the Octoparse app.
2. In the upper left menu, hover over the New button and click Advanced Mode. For testing purposes, we will create a custom task.
3. In the Website field, indicate the website from which you want to extract data. Then click the Save button.
4. You should now find yourself in the Tasks tab. To configure our proxy, select the Settings button.
5. In the popup menu, scroll down to Anti-blocking settings and check the Use IP proxies option. You should now be able to click the Settings button.
6. In the proxy settings popup, define the proxy you want to use. Unfortunately, Octoparse only provides format-based authentication over proxy networks. For this particular reason, you need to use our allowlist IP feature to skip traditional authentication when going through a proxy.
7. After the IP:PORT is ready, select the switching interval according to your session type. If you are using a rotating session type, set the interval to 1. If you are using sticky sessions, set this to 600. Finally, click the OK button.
8. To verify that everything is working correctly, look for a check mark next to the Settings option under Anti-blocking Settings. Once confirmed, click Save to continue.
9. To extract data from our sample page, click on the IP address you can see at the top of the Octoparse application and select Extract text of the selected element.
10. When done, click Save, then Run.
11. Depending on how you want to run your task, select one of the available extraction options. For testing purposes, you can Run task on your device.
12. If done correctly, you should see our proxy IP in the extracted data table once the task is finished.
USER GUIDE > Scrapers> Apify
Apify
Integrate lunaproxy with Apify
1. Select the way the lunaproxy API is extracted
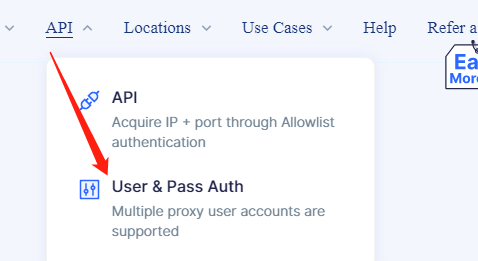
2. Select any country or a designated country, and here I choose "America"
3. Time can choose: 1min, 5min, 30min ", here I choose 30min
4. You can select the protocol format IP mode splitter default options as required
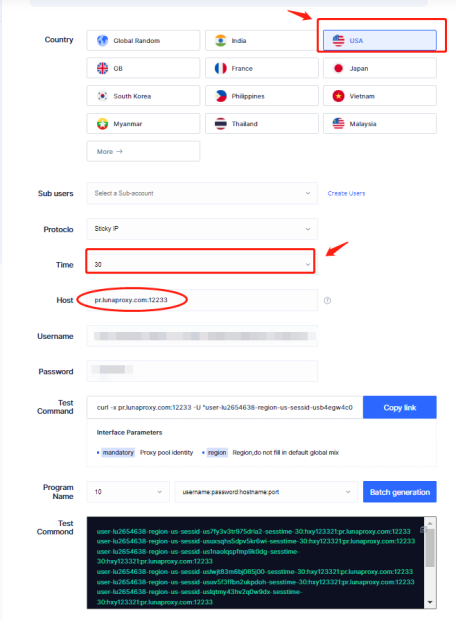
5. Log in to your account on Apify.
6. Navigate to the menu on the left and select Actors:
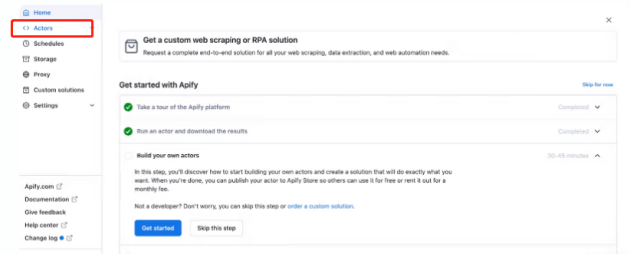
7. Select the Store section. Here, select the tool you want based on your grab project goals. You can browse through the categories or use the search.

In our example, we will use the Web Scraper actor.
8. In the Input section, select Basic Configuration, where you can enter the target URL.
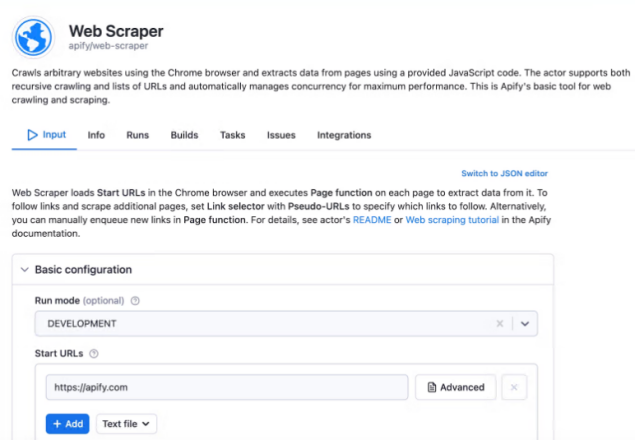
9. Scroll down to the agent and browser configuration and find the proxy configuration section. Here, select Custom Proxy to change the agent settings.
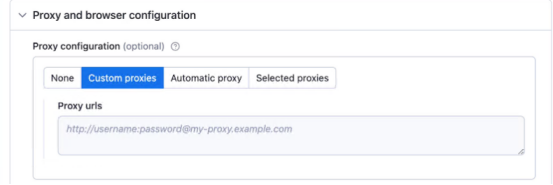
10. Depending on your validation style, enter your IP address and port, and your own lunaproxy user credentials and other details, as shown in the following example.
Address:pr.lunaproxy.com
port :12233
user name :The user name of your lunaproxy user
Password:Password for your lunaproxy user
11. To complete the agent configuration process, click Start.
12. After the Web crawl process is complete, you can preview the data or download it in the format you like.
USER GUIDE > Luna S5 Proxy> LunaProxy-Linux version client usage tutorial
LunaProxy-Linux version client usage tutorial
1. Start the client
Start command:
./LunaProxy -api_port=API port -email=account email -pwd=login password -local=intranet address (default 127.0.0.1)
2. Assign the dynamic residential plan IP to the designated port
Call interface:
curl "http://127.0.0.1:API port/set_dynamic_ip?port=assigned port&num=number of IP&country=country code&city=city code&zip=zip code&isp=isp code&state=state code"
After the allocation is successful, the test command is as follows:
curl -x 127.0.0.1: assigned port ipinfo.io
Example:
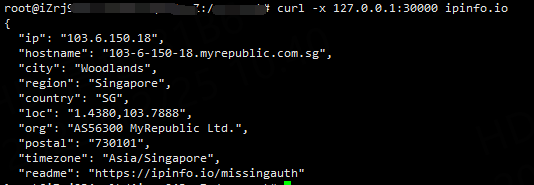
3. Release the allocated port
Call interface:
3.1 Release all allocated ports
curl "http://127.0.0.1:API port/port_free"
3.2 Release the specified allocated port
curl "http://127.0.0.1:API port/port_free?port=port number to be released"
4. Assign static residential IP to designated port
Call interface:
curl "http://127.0.0.1:API port/set_static_port?port=assigned port&ip=purchased static residential IP&country=country code"
Country parameter description: If the ip parameter is not specified, the static residential IP of this country code will be randomly assigned, provided that the user has a static residential IP of this country.
5. Assign static data center IP to designated port
Call interface:
curl "http://127.0.0.1:API port/set_data_center_port?port=assigned port&ip=purchased datacenter IP&country=country code"
Country parameter description: If the ip parameter is not specified, the static data center IP of this country code will be randomly assigned, provided that the user has a static data center IP of this country.
USER GUIDE > Luna S5 Proxy> LunaS5 Setting Tutorial
LunaS5 Setting Tutorial
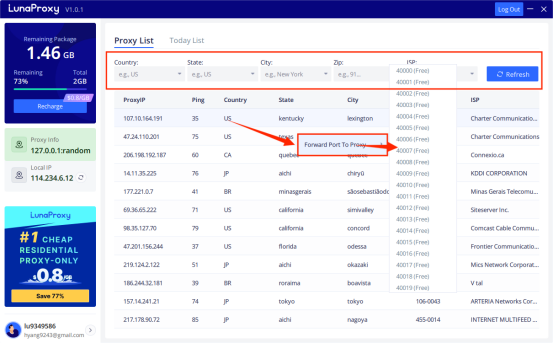
Step 1:Filter by country/postal code
1. Select your desired country in "Country"
2. Select your desired region in "City"
3. Select the zip code you want in "Zip Code"
4. Click "Refresh" to update the proxy list
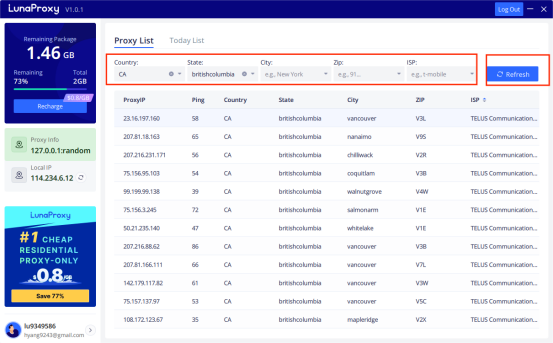
Step 2:Get proxy IP address
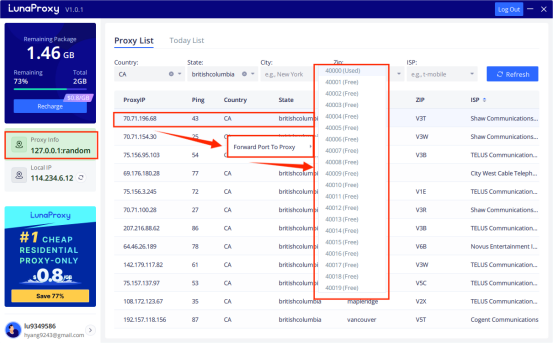
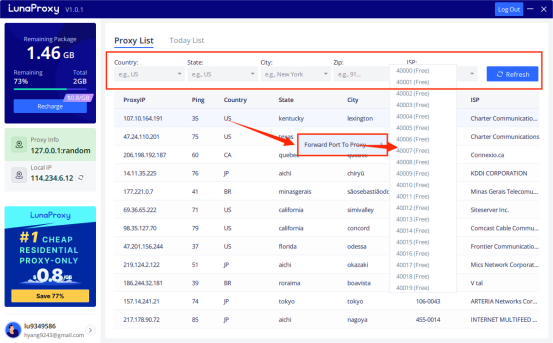
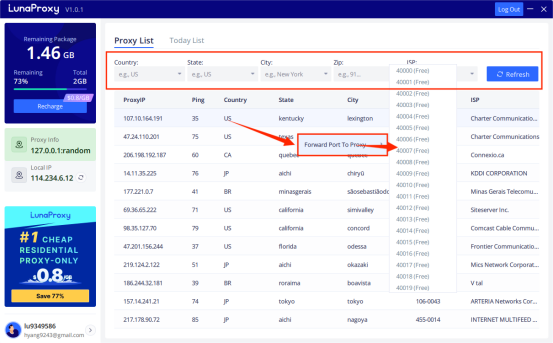
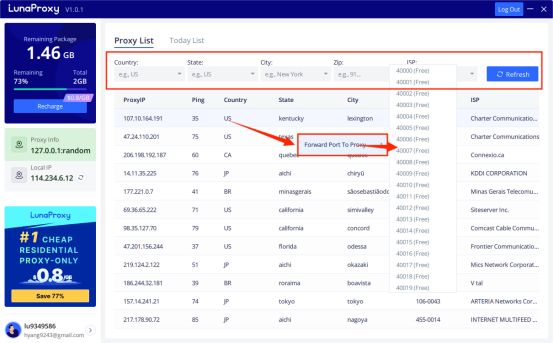
Select Proxy > Right Mouse Button > Forward Port to Proxy > 40000/40001...
1. Select a proxy from the list and right click.
2. Select "Forward port to proxy" and select a port from the drop-down list, for example 40000.
3. Configure the IP and port used in "Proxy info" to the tool to be used, and the proxy starts to run
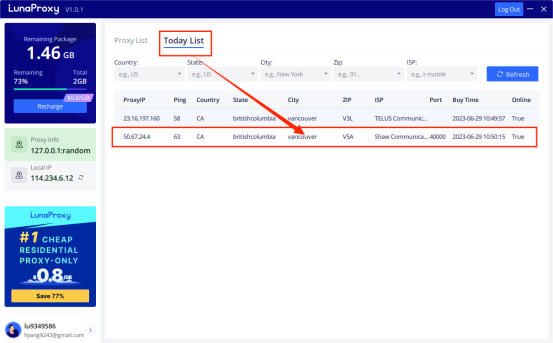
After completing the above, you can see detailed proxy parameters in "Today's List"
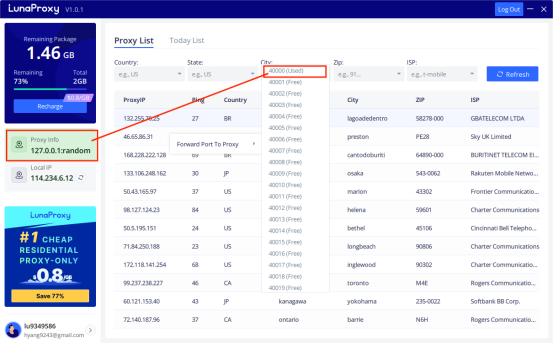
Example Set up fixed port forwarding
Example:
① Set port 40000 in proxy IP.
② Enter the IP as the local proxy address when using it. My local proxy address is 127.0.0.1, and the port is port 40000 set in the proxy IP.
USER GUIDE > Luna S5 Proxy> Client interface introduction
Client interface introduction
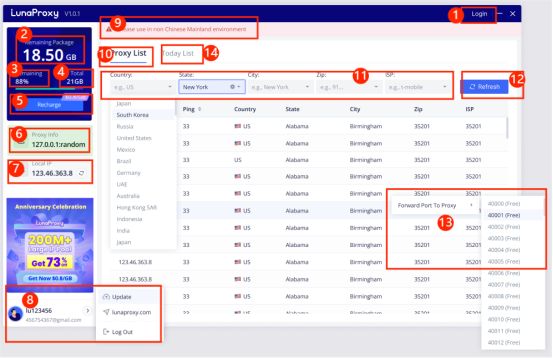
1. Login: Log in to the client
2. The remaining flow of the account in the residential proxy plan
3. Percentage of residential proxy program remaining traffic
4. Total traffic owned by the account in the residential proxy program
5. Recharge: enter the purchase page to recharge
6. Proxy info: local intranet IP and port
7.Local IP: local external network IP
8. Quick entry: update, official website, exit
9. Proxy cannot be used in Mainland China environment
10.ProxyList: proxy information list
11.Targeting: filter country/state/city, support ZIP, ISP search
12.Refresh
13.Forward Port To Proxy: Choose to use the port
14.Today List: IP information used that day
USER GUIDE > Luna S5 Proxy> Undetectable integrated with LunaS5
Undetectable integrated with LunaS5
Add proxy settings
1. After selecting the country, continent, and city, click the "Refresh" button, then right-click to select the proxy IP and port
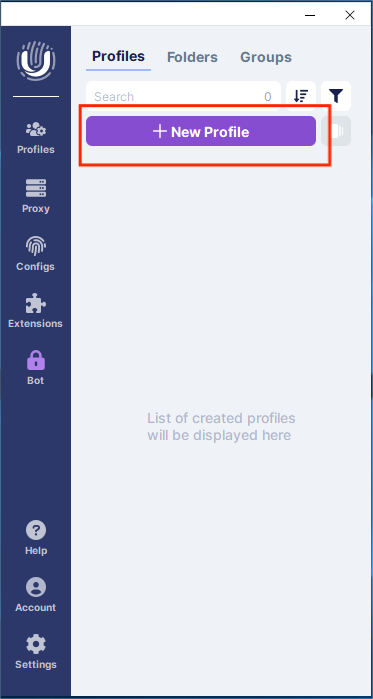
2. First, open the undetectable browser and log in. Click "New Profile" to create a new profile
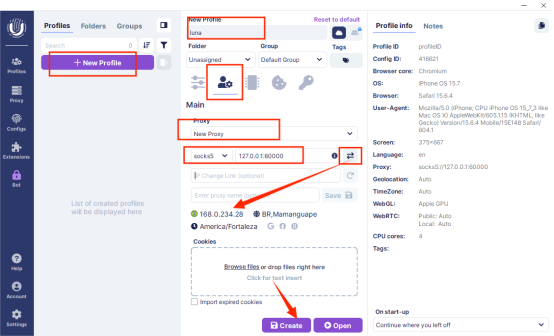
3. Click "New profile" to enter a new name, select proxy configuration, select "New Proxy" -> "socks5" -> input IP and port -> detect proxy -> click "create" to complete the creation
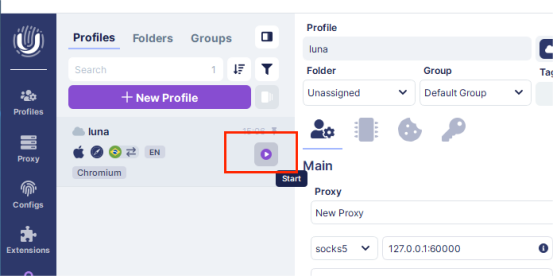
4. Click "Start" to open the page
5. The configuration is successful!
USER GUIDE > Luna S5 Proxy> VMLogin integrated with LunaS5
VMLogin integrated with LunaS5
Add proxy settings
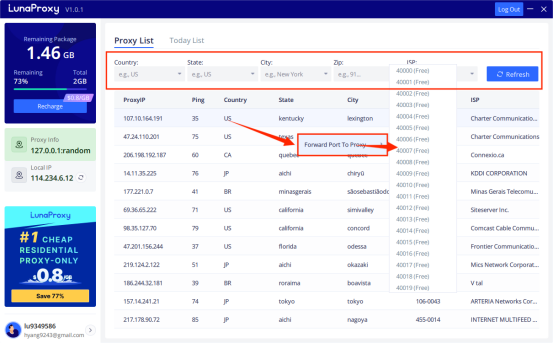
1.After selecting the country, continent, and city, click the "Refresh" button, then right-click to select the proxy IP and port
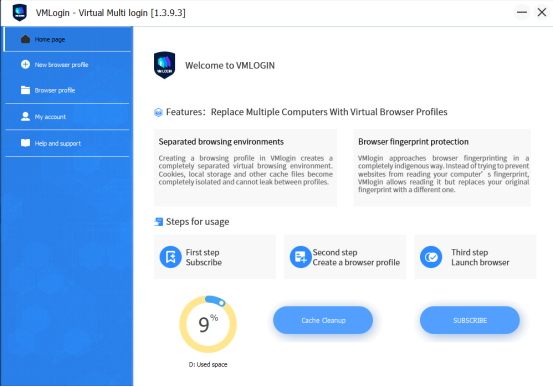
2. First, open the VMLogin browser and log in.
3. Click "New browser profile" and select "Setting proxy server"
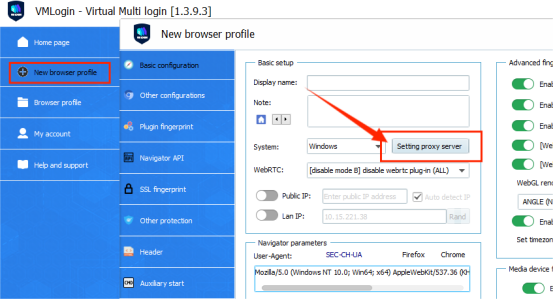
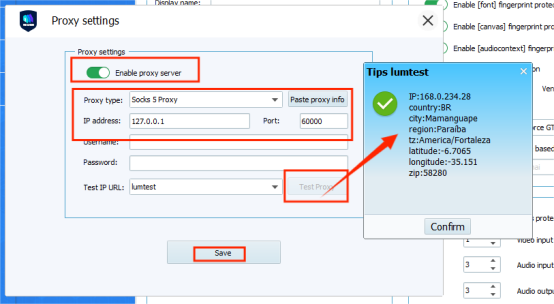
4. Turn on "Enable proxy server", select "socks5" proxy, enter IP and port, click "Test Proxy" to test, click "Save" to save
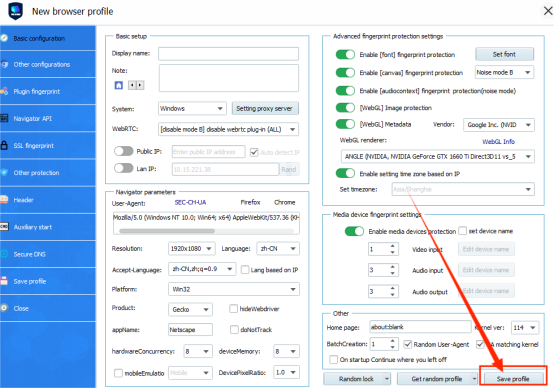
5. Click "Save profile" to complete the configuration
USER GUIDE > Luna S5 Proxy> Alayu integrated with LunaS5
Alayu integrated with LunaS5
Add proxy settings
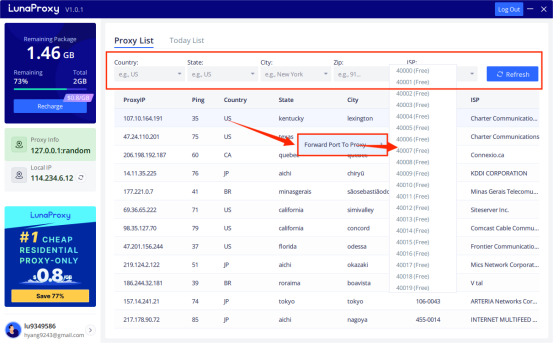
1.After selecting the country, continent, and city, click the "Refresh" button, then right-click to select the proxy IP and port
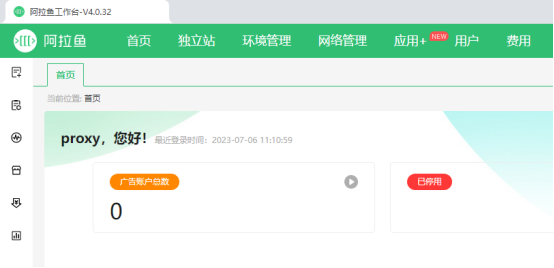
2. First, open the Ala Fish browser and log in.
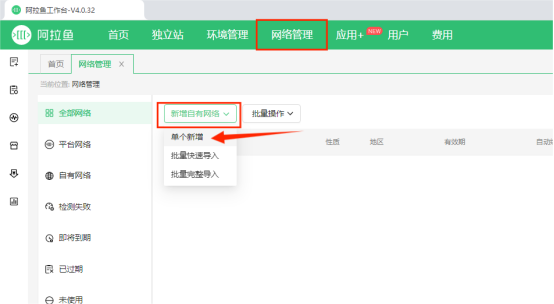
3. Select the "Network Management" page, click "Add Owned Network" -> "Single Add"
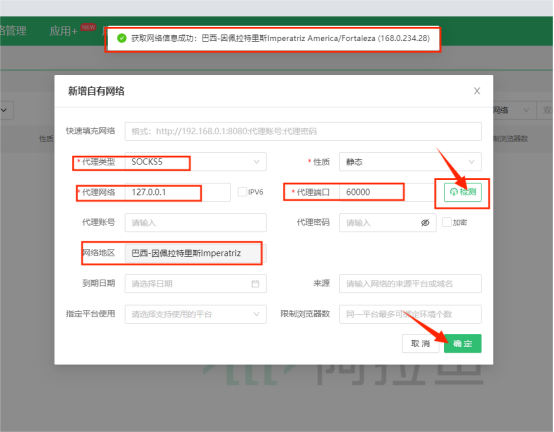
4. Select the proxy type "socks5" and enter the IP and port, click "Detect" -> the detection is successful, click "OK" to complete the configuration
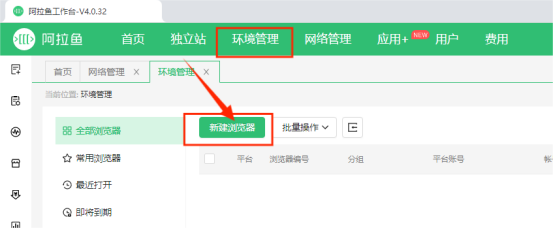
5. Select "Environment Management" and click "New Browser"
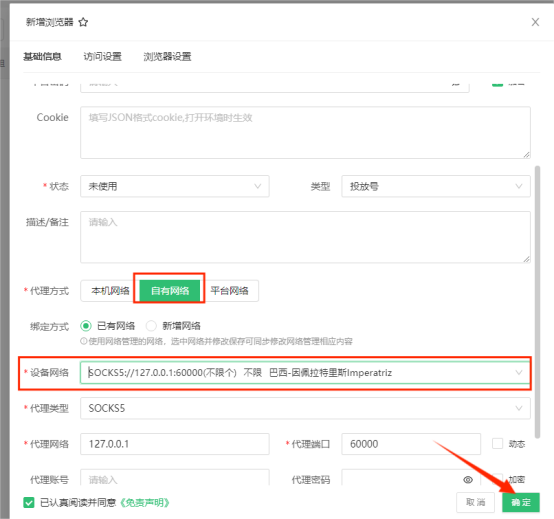
6. In the new browser, select "Owned Network" and select the created network in "Device Network", click Finish to complete the configuration
7. Click "Start" to open the environment

8. After completing the above steps, the proxy is successful.
USER GUIDE > Luna S5 Proxy> YTBrowser integrated with LunaS5
YTBrowser integrated with LunaS5
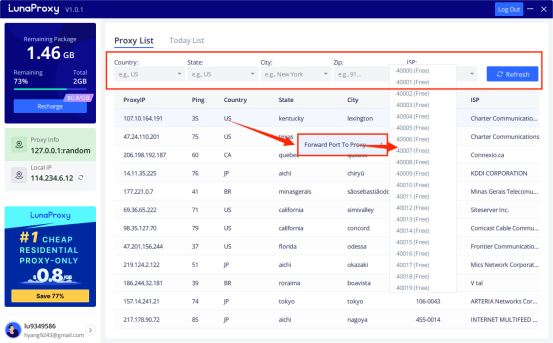
Add proxy settings
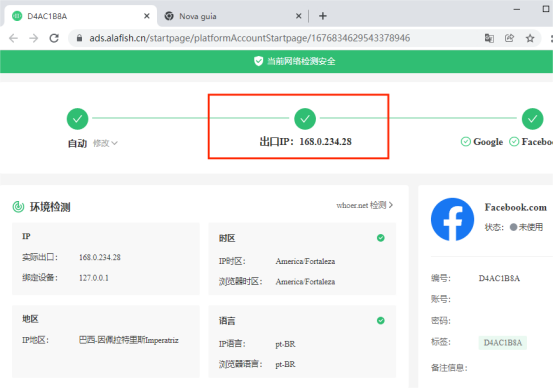
1.After selecting the country, continent, and city, click the "Refresh" button, then right-click to select the proxy IP and port
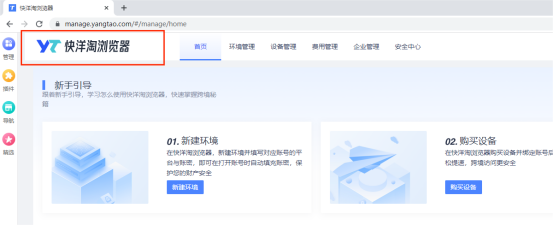
2. First, open the Yangtao browser and log in.
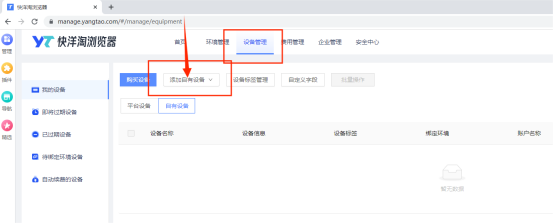
3. Select the "Device Management" page and click "Add Own Device"
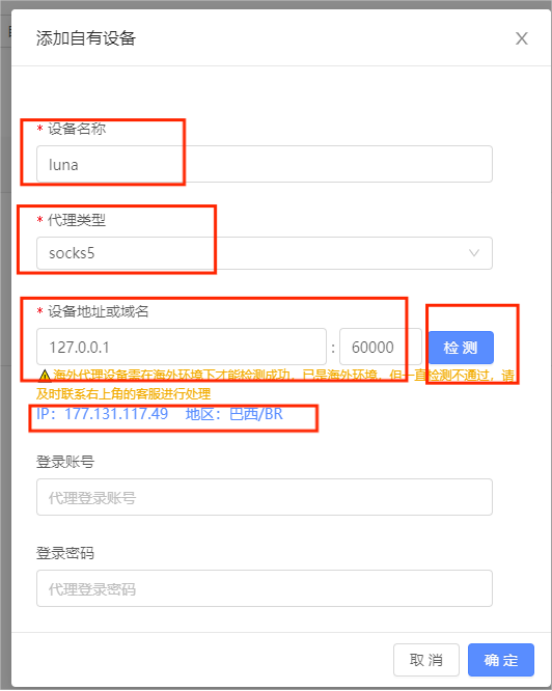
4. Set the device name "luna" and select the proxy type "socks5", set the IP: port, after completing the settings, click "Detect"
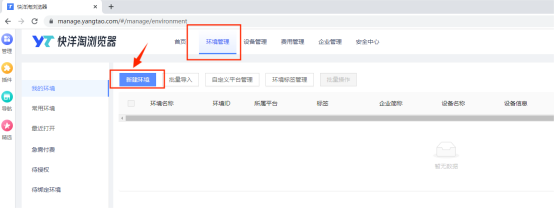
5. Select "Environment Management" and click "New Environment"
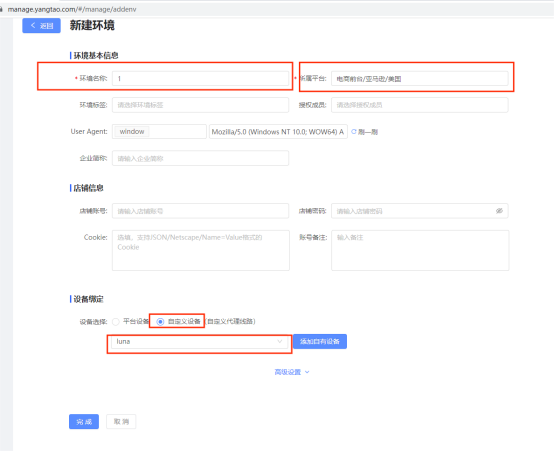
6. Enter "Environment Name" and "Platform", select "Custom Device" in "Device Binding" -> select the added device -> click "Finish"
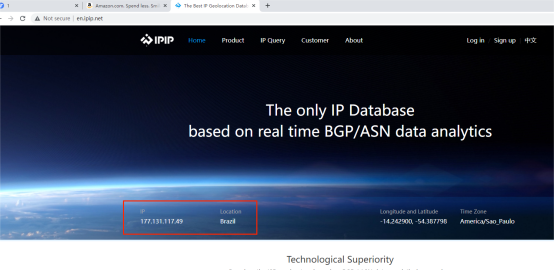
7. Click "Open" to open the environment

8. After completing the above steps, the proxy is successful.
USER GUIDE > Luna S5 Proxy> Multilogin integrated with LunaS5
Multilogin integrated with LunaS5
Add proxy settings
1.After selecting the country, continent, and city, click the "Refresh" button, then right-click to select the proxy IP and port
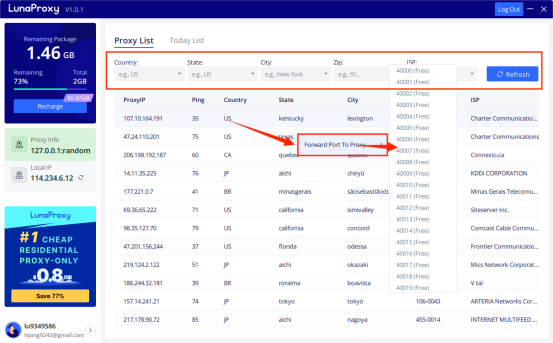
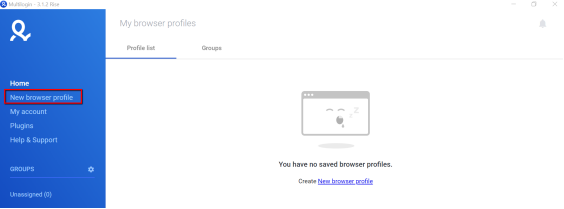
2. Open Multilogin and select the new browser profile.
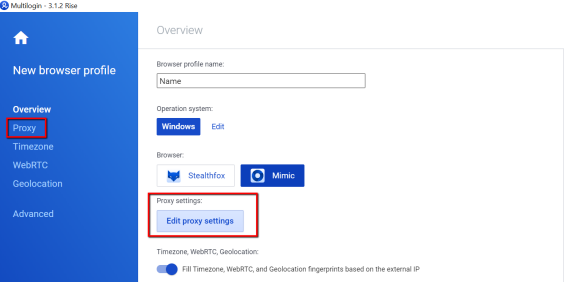
3. Click Edit Proxy Settings.
4. Select HTTP/socks5 Proxy from the drop-down menu.
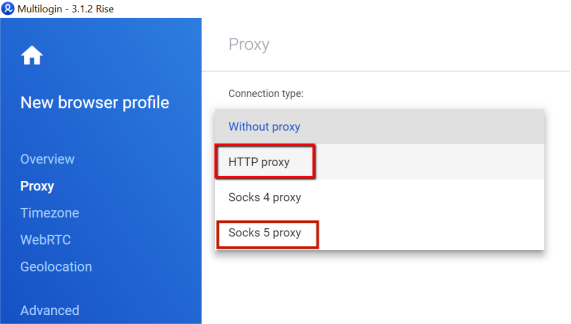
5. Enter the proxy details eg 127.0.0.1:40000
6. Then you can click "Check Proxy" to see if the setup is successful.
USER GUIDE > Luna S5 Proxy> YunLogin integrated with LunaS5
YunLogin integrated with LunaS5
Add proxy settings
1. After selecting the country, continent, and city, click the "Refresh" button, then right-click to select the proxy IP and port
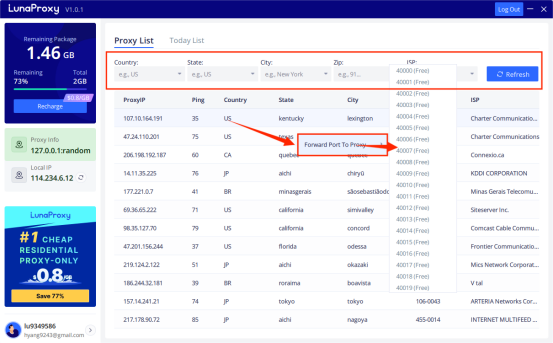
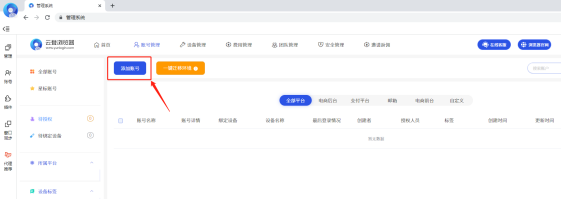
2. Log in to the YunLogin interface, click Account Management at the top

3. Click Add account
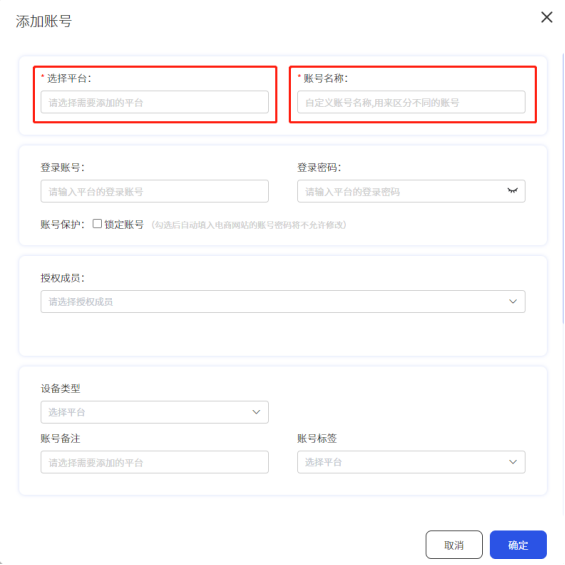
4. Select the corresponding platform and enter the account name
5. Proxy type select proxy device, and then select the platform to add
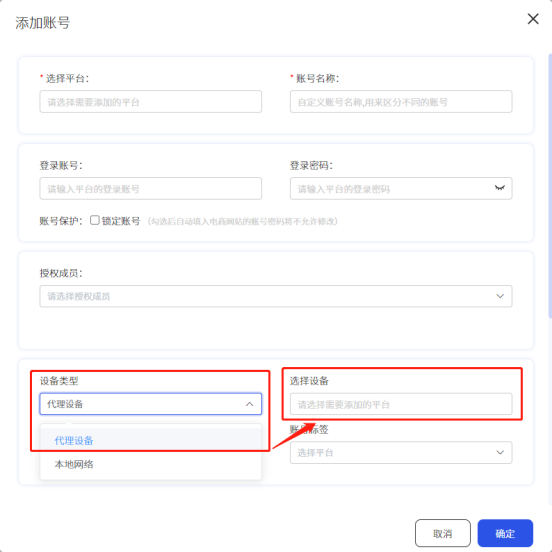
6. Device platform selection: your own device, then click Add
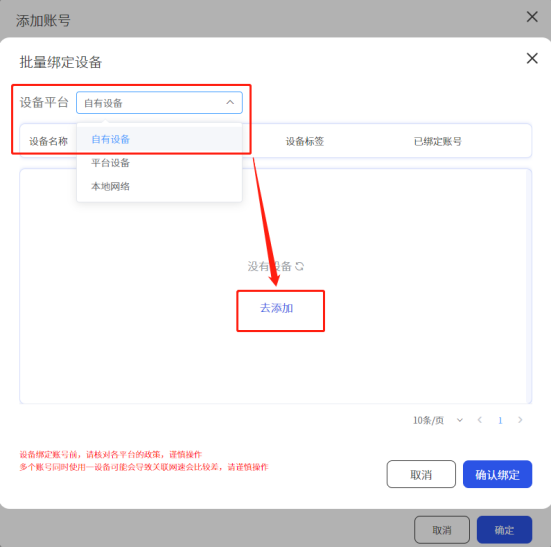
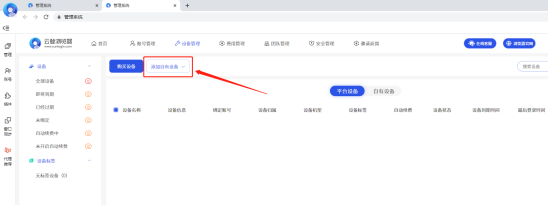
7. Click to add your own device
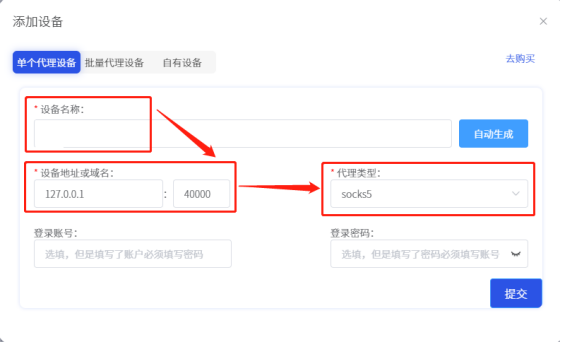
8. Add device Fill in the device name, enter the proxy IP, and select the proxy type as socks5
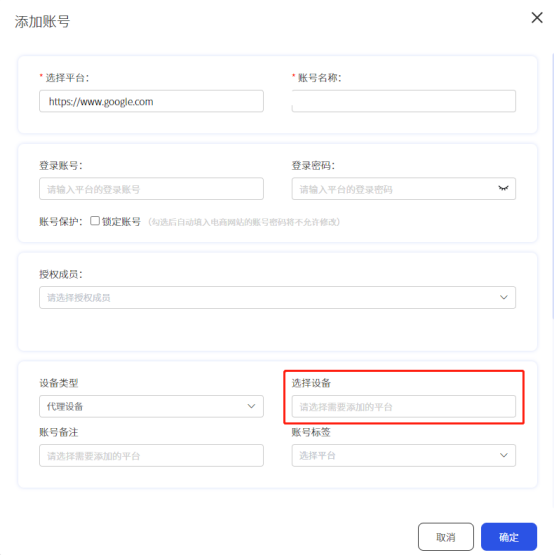
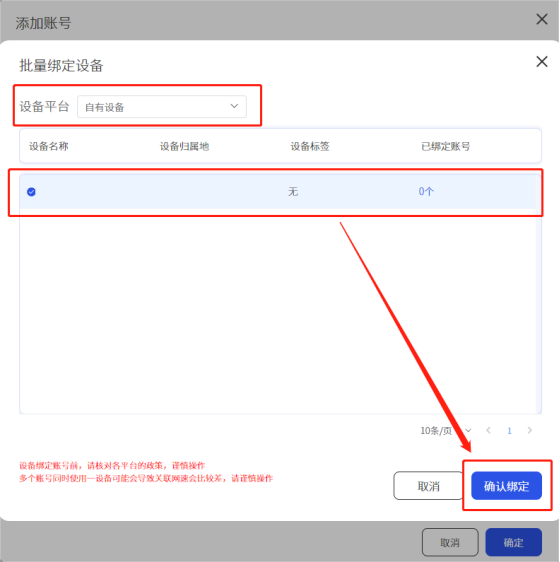
9. Then go back to the add account page, click Select Device, then select your own device, click the agent you just set, and click Confirm Binding
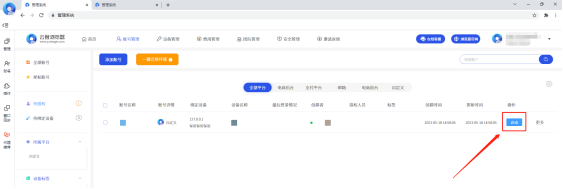
10. After the setup is complete, click the Start button
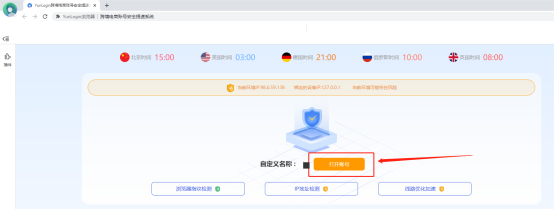
11. Click to open account
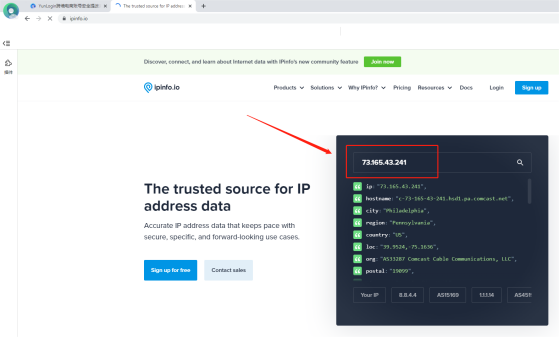
12. Query the browser's IP in ipinfo, which is also the IP address after the proxy!
USER GUIDE > Luna S5 Proxy> MoreLogin integrated with LunaS5
MoreLogin integrated with LunaS5
Add proxy settings
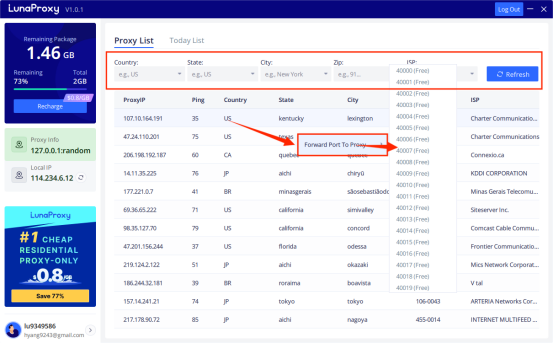
1.After selecting the country, continent, and city, click the "Refresh" button, then right-click to select the proxy IP and port
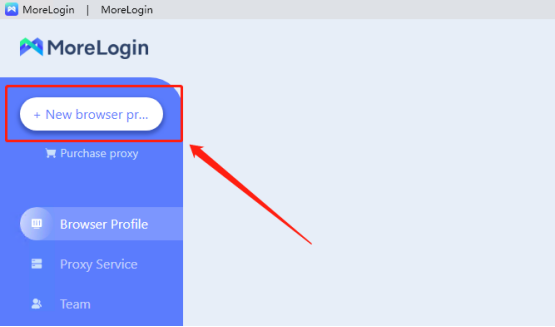
2. Now let us go to the MoreLogin application and click on the "New Profile" button to create a new profile.
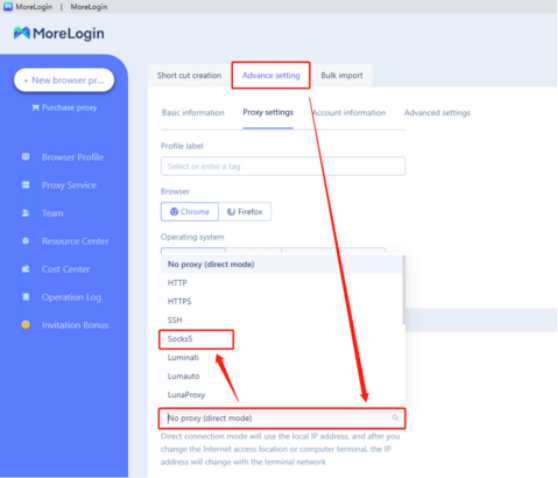
3. Click "Advanced Settings". Proxy type select "Socks5".
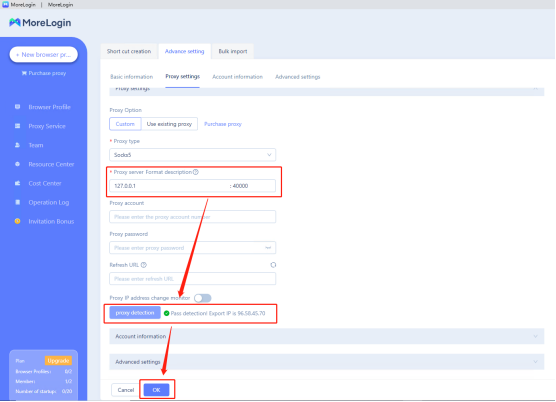
4. Enter the proxy host, proxy port, proxy account, proxy password, etc., and then click "Test". When Test Passed is displayed, click OK.
5. Click "Start"
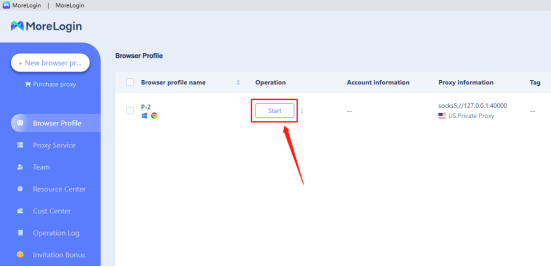
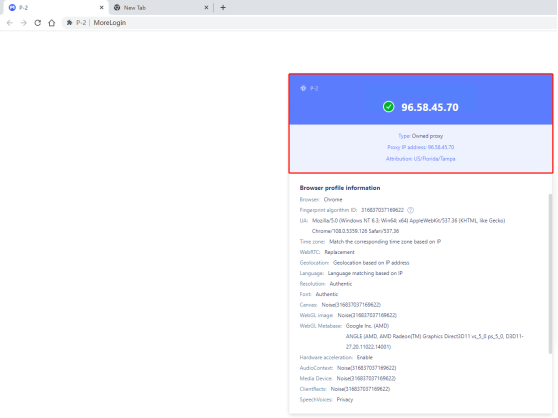
6. Your obtained IP address will be displayed on the launched browser.
USER GUIDE > Luna S5 Proxy> Incogniton integrated with LunaS5
Incogniton integrated with LunaS5
Add proxy settings
1.After selecting the country, continent, and city, click the "Refresh" button, then right-click to select the proxy IP and port
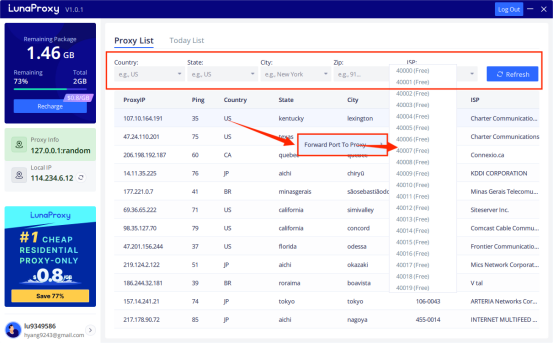
2. Open the Incogniton browser and click New Profile

3. Go to Proxy tab and select Socks5 as connection type
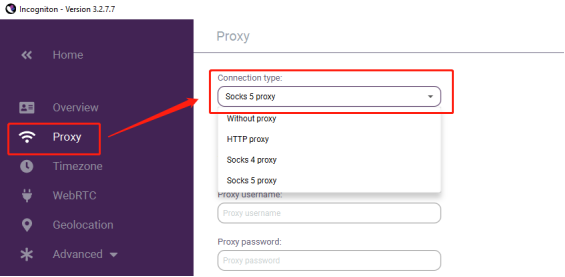
4. Enter your Luna s5 proxy credentials (IP and port) and click Check Proxy
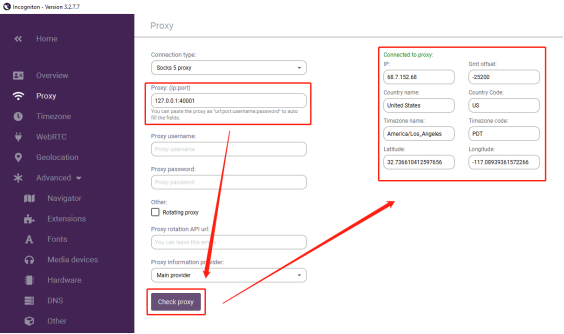
5. Click Create Profile on the right side of the screen
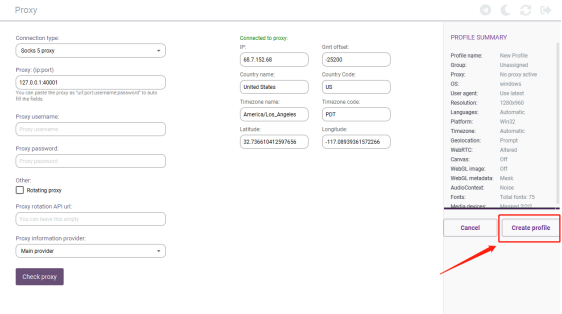
6. Enable your proxy profile, click start, a new browser window will open and immediately connect to the proxy

USER GUIDE > Luna S5 Proxy> XLogin integrated with LunaS5
XLogin integrated with LunaS5
Add proxy settings
1. After selecting the country, continent, and city, click the "Refresh" button, then right-click to select the proxy IP and port
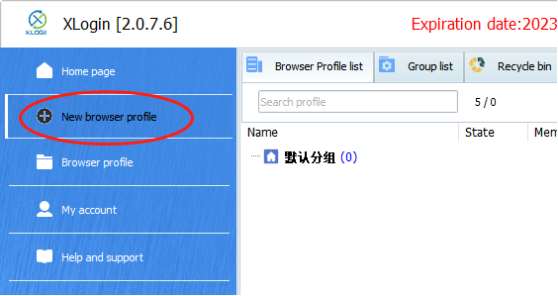
2. Open the XLogin browser and click New browser profile
3. Click Set Proxy Server
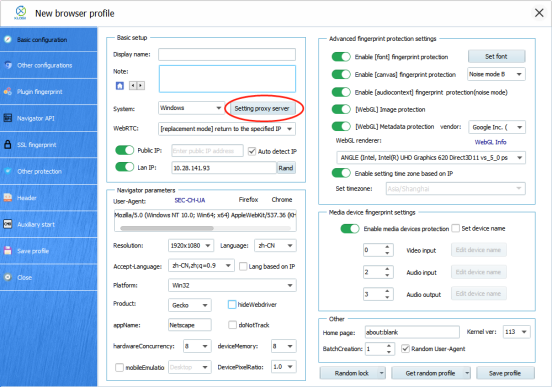
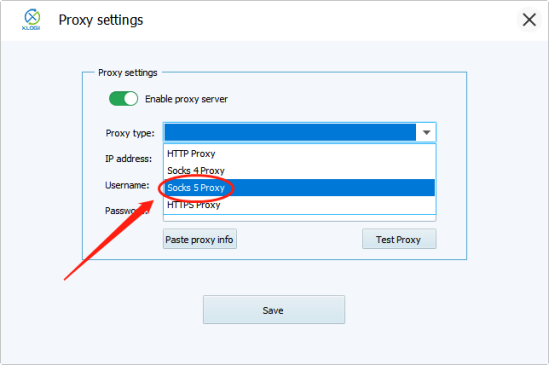
4. Turn on the proxy server, select Socks 5 Proxy as the proxy mode
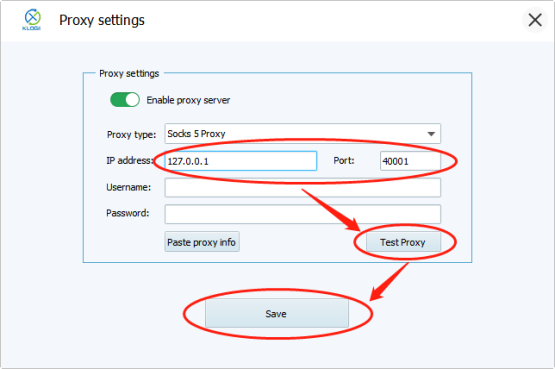
5. Enter the proxy credentials (IP and port) to test the proxy
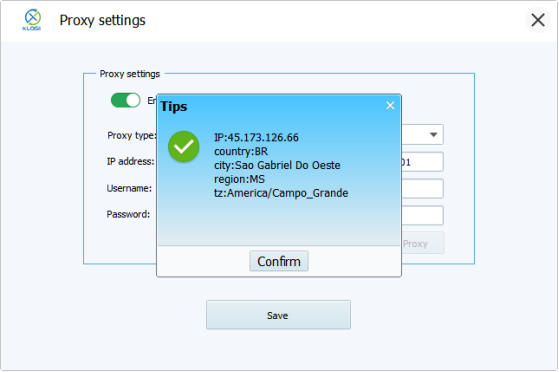
6. After detecting the proxy IP successfully, click OK
7. Then we click Save Configuration File
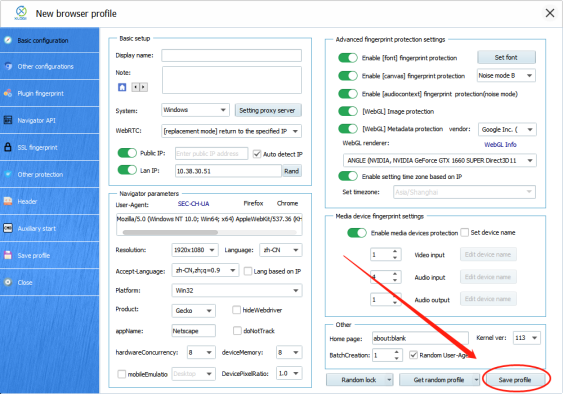
USER GUIDE > Luna S5 Proxy> ClonBrowser integrated with LunaS5
ClonBrowser integrated with LunaS5
Add proxy settings
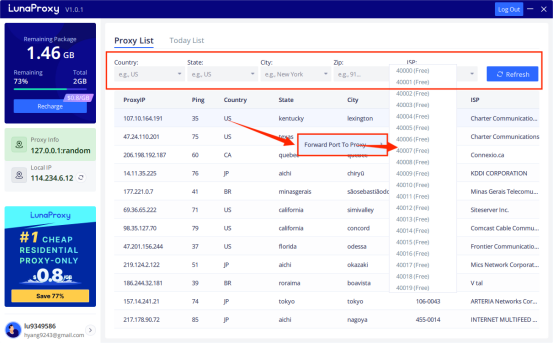
1.After selecting the country, continent, and city, click the "Refresh" button, then right-click to select the proxy IP and port
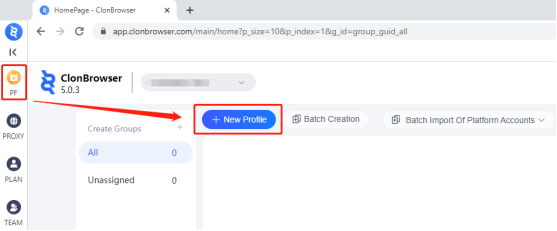
2. Open ClonBrowser, click PF > New Profile
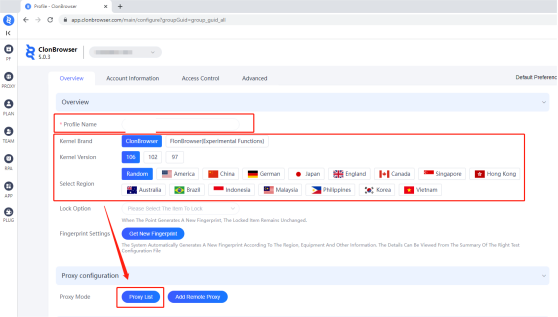
3. Then enter the name, select the country and region, and click Proxy List
4. Then click Add Remote Proxy and select the Socks protocol
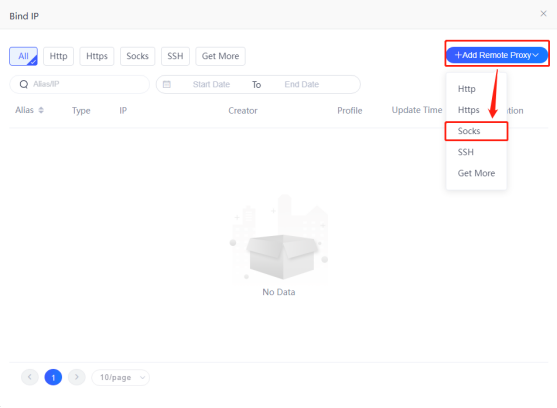
5. Then paste the proxy IP and port in, click the connection test, and click save after completion
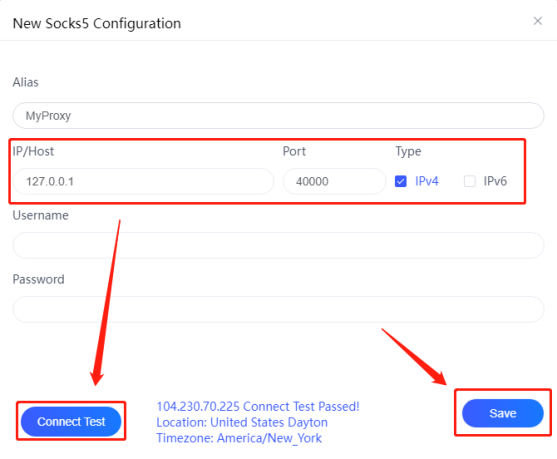
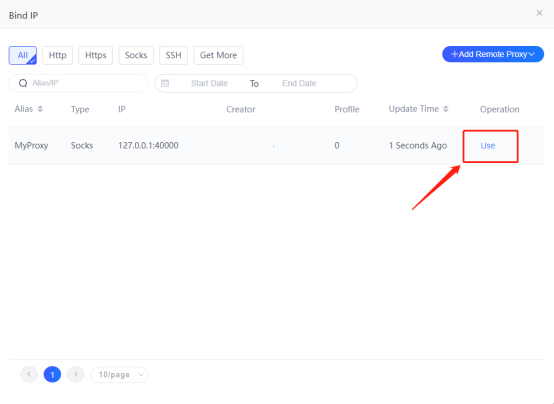
6. Click to use
7. Click Create Profile
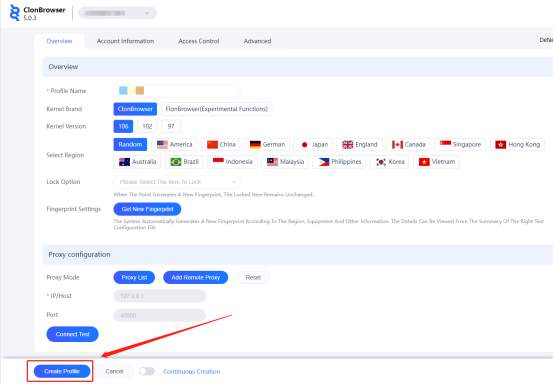
8. Save all settings and finally click "Start"

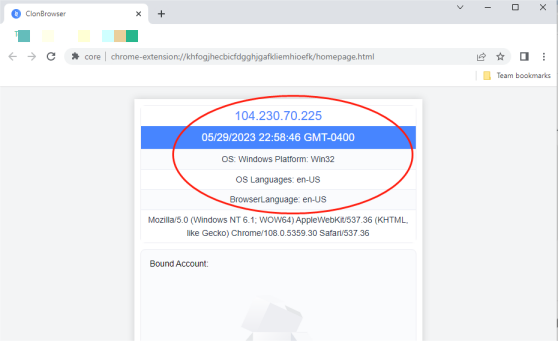
9. Now the proxy IP is set successfully
USER GUIDE > Luna S5 Proxy> Adspower integrated with LunaS5
Adspower integrated with LunaS5
Add proxy settings
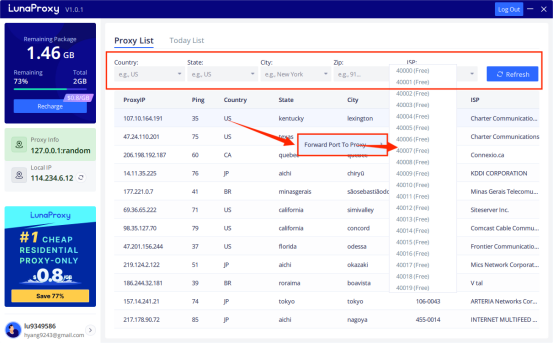
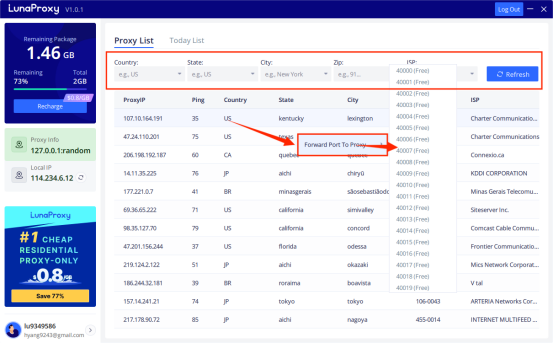
1.Open the Luna S5 proxy client and log in, fill in the "Country", "City", "Zip Code" fields and other information as required.
2. Click "Refresh"
3. Select a proxy from the list and right-click. Select "Forward Port To Proxy" and select a port from the drop-down list, such as 40000.
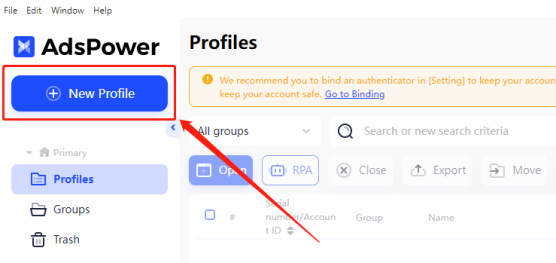
4. Open Adspower browser and log in
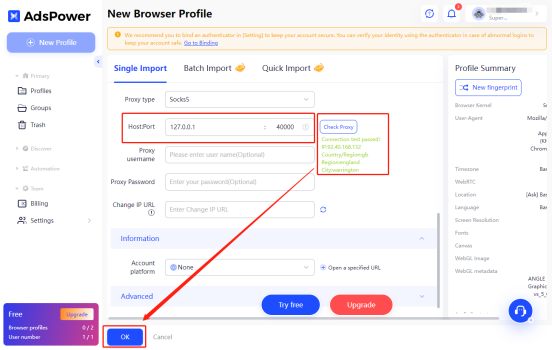
5. Click the "New Profile" button to create a new profile
6. Select the proxy type
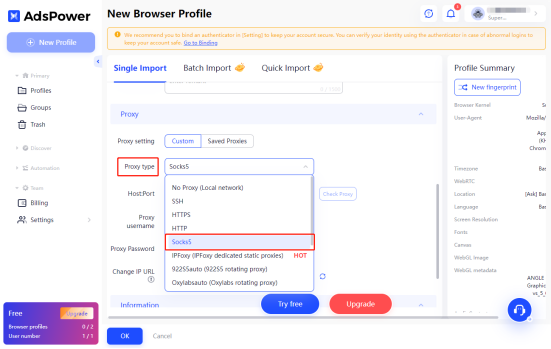
7. Fill in the proxy information and click the "Check Proxy" button to check the proxy information; all done!
8. Click the "Open" button to launch the configuration file.
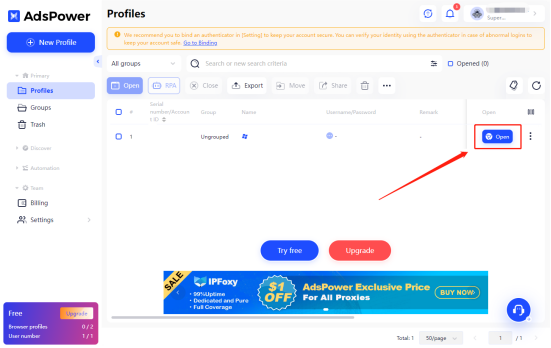
9. Now you can start working!
USER GUIDE > Luna S5 Proxy> Vmmask integrated with LunaS5
Vmmask integrated with LunaS5
Add proxy settings
1.After selecting the country, continent, and city, click the "Refresh" button, then right-click to select the proxy IP and port
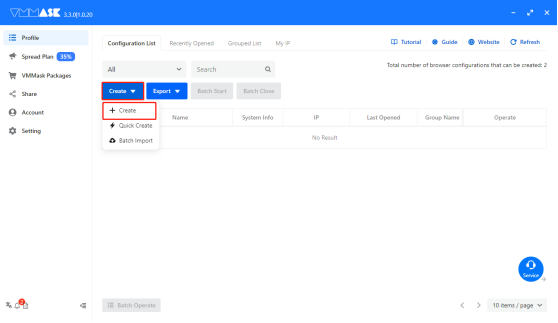
2. Open Vmmask, and click the Create button
3. Enter the name, then click Add proxy IP, proxy type, select Socks5 proxy
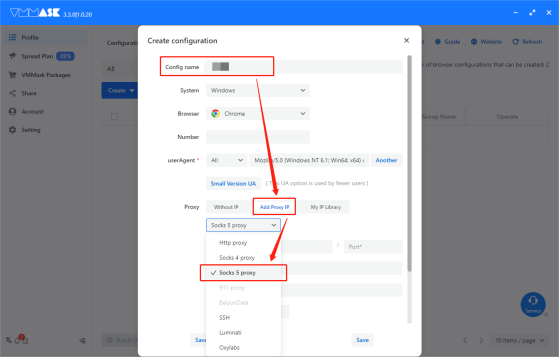
4. Fill in the proxy host and proxy port, then click to check the proxy, and finally click Save
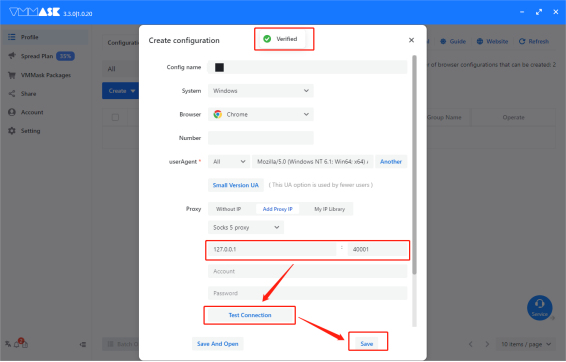
5. After completing the above steps, the proxy is successful
USER GUIDE > Luna S5 Proxy> Mulogin integrated with LunaS5
Mulogin integrated with LunaS5
Add proxy settings1. After selecting the country, continent, and city, click the "Refresh" button, then right-click to select the proxy IP and port
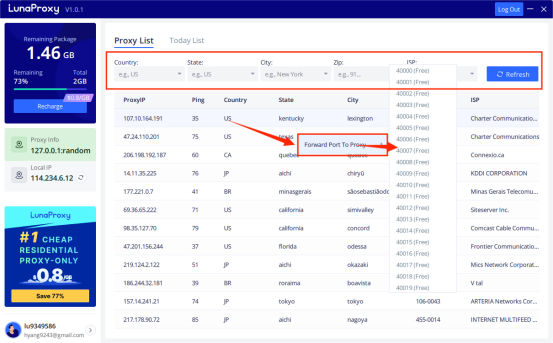
2. Log in to the mulogin interface, click "Add Browser" --> find "Basic Settings" --> select "socks5", enter the "Local Proxy" displayed in luna S5, and the port is 40000 previously selected.
Then click "Check Network", if it shows green, the proxy is successful!
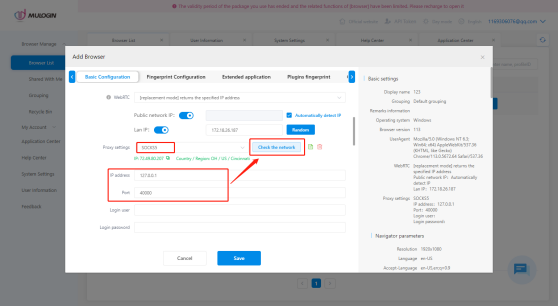
3. Then click "Save" to complete the proxy settings
USER GUIDE > Luna S5 Proxy> MaskFog integrated with LunaS5
MaskFog integrated with LunaS5
Add proxy settings
1.After selecting the country, continent, and city, click the "Refresh" button, then right-click to select the proxy IP and port
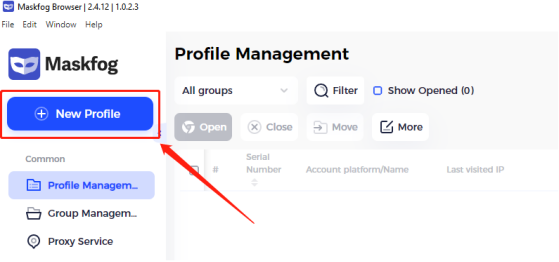
2. Log in to MASKFOG, click "New Browser"
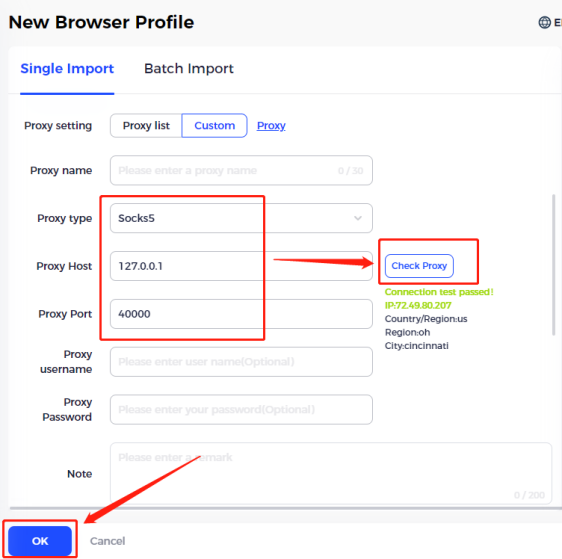
3. In the new browser environment
① Select "Device Configuration"
② Select "custom device" as the proxy method
③ Fill in the "device name" arbitrarily
④ Select "Socks5" device type
⑤ Fill in the "IP+Port" obtained from Luna S5, enter
⑥ Finally, click to view the device, and it will display "Link Test Successful", which means that the proxy is successful and can be run!
USER GUIDE > Luna S5 Proxy> Dolphin{anty} integrated with LunaS5
Dolphin{anty} integrated with LunaS5
Hello! Here we will tell you how to integrate and easily manage luna S5 proxy in anti-spy browser Dolphin{anty}. Let's go step by step.
Step 1: Proxy Preparation
Before starting the integration, we need to choose a plan in lunaproxy.com and prepare a proxy.
1.Sign up for an account (if you don't already have one)
2. Download the client to find and manage proxy.

3. Install the client.
4. Launch the client and follow the instructions.
Step 2: Create a browser profile with a proxy
1.Open the Dolphin{anty} browser client.
2. Click the Create Profile button.
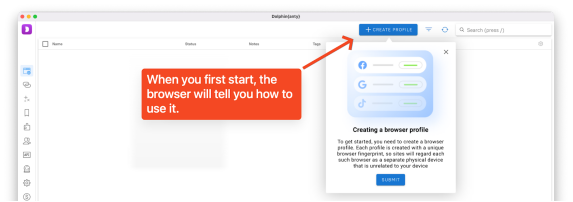
3. In the window that appears, configure the desired browser profile settings as required: name, operating system, purpose of use, and status and labels.
4. Go to your luna S5 personal account and copy the desired proxy.
5. In the Dolphin{anty} configuration file creation window, select New Proxy → Connection Type (http, socks) → insert proxy data in the format of hostname: port: username: password.
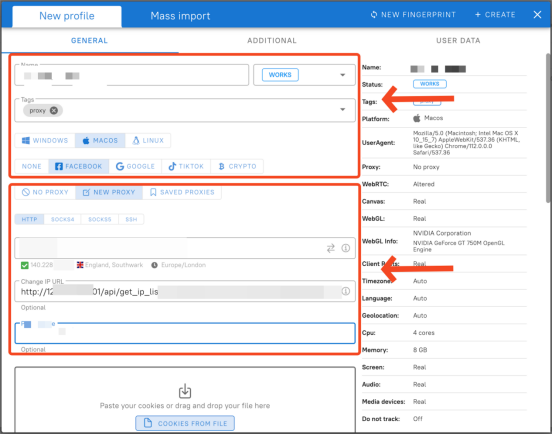
6. If you are using a rotating proxy, you can paste the URL link and manually change the IP after clicking.
7. Give the proxy a name so that it can be found quickly in the future.
8. Proxy is set. Click the Create button in the upper right corner to complete the creation of the configuration file.
9. The configuration file is ready.

Your proxy has been added and is ready to go. good luck with your work!
USER GUIDE > Luna S5 Proxy> Hubstudio integrated with LunaS5
Hubstudio integrated with LunaS5
Add proxy settings
1.After selecting the country, continent, and city, click the "Refresh" button, then right-click to select the proxy IP and port
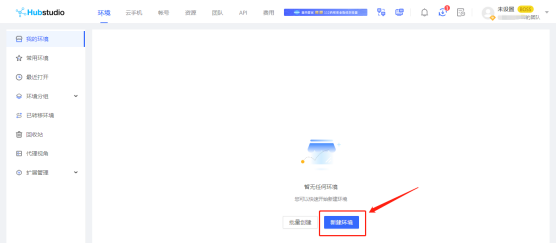
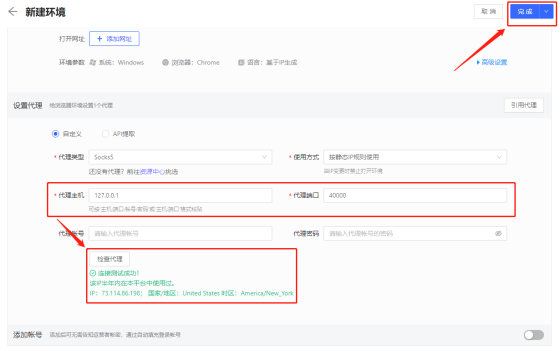
2. Open the Hubstudio browser, log in and click New Environment
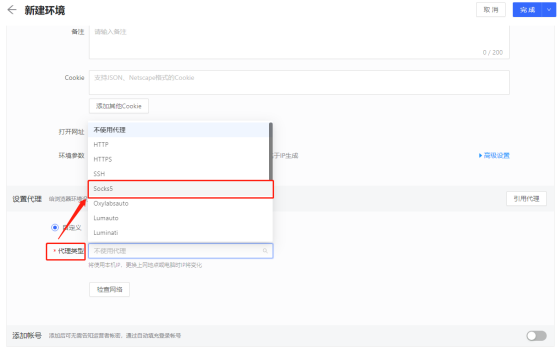
3. Proxy type select Socks5
4. Paste the proxy IP and port you just copied, and click "Check Proxy". When the check is complete, click "Finish"
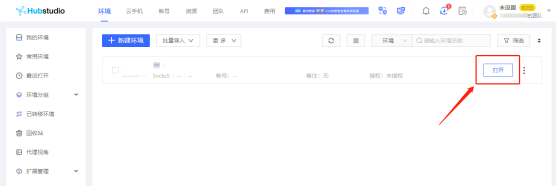
5. After the final save is completed, click Open to start
USER GUIDE > Luna S5 Proxy> Lalicat integrated with LunaS5
Lalicat integrated with LunaS5
Add proxy settings
1.After selecting the country, continent, and city, click the "Refresh" button, then right-click to select the proxy IP and port
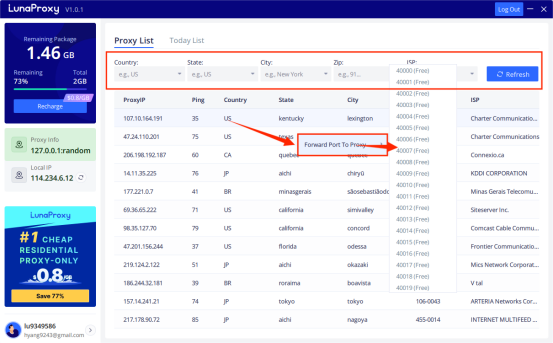
2. First open Lalicat, click Add Browser Profile
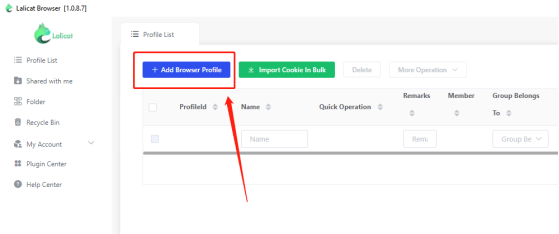
3. Enter the basic configuration, enter the name
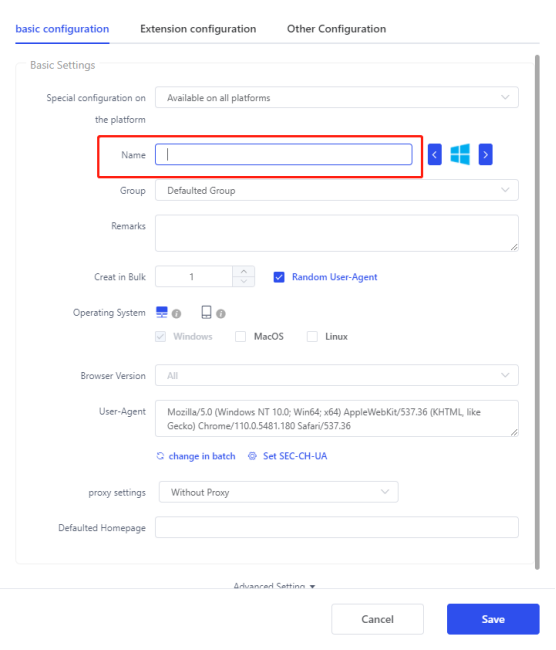
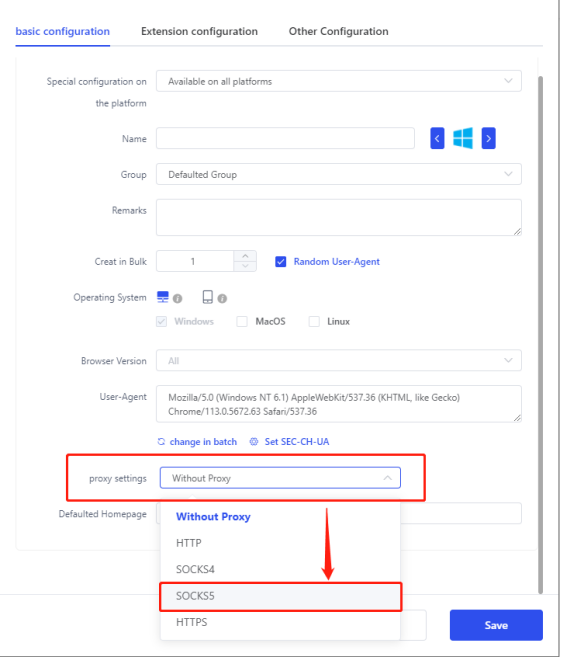
4. Click Proxy Settings and select SOCKS5
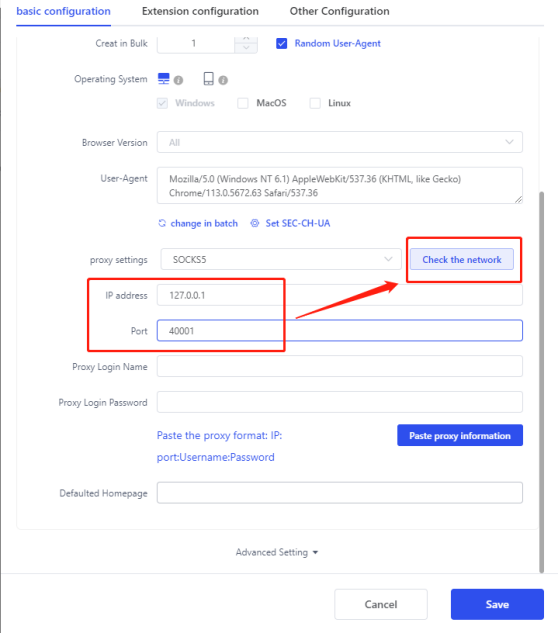
5. Enter the obtained IP address and port
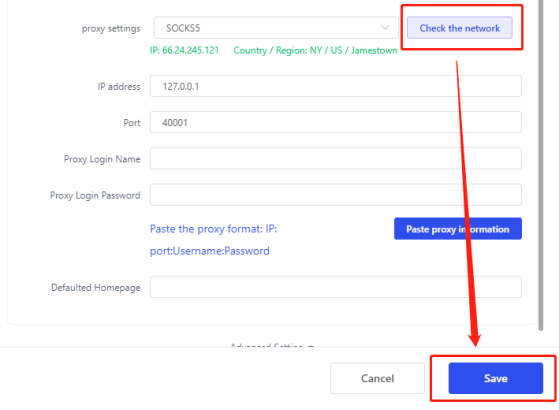
6. Click Check Network
7. Click Save
USER GUIDE > Luna S5 Proxy> MBbrowser integrated with LunaS5
MBbrowser integrated with LunaS5
Add proxy settings
1. After selecting the country, continent, and city, click the "Refresh" button, then right-click to select the proxy IP and port
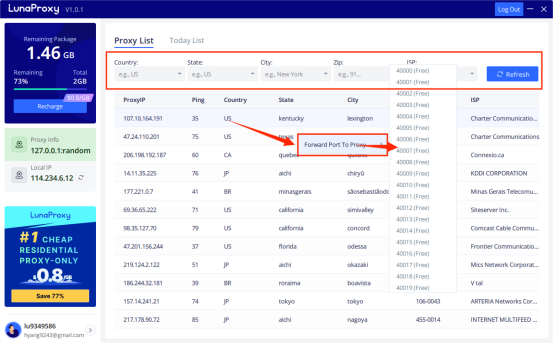
2. First, open the MBBrowser software.
3. Click "Create New Session"
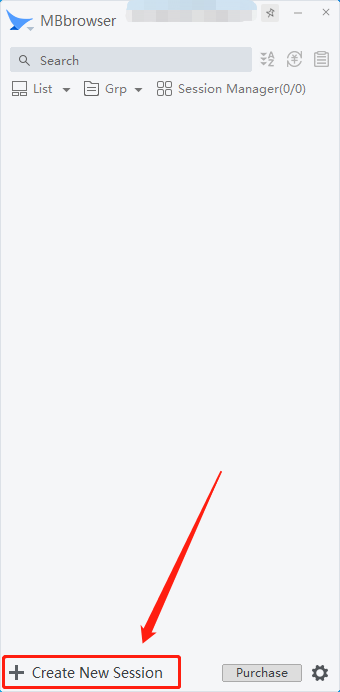
4. Click Proxy and select SOCKS5.
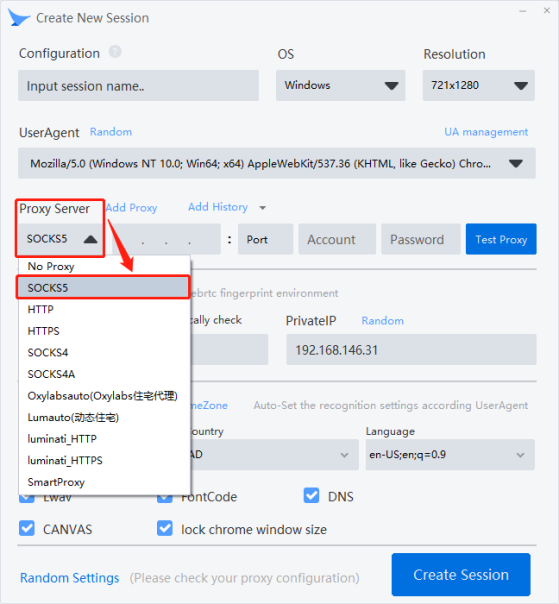
Fill in the proxy address and proxy port
6. Click the Test Proxy button
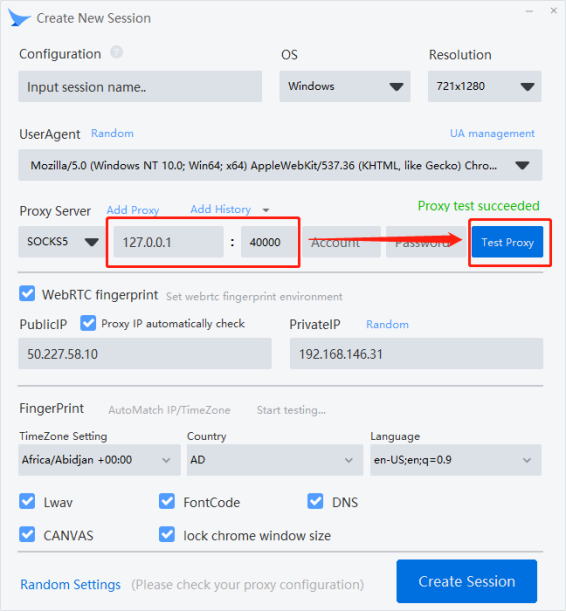
7. Click "Create Environment". Complete the creation
USER GUIDE > Luna S5 Proxy> BitBrowser integrated with LunaS5
BitBrowser integrated with LunaS5
Add proxy settings
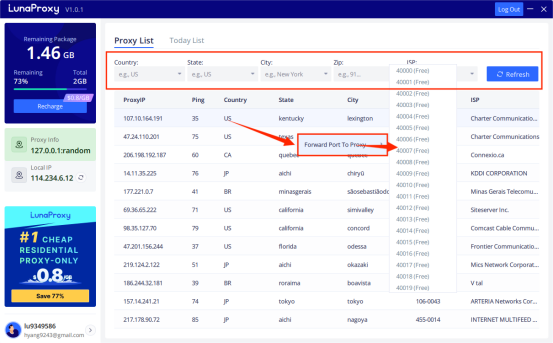
1. After selecting the country, continent, and city, click the "Refresh" button, then right-click to select the proxy IP and port
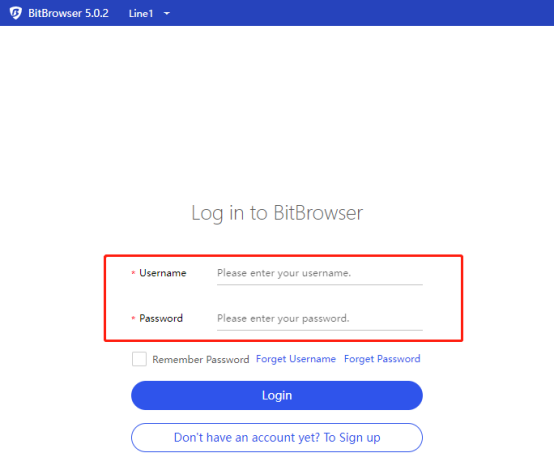
2. First, open BitBrowser and log in.
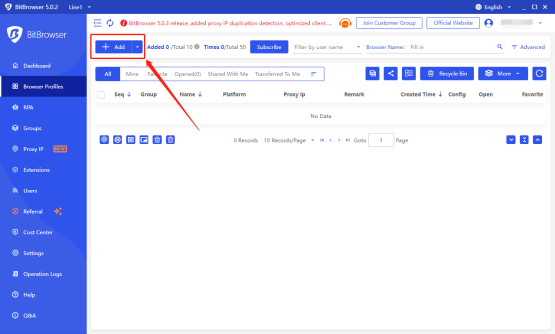
3. Enter the "Browser Window" sidebar tab in the background, and click "Create Window".
4. Select the proxy type
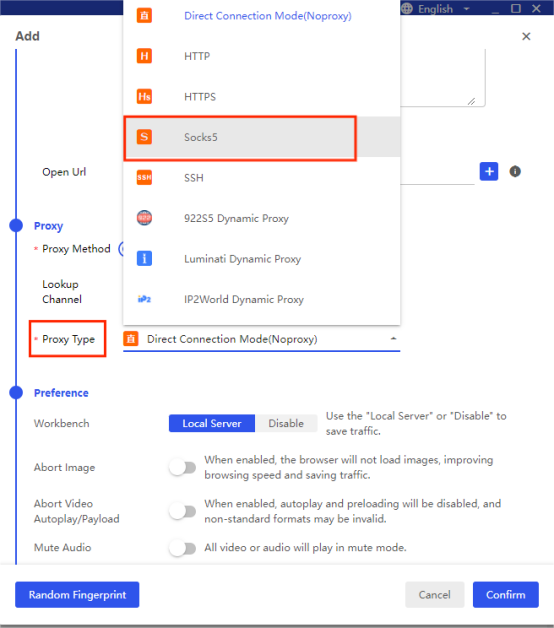
5. Fill in the proxy information and click the "Check Proxy" button to check the proxy information; all done
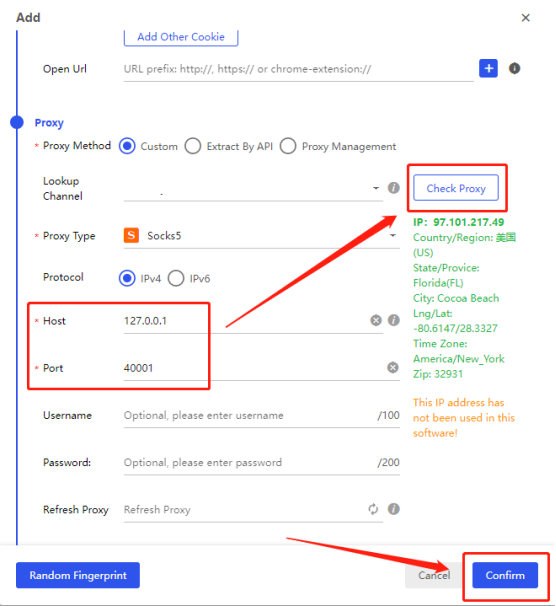
6. After completing the above steps, the proxy is successful.
USER GUIDE > Proxy Manager> Proxy Manager usage tutorial
Proxy Manager usage tutorial
1. What is a proxy manager?
Proxy Manager is lunaproxy's new integrated proxy management function. Through simple visual pages, flexible custom operations, rich interface examples, and various forms, it helps you create personalized configuration files and one-stop management of proxy needs to meet your needs. Your proxy business uses
2. How to use the proxy manager?
(1).Log in to your account
After logging in, enter the personal center and you can see the new function [Proxy Manager]

(2). Apply for a free server
Before using the proxy manager, you need to add the IP whitelist first. If it has been added, you can directly enter the proxy manager interface and click Apply for Free
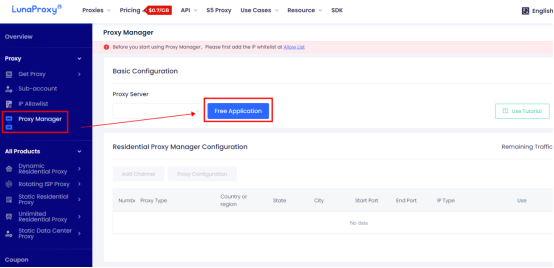
(3).Proxy configuration
After the application is successful, click Add Channel to enter the proxy configuration interface.
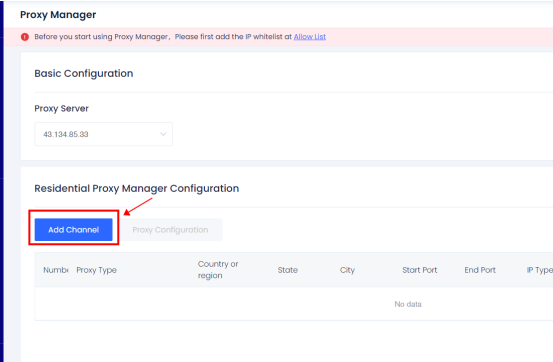
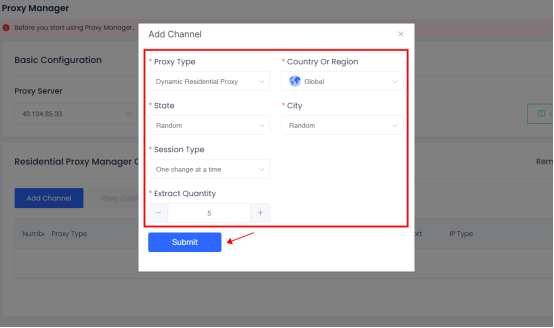
①Proxy type: Only dynamic residential proxy are allowed to use the proxy manager function
②Supports self-selecting different countries, states, and cities around the world
③The IP type supports [One-time change] or [Aging IP]. Select the aging IP to customize the proxy aging.
④Customize the number of extractions. A single configuration supports extraction of up to 5,000 IPs.
After completing the proxy configuration, click [Submit] to generate a configuration item record in the list area. You can use this configuration item to extract the proxy IP that meets the conditions you set with one click.
(4). Extract proxy IP
After completing the proxy configuration, click the [Extract] button to quickly obtain the proxy IP that meets the current configuration conditions. You can copy or directly open the link to extract the proxy IP by accessing this link.
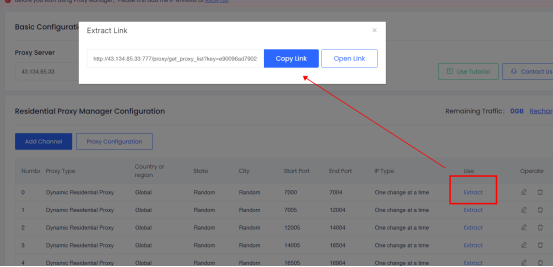
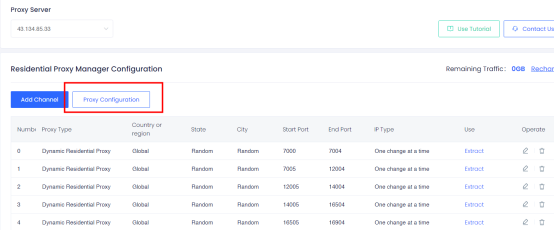
(5). reate a personalized proxy profile
Click Proxy Configuration to view proxy configuration information
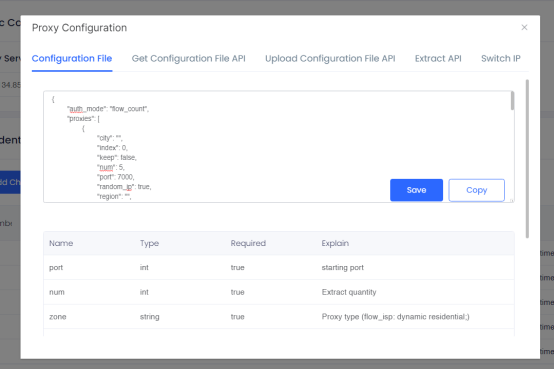
① Click on the configuration file to view the parameter information and parameter comments of the proxy configuration. It supports custom modification of the configuration information. You need to click Save after modification.
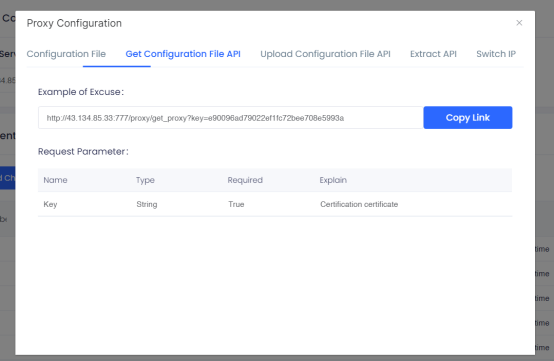
② Click Get Configuration File API to view the interface examples and request parameters for obtaining configuration information. Click [Copy Link] and access this interface to obtain configuration information.
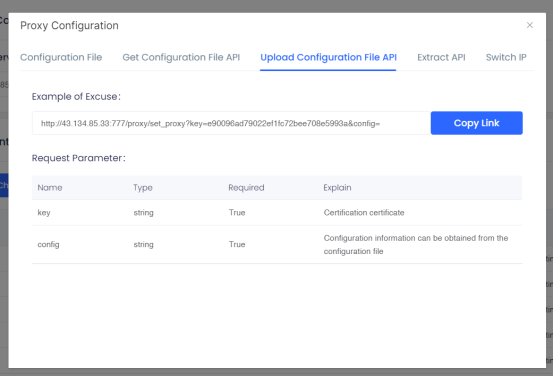
③ Click the Upload Configuration File API to view the interface example and request parameters for uploading configuration item information. Click [Copy Link] and call this interface to update the configuration information to the proxy server.
Note: Please pass in the config parameters according to the format in [Configuration File]
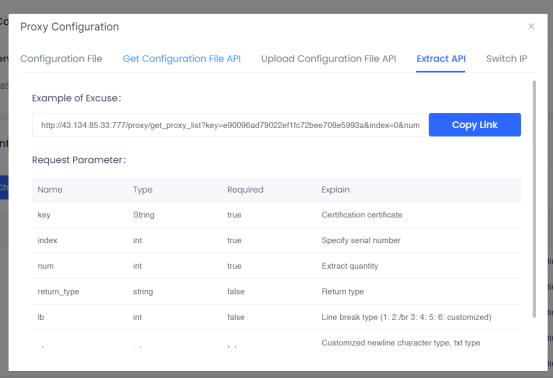
④Click on the extraction API to view the extraction link and parameter comments
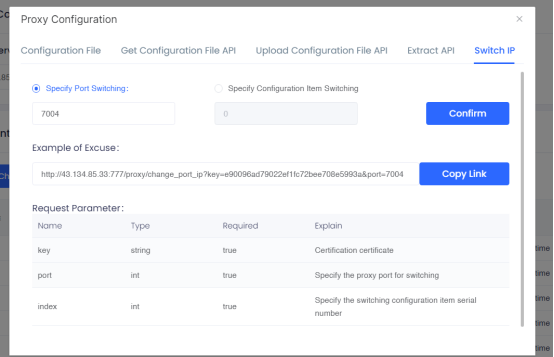
⑤ Click Switch IP to switch IP within the IP validity period. Two switching methods are provided here:
Specified port switching: If you need to switch the IP of a specific configured proxy port, select [Specified port switching] and enter the port number, and click [Confirm switching] to switch successfully.
Specified configuration item switching: If you need to switch all port proxy IPs under a specific configuration item, select [Specify configuration item switching] and enter the configuration item serial number. Click [Confirm Switching] to switch successfully.
At the same time, you can get these two The interface link and parameter explanation of the IP switching method can be extracted and used to realize the need to switch IP within the proxy IP time limit.
USER GUIDE > Basic Knowledge> Whitelist and Blacklist Guide
Whitelist and Blacklist Guide
The safety of your account can be improved by setting Whitelist and Blacklist in Account Settings. These settings will apply to rotating residential proxies and rotating ISP proxies.
How to use it?
Check the IPs of all your devices and add proper IP subnet in the list. If you’ve set Whitelist, only IPs which are in the range of Whitelist can consume the traffic in your account. IPs which are not in Whitelist can’t consume your traffic. If you’ve set Blacklist, IPs which are not in the range of Blacklist can consume the traffic in your account.
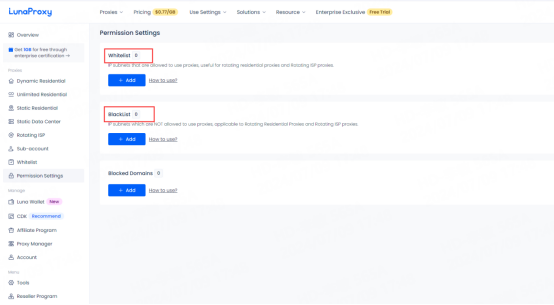
IP subnet Calculation:
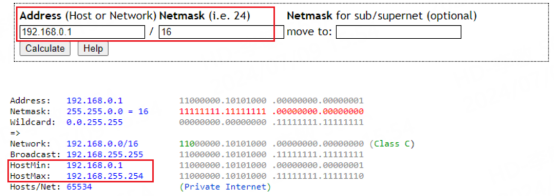
1.If the Netmask is 16, Class A of the IP addresses will be fixed. There’ll be 65534 IPs.
Example: 192.168.0.1/16
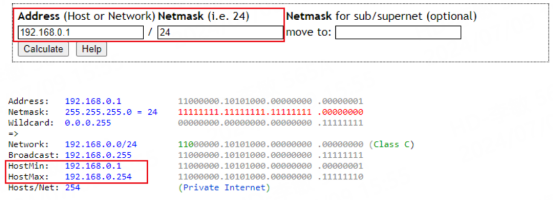
2.If the Netmask is 24, Class A and B of the IP addresses will be fixed. There’ll be 254 IPs.
Example: 192.168.0.1/24
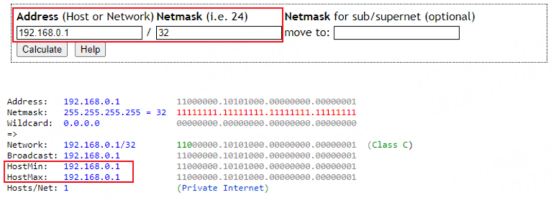
3.If the Netmask is 32, Class A, B and C of the IP address will be fixed. There’ll be only 1 IP.
Example: 192.168.0.1/32
You can search for “IP subnet calculator” online to check how many IPs will be in the list when certain Mask bits are set.
USER GUIDE > Basic Knowledge> Static residential proxy extraction
Static residential proxy extraction
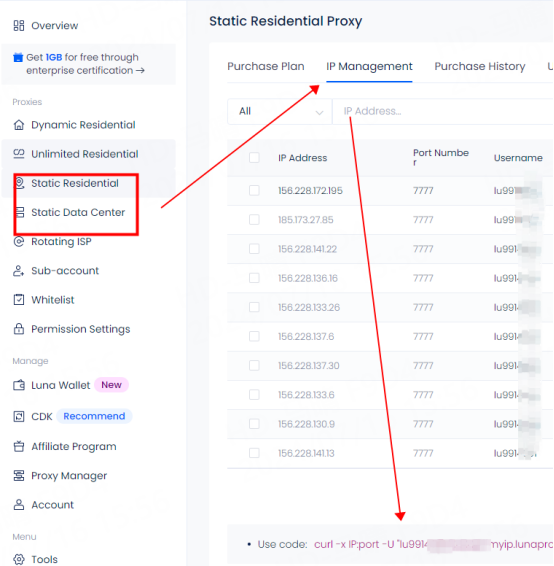
Get IP
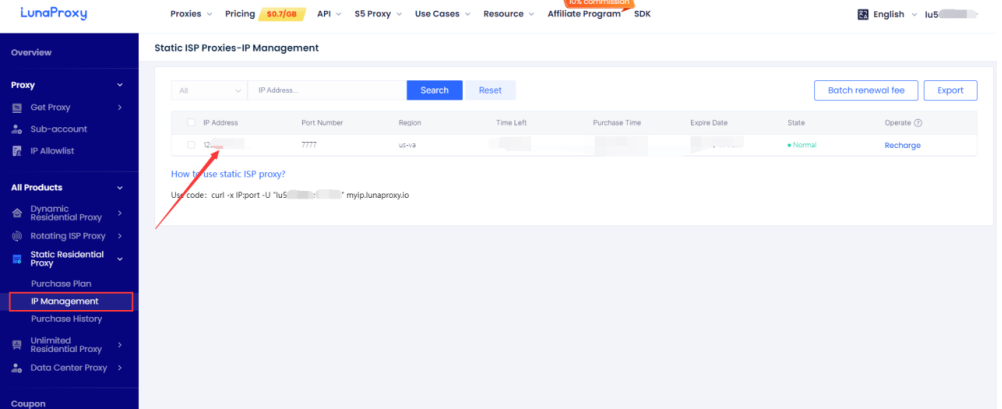
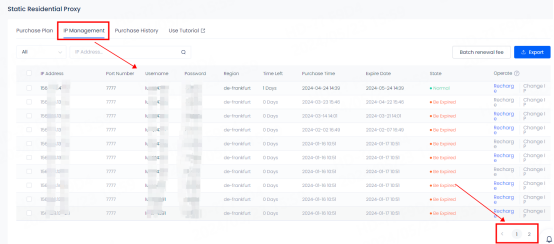
1. Enter the personal dashboard and click Static Residential Proxy
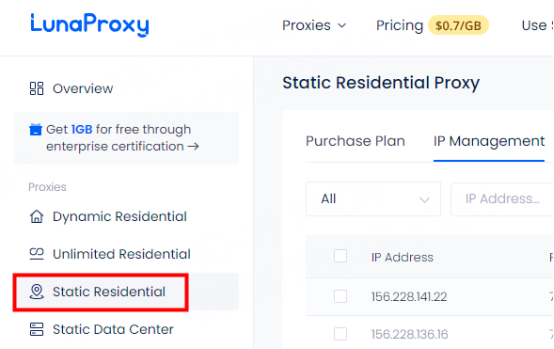
2. You can see all the purchased IP information in the IP management interface
Tip: 10 IPs are displayed on one page by default. Click the lower right corner to select the number of pages to see more IPs
Usage tutorial
After obtaining the IP, please click the link to view the configuration tutorial: [User Guide]
USER GUIDE > Basic Knowledge> Rotating ISP Proxy-Account and Password Authentication
Rotating ISP Proxy-Account and Password Authentication
Tip: If you need to use a sub-account, please refer to the tutorial on adding sub-accounts: [Sub-account Adding Tutorial]
1. Enter the personal dashboard and click Rotating ISP Proxy
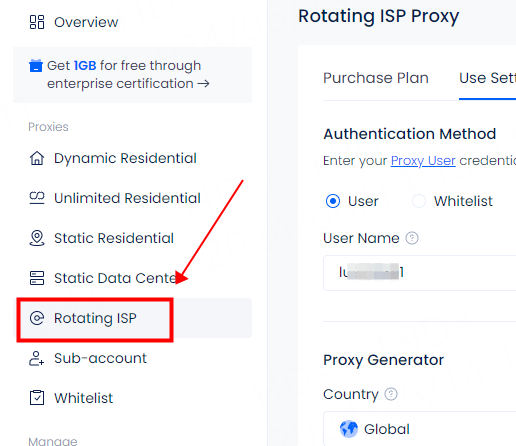
2. Click User and select the account you want to use. If you need to use a sub-account, click Add Account to enter the sub-account adding interface
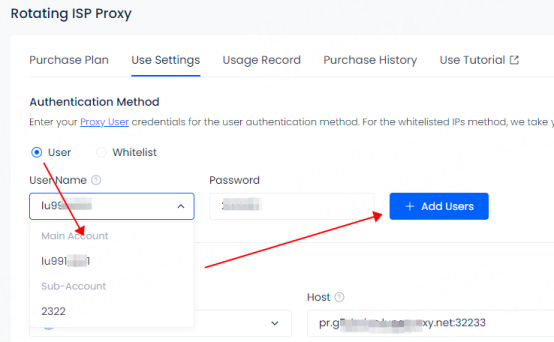
3. Select the country you want to use. Click Favorites for frequently used countries. You can view them in the favorites after favorites are added
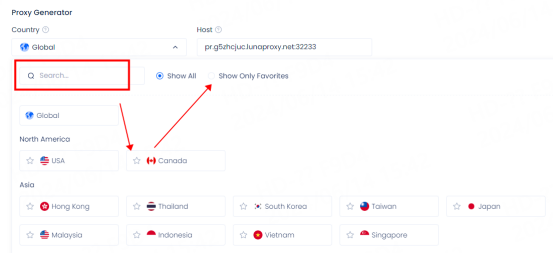
4. Select the session type
Session type:
① Sticky IP can be stable for up to 90 minutes. After selecting sticky IP, you can manually modify the duration according to your needs
② Rotating IP will obtain a new IP for each request
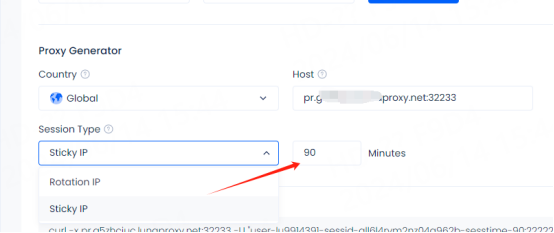
5. API link. After selecting, you can click Copy API link to test whether the proxy is available in cmd
For the test tutorial, please refer to: [Proxy cannot connect]
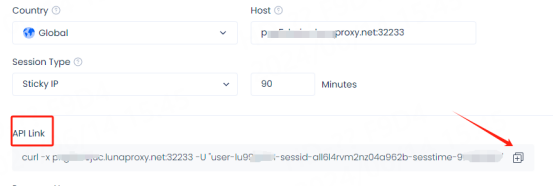
6. Select the number of program names and usage format you need. The configuration information will be automatically updated below. If a new IP is required, you need to reselect the number of program names
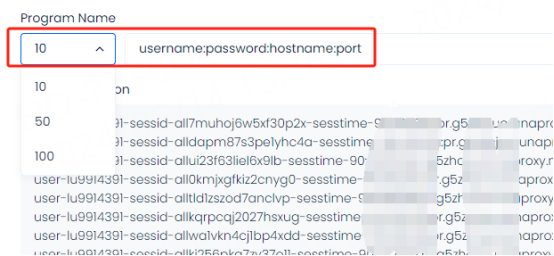
Tip: ① Select rotating IP. The configuration information is displayed the same, but different IPs are used in actual use
② Select sticky IP. The sessid in the configuration information is displayed differently. Different sessids represent different IP information. The sessid consists of English letters and numbers and can be changed manually
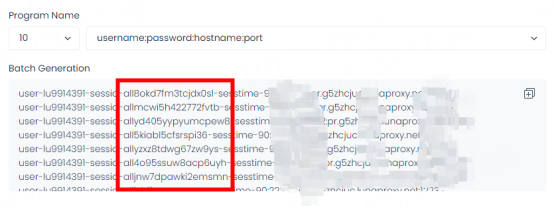
7. After the selection is completed, you can configure and use it. If you need to use it in the code or manually set state, city and other information, you can refer to the API examples and usage examples
①API Example

②Usage Example
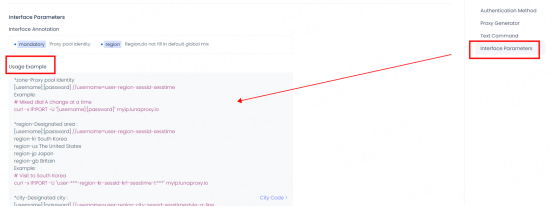
Username Explanation:
Username = user-region-st-city-sessid-sesstime
For example: Select sub-account 516, United States, California, Adelanto
user-516-region-us-st-california-city-adelanto-sessid-y0xd3h4iy3pydiu9-sesstime-1
user-516: Set sub-username
region-us: The country you selected. You can edit the country code to use IPs from different countries.
st-california: The state you selected. You can edit the state name to use IPs from a specific state.
city-adelanto: The city you selected. You can edit the city name to use IPs from a specific city.
sessid-y0xd3h4iy3pydiu9: The string used for fixed IPs. You can edit this string to manually change the IP. The string must contain 12 characters, including letters and numbers.
sesstime-1: The duration of the IP you set. You can edit the number to change the duration. The shortest is 1 minute and the longest is 90 minutes.
After the extraction is successful, please refer to the tutorial for configuration. For more tutorials, please click: [User Guide]
USER GUIDE > Basic Knowledge> Rotating ISP Proxy-API Extraction
Rotating ISP Proxy-API Extraction
Tip: To use the API link, you need to add an IP whitelist. For the tutorial, please refer to: [IP Whitelist Authentication]
1. Enter the personal center and click Rotating ISP Proxy-Whitelist
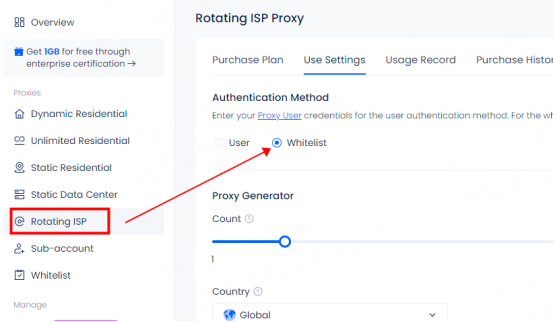
2. Select the number of extracted IPs, country, proxy protocol, session type and other information, and click Generate API Link
Session Type: ① Sticky IP can be stable for up to 90 minutes
② Rotating IP will obtain a new IP for each request
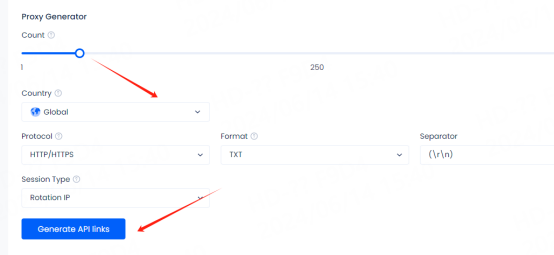
3. Click Open Link to view the IP list, copy the IP port or API link to configure and use
Tip: The IP displayed in the IP list is not the actual IP used, so the display is the same. When actually used, different ports and IPs are different
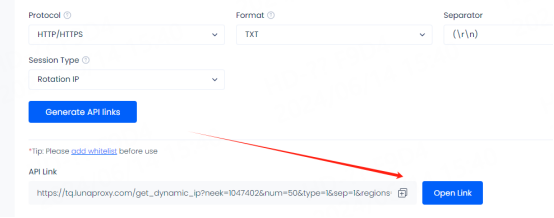
After successful extraction, please refer to the tutorial for configuration. For more tutorials, please click: [User Guide]
USER GUIDE > Basic Knowledge> Static Data Center Proxy Extraction
Static Data Center Proxy Extraction
Get IP
1. Enter the personal dashboard and click Static Data Center Proxy
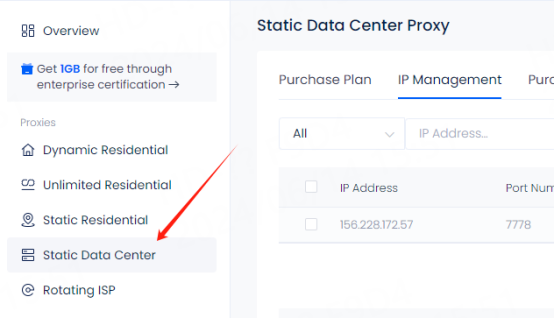
2. You can see all purchased IP information in the IP management interface
Tip: 10 IPs are displayed on one page by default. Click the lower right corner to select the number of pages to see more IPs

Usage Tutorial
After obtaining the IP, please click the link to view the configuration tutorial: [User Guide]
USER GUIDE > Basic Knowledge> Unlimited residential proxy-account and password authentication
Unlimited residential proxy-account and password authentication
Tip: If you need to use a sub-account, please refer to the tutorial on adding sub-accounts: [Sub-account Addition Tutorial]
1. Enter the personal dashboard and click Unlimited Residential Proxy
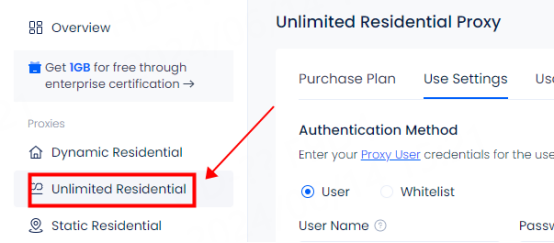
2. Click User and select the account you want to use. If you need to use a sub-account, click Add Account to enter the sub-account addition interface
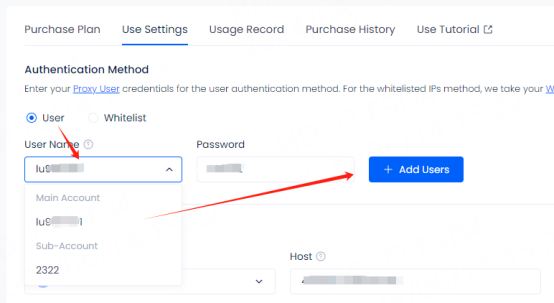
3. Select the country you want to use. Click Favorites for frequently used countries. After favorites, you can view them in the favorites
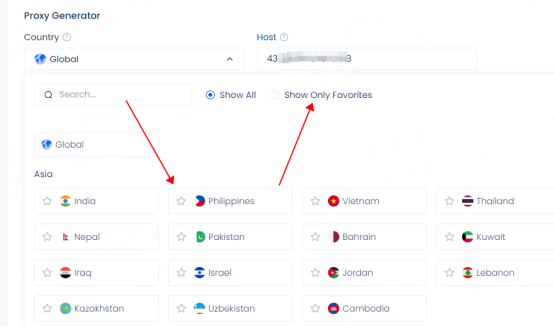
4. Select the session type
Session type:
① Sticky IP can be stable for up to 90 minutes. After selecting sticky IP, you can manually modify the duration according to your needs
② Rotating IP will obtain a new IP for each request
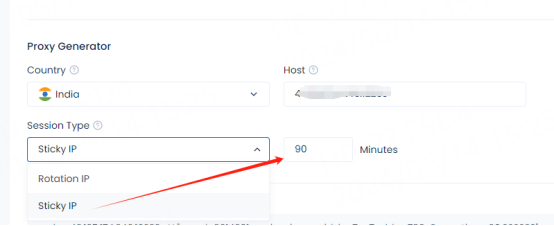
5. API link
After the selection is completed, you can click Copy API link to test whether the proxy is available in cmd
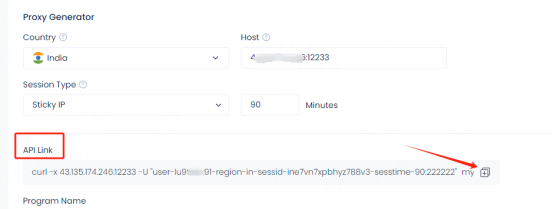
For the test tutorial, please refer to: [Proxy cannot connect] https://www.lunaproxy.com/help/faq/proxy-cannot-connect t.html
6. Select the number of program names and usage format you need. The configuration information will be automatically updated below. If a new IP is required, you need to reselect the number of program names
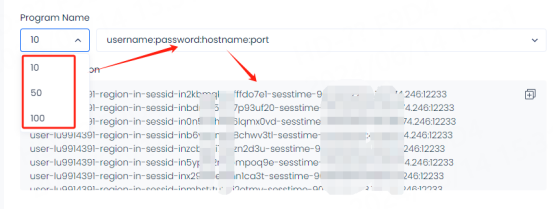
Tip: ① Select rotating IP. The configuration information is displayed the same, but different IPs are used in actual use
② Select sticky IP. The sessid in the configuration information is displayed differently. Different sessids represent different IP information. The sessid consists of English letters and numbers and can be changed manually
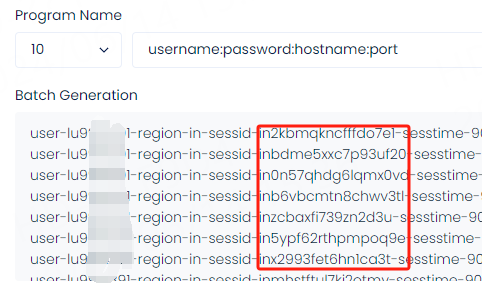
7. After the selection is completed, you can configure and use it. If you need to use it in the code or manually set the state, city and other information, you can refer to the API examples and usage examples. Example
①API Example

②Usage Example
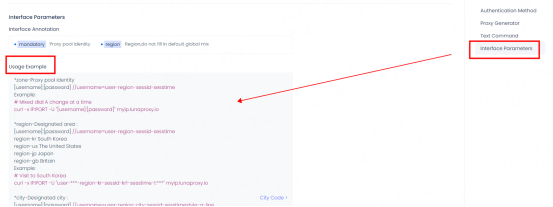
Username Explanation:
Username = user-region-st-city-sessid-sesstime
For example: Select sub-account 516, United States, California, Adelanto
user-516-region-us-st-california-city-adelanto-sessid-y0xd3h4iy3pydiu9-sesstime-1
user-516: Set sub-username
region-us: The country you selected. You can edit the country code to use IPs from different countries.
st-california: The state you selected. You can edit the state name to use IPs from a specific state.
city-adelanto: The city you selected. You can edit the city name to use IPs from a specific city.
sessid-y0xd3h4iy3pydiu9: The string used for fixed IPs. You can edit this string to manually change the IP. The string must contain 12 characters, including letters and numbers.
sesstime-1: The duration of the IP you set. You can edit the number to change the duration. The shortest is 1 minute and the longest is 90 minutes.
After the extraction is successful, please refer to the tutorial for configuration. For more tutorials, please click: [User Guide]
USER GUIDE > Basic Knowledge> Unlimited residential proxy-API extraction
Unlimited residential proxy-API extraction
Tip: To use the API link, you need to add an IP whitelist. For the tutorial, please refer to: [IP whitelist authentication]
1. Enter the personal dashboard and click Unlimited Residential Proxy-Whitelist
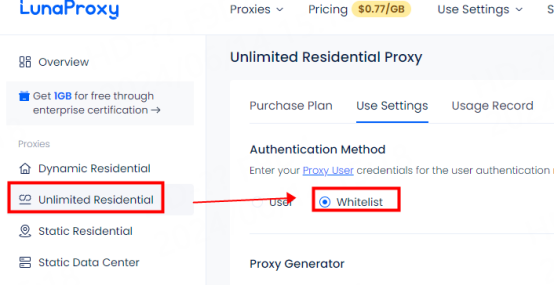
2. Select the number of IPs, proxy protocol, session type and other information, and click Generate API link
Tip: Unlimited proxy API mode does not support selecting a country
Session type: ① Sticky IP can be stable for up to 90 minutes
② Rotating IP will obtain a new IP for each request
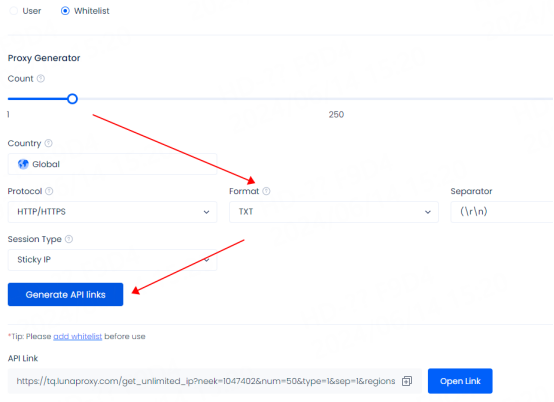
3. Click Open Link to view the IP list, copy the IP port or API link to configure and use
Tip: The IP displayed in the IP list is not the actual IP used, so the display is the same. When actually used, different ports and IPs are different

After successful extraction, please refer to the tutorial for configuration. For more tutorials, please click: [User Guide]
USER GUIDE > Basic Knowledge> Dynamic Residential Proxy-Account and Password Authentication
Dynamic Residential Proxy-Account and Password Authentication
Tip: If you need to use a sub-account, please refer to the sub-account adding tutorial: [Sub-account Adding Tutorial]
1. Enter the personal dashboard and click Dynamic Residential
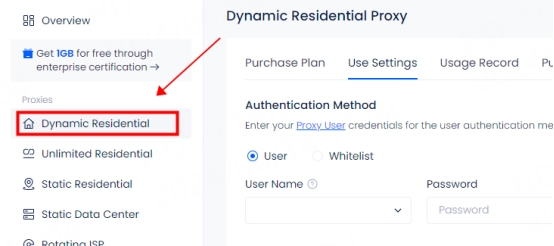
2. Click User and select the account you want to use. If you need to use a sub-account, click Add Account to enter the sub-account adding interface
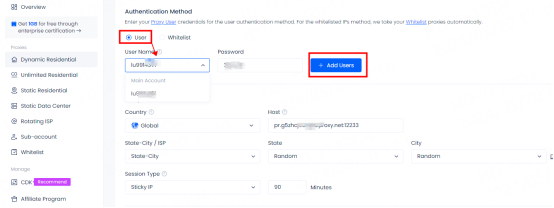
3. Select the country you want to use. You can click Favorite for frequently used countries. You can view them in the Favorites folder after you have collected them
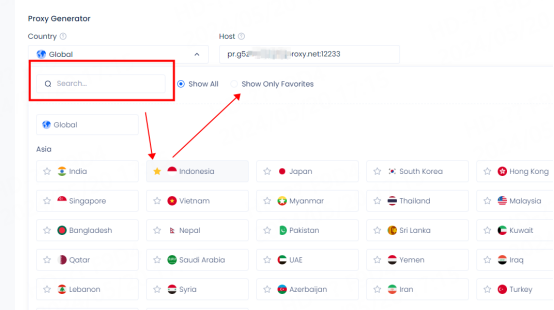
Tips: For more information about countries and states, click to download the country list

4. Select state-city/ISP
① After selecting state-city, you can select a specific area or random in the state and city list
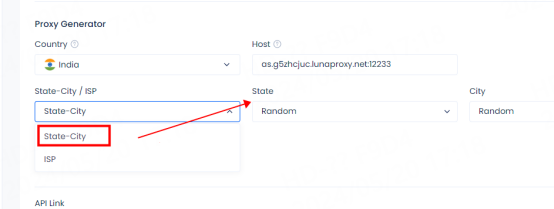
② Select ISP, you can select the supplier you need in the ISP list, and click to download the ISP list for detailed information
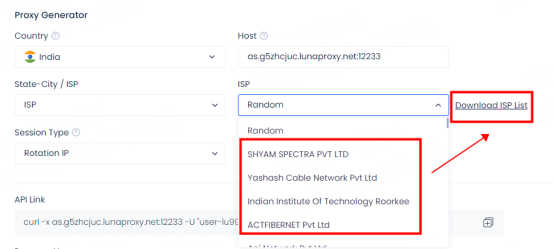
5. Select session type
Session type: ① Sticky IP can be stable for up to 90 minutes. After selecting sticky IP, you can manually modify the duration according to your needs
② Rotating IP will obtain a new IP for each request
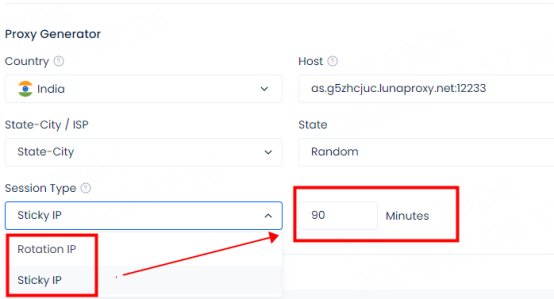
6. API link.
After selecting, you can click to copy the API link to test whether the proxy is available in cmd
For the test tutorial, please refer to: [Proxy cannot connect ]
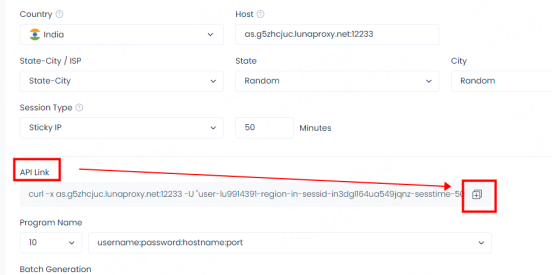
7. Select the number of program names and usage format you need. The configuration information will be automatically updated below. If a new IP is required, you need to reselect the number of program names
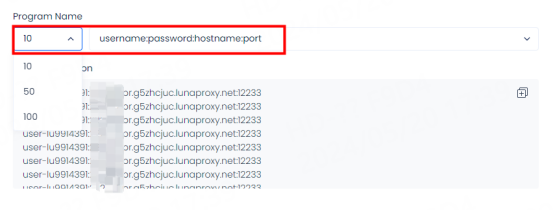
Tips: ① Select rotating IP. The configuration information is displayed the same, but different IPs are used in actual use
② Select sticky IP. The sessid in the configuration information is displayed differently. Different sessids represent different IP information. The sessid consists of English letters and numbers and can be changed manually
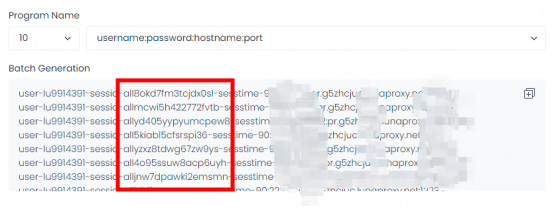
8. After the selection is completed, you can configure and use it. If you need to To use or manually set state, city and other information, please refer to API examples and usage examples
①API examples

②Usage examples
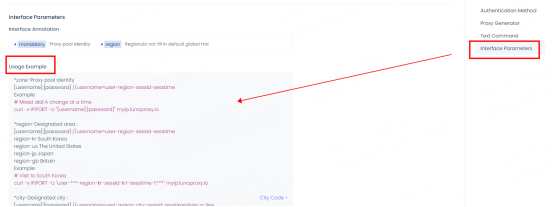
Username description:
Username = user-region-st-city-sessid-sesstime
For example: Select sub-account 516, United States, California, Adelanto
user-516-region-us-st-california-city-adelanto-sessid-y0xd3h4iy3pydiu9-sesstime-1
user-516: Set sub-user name
region-us: The country you selected. You can edit the country code to use IPs from different countries.
st-california: The state you selected. You can edit the state name to use IPs from a specific state.
city-adelanto: The city you selected. You can edit the city name to use IPs from a specific city.
sessid-y0xd3h4iy3pydiu9: The string used for fixed IP. You can edit this string to change the IP manually. The string must contain 12 characters, including letters and numbers.
sesstime-1: The duration of the IP you set. You can edit the number to change the duration. The shortest is 1 minute and the longest is 90 minutes.
After the extraction is successful, please refer to the tutorial for configuration. For more tutorials, please click: [User Guide]
USER GUIDE > Basic Knowledge> Dynamic residential proxy-API extraction
Dynamic residential proxy-API extraction
Tip: To use the API link, you need to add an IP whitelist. For the tutorial, please refer to: [IP whitelist authentication]
1. Enter the personal dashboard and click Dynamic Residential-Whitelist
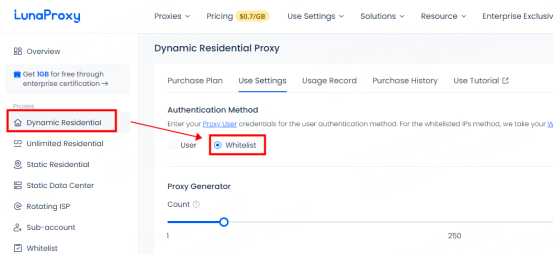
2. Select the number of extracted IPs, country, proxy protocol, session type and other information, and click Generate API link
Session type:
① Sticky IP can be stable for up to 90 minutes
② Rotating IP will obtain a new IP for each request
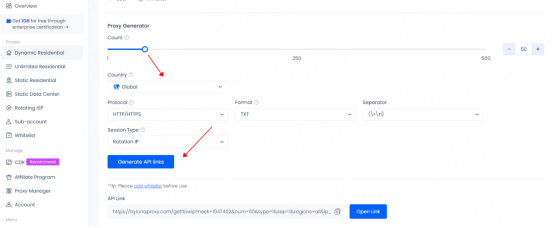
3. Click Open Link to view the IP list, copy the IP port or API link to configure and use

Tip: The IP displayed in the IP list is not the actual IP used, so the display is the same. When actually used, different ports and IPs are different
After successful extraction, please refer to the tutorial for configuration. For more tutorials, please click: [User Guide]
USER GUIDE > Basic Knowledge> How to use luna wallet
How to use luna wallet
Step1. Enter the recharge interface
1. Log in to your luna account and enter the overview interface
2. Click [luna wallet] in the left navigation bar to enter the recharge interface
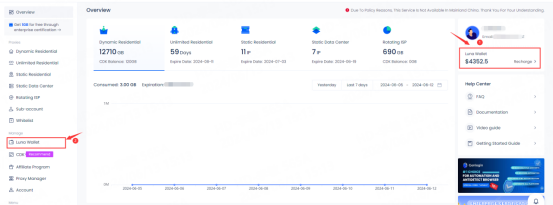
Step2. Recharge
1. Confirm the recharge amount by moving the slider or clicking the plus or minus button
2. After confirming the amount, click [Recharge] in the lower right corner to recharge

3. After the recharge is successful, you can view the recharge record at the bottom of the page

Step3. Use luna wallet
1. Manually purchase a package
① Select the package you need to purchase and click Buy
② Select [Wallet Payment] in the payment method to directly deduct the amount and quickly transfer it to your account
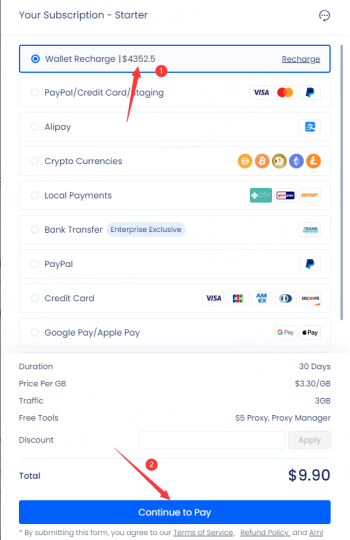
③ Click on the transaction record and jump to [Account-Wallet Transaction Record] to view your wallet details
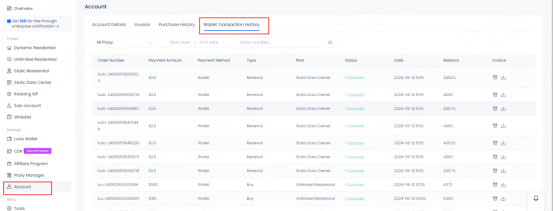
2. Turn on automatic renewal
① Enter the [luna wallet] interface and click the Turn on Automatic Renewal button

② Configure the renewal time or the amount of traffic left to automatically renew

③ Long press and drag to adjust the renewal order and click Save
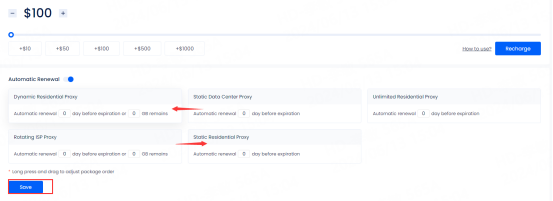
④ After saving, your wallet balance will be automatically deducted before the package expires
USER GUIDE > Basic Knowledge> Dealer Guide
Dealer Guide
Step 1. Register on the LunaProxy reseller website.
Step 2. Log in to the dealer dashboard. You can view your balance and user overview here.
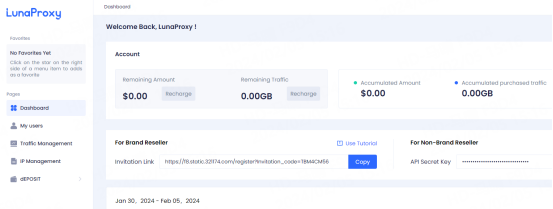
Step 3. Go to Deposit-Deposit to add account balance.
NOTE: The initial deposit must exceed $1,000. Reseller level is determined by the accumulated balance you deposit. If you have other requirements, please contact our customer service.
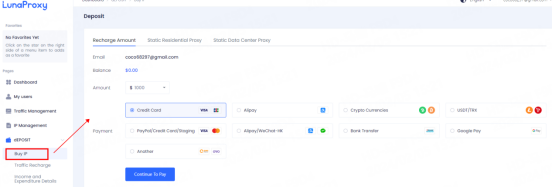
Step 4. Copy your link and send it to your users to sign up there.
Note: Only users registered with your link are considered your users.
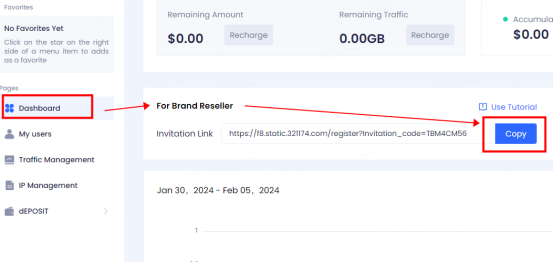
Step 5. Go to Traffic Management to allocate traffic to your users. Click the "Create Order" button and select the user and the package you want to send to them. Click OK.

Step 6. You can view the order records in the table below. And your balance will be deducted based on the package you sent.

USER GUIDE > Basic Knowledge> How to use LunaProxy
How to use LunaProxy
Lunaproxy supports two usage methods, whitelist authentication and account authentication. Choose one to get started!
Whitelist authentication
Step 1. Check your current IP in IP whitelist and add it to the list.
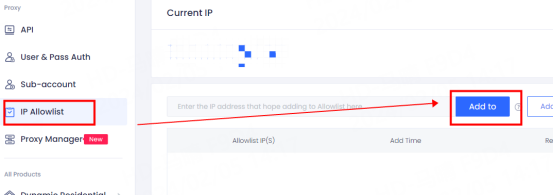
Step 2. Go to Get Proxy API, set the number of IPs you need, select the country of the IPs you want to use, and change the protocol and delimiter (if required). Then click the "Generate API Link" button to get your proxy link.
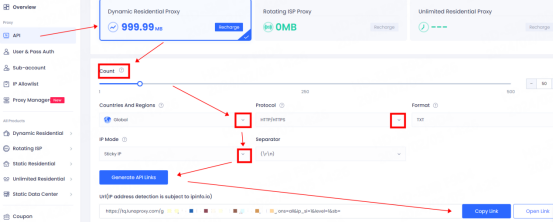
Step 3. Click the "Open Link" button to get the proxy list, or click the "Copy Link" button to copy the API link

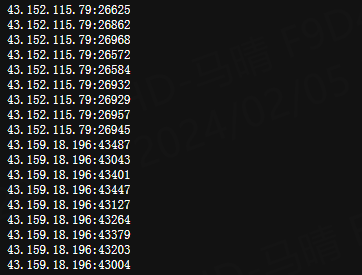
Account and password authentication
Step 1. Enter the sub-account interface and click the Add User button to create a sub-user.

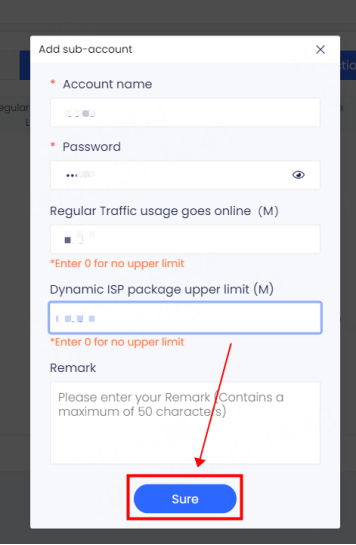
Step 2. Enter the account and password authentication interface and select the area and sub-user you want to use.
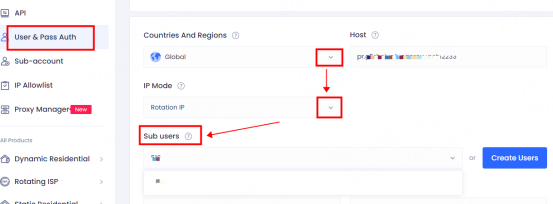
Step 3. If you don't care about the rotation duration, select Rotate IP. If you want to set a fixed rotation duration, select Sticky IP.

Step 4. Copy the proxy information you just generated and configure it in your proxy software for use.
Tip: Proxy Username Description
username=user-region-st-city-sessid-sesstime
For example: Select Subaccount 516, Adelanto,california , USA
user-516-region-us-st-california-city-adelanto-sessid-y0xd3h4iy3pydiu9-sesstime-1
user-516: set sub-user name
region-us: The country/region of your choice. You can edit the country code to use an IP from a different country.
st-california: The state of your choice. You can edit the state name to use the IP of a specific state.
city-adelanto: The city of your choice. You can edit the city name to use the IP of a specific city.
sessid-y0xd3h4iy3pydiu9: String used for fixed IP. You can edit the string to change the IP manually. The string must contain 12 characters, including letters and numbers.
sesstime-1: The IP duration you set. You can edit the number to change the duration. The minimum is 1 minute and the maximum is 90 minutes.
USER GUIDE > Basic Knowledge> How to obtain IP after purchase
How to obtain IP after purchase
Purchased packages: Dynamic Residential Proxy, Unlimited Residential Proxy, Rotating ISP Proxy
1. Lunaproxy provides two extraction methods: API link and account authentication
If you use API links, please refer to the acquisition tutorial: [API extraction tutorial]
And you need to add IP whitelist before use. Please refer to the tutorial for adding: [IP Whitelist Tutorial]
2. If you use account and password authentication, please refer to the tutorial: [Account and password authentication tutorial]
Purchased packages: Static Residential Proxy, Data Center Proxy
You need to fill in the account and password when using it. You can check the purchased IP, port, account, and password on the IP management interface corresponding to the package.
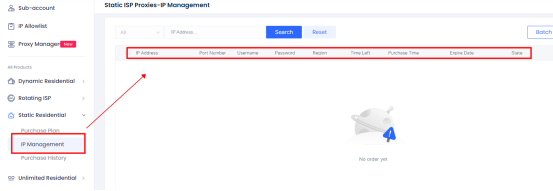
USER GUIDE > Basic Knowledge> How to change password
How to change password
1. In the navigation bar on the left side of the [Overview] interface, find [Account] and click to enter the account interface, then click [Modify] to change the password
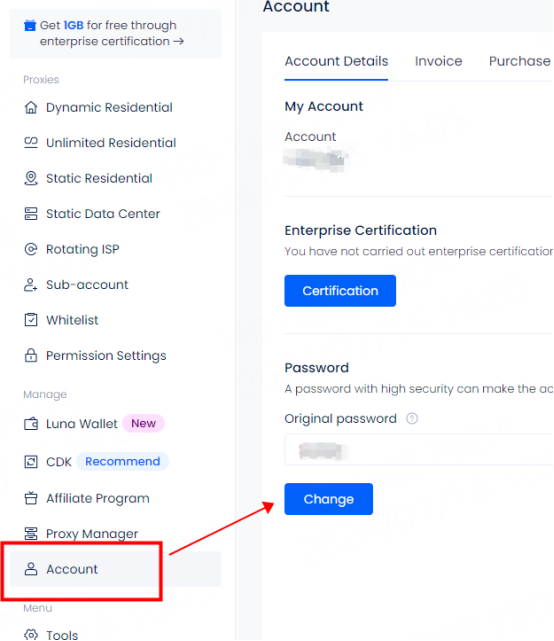
2. Enter your original password, new password and confirm the new password, then click [Get Verification Code]. Your registered email address will receive a verification code email. After entering the verification code, click Confirm the modification and the modification will be successful.
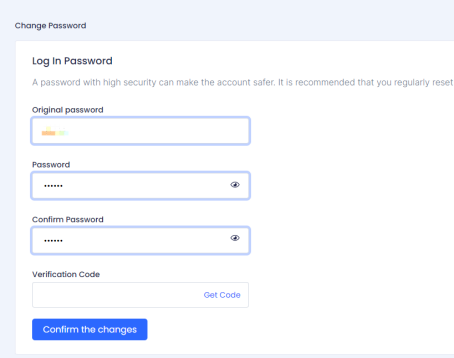
Notice:
If you do not receive the verification code or fail to change the password, please try to clear the browser cache and log in again, and change the password again.
If you still cannot solve the problem, please send your account, screenshot or video of the unmodifiable prompt to our official email: [email protected]
USER GUIDE > Basic Knowledge> Purchase tutorial
Purchase tutorial
If you do not have an account or have not logged in, please refer to: [Registration and Login Tutorial] to learn about registration and login.
LunaProxy has five proxy packages, including dynamic residential proxy, unlimited proxy, static residential proxy, data center proxy, and rotating ISP proxy. This article takes the purchase of dynamic residential proxy as an example.
1. First log in to the lunaproxy official website and click [Price] on the upper navigation bar.
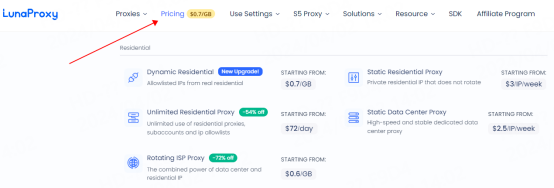
2. After entering the package purchase page, you can view detailed package information and prices, select the package you need and click [Order Now]
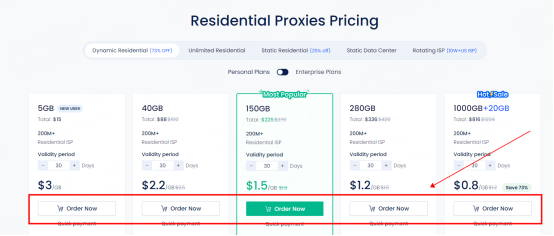
3. In the purchase interface, select the payment method you want to use, the validity period of the package, and then click [Continue To Pay]

4. Here we take cryptocurrency payment as an example. After clicking [Continue To Pay], you will enter the order interface and you can see your order number and cryptocurrency type.
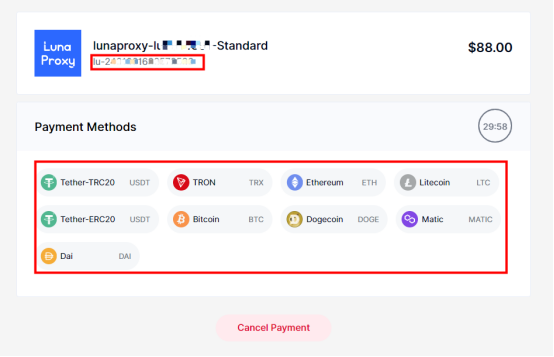
5. Select the type of cryptocurrency you want to use, you can view the payment address and amount, open your encryption wallet and scan the QR code, or copy the address below BTC to make a payment.
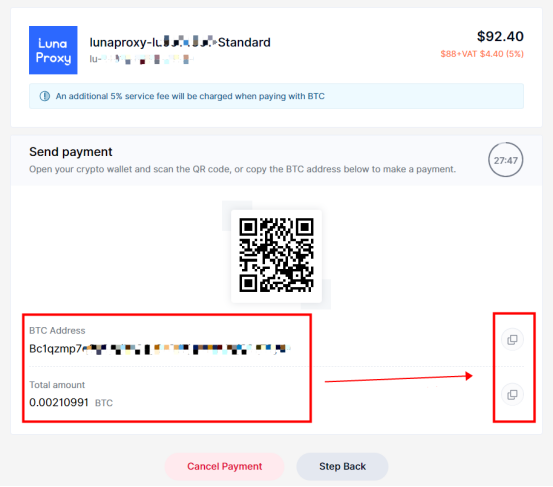
6. After the payment is successful, you will jump to the [Overview] interface.
Note:
1. If your order does not arrive after payment, please send your account number, order number, and payment success screenshot to the official email
2. If you encounter any problems when paying, please send a screenshot or video of the problem to the official email
Official email: [email protected]
After receiving your email, relevant personnel will handle it for you
USER GUIDE > Basic Knowledge> Registration and login tutorial
Registration and login tutorial
How to register if you don’t have an account?
1. First enter the lunaproxy official website and click [Sign up] in the upper right corner of the homepage.
2. After entering the registration interface, enter your registration email and password, check the user agreement, and then click Create Account
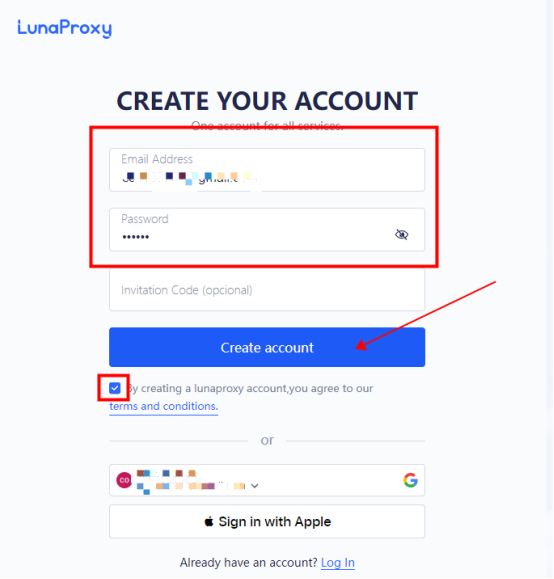
3. After successful creation, you will automatically log in to the [Overview] interface.
How to log in if you already have an account?
1. If you have already registered an account, you can directly click [Login] in the upper right corner of the homepage.
2. After entering the login interface, choose to enter your account and password to log in or directly click on your Google email/Apple account to log in.
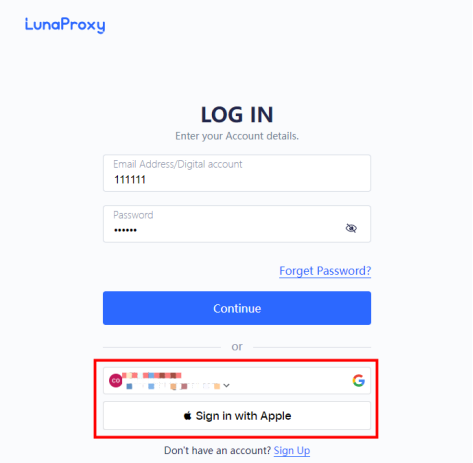
3. After successful login, you will enter the [Overview] interface.
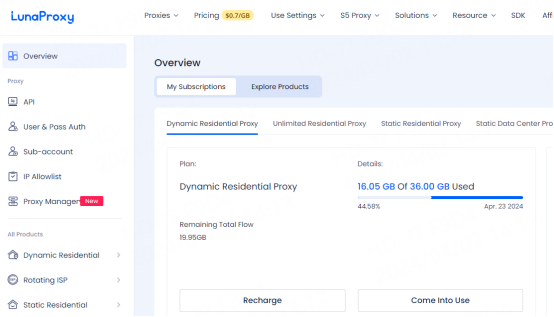
Note:
When logging in, you may encounter a login exception prompt. If you cannot log in, please refer to the tutorial: [Unable to log in due to account abnormality] to solve the problem.
USER GUIDE > Basic Knowledge> Introduction to Proxy Manager
Introduction to Proxy Manager
What is a proxy manager?
The proxy manager is lunaproxy's new integrated proxy management function. Through simple visual pages, flexible customization operations, and rich interface examples, it helps you create personalized configuration files in a variety of ways to meet your proxy needs in one stop. Your proxy business uses
Applicable plans
Dynamic residential proxy, starting at $0.7/GB
Main features:
Free application for server
Supports country, state, and city positioning
Port switching can be specified
The upper limit for extracting a single configured IP is 5,000
Complete configuration file information
Free server application: https://www.lunaproxy.com/proxyManager/
Usage tutorial: https://www.lunaproxy.com/help/userguide/34_360.html
USER GUIDE > Basic Knowledge> Luna S5 proxy function introduction
Luna S5 proxy function introduction
What is Luna S5 Proxy?
Luna S5 proxy is perfectly compatible with the S5 proxy IP function of PIA S5 Proxy, and can perform accurate IP proxying by using the S5 client.
Luna S5 Proxy supports country, state, city, zip code and ISP level positioning, and is very easy to integrate with third-party software such as fingerprint browsers and proxy tools.
Applicable plans
Dynamic residential proxy, starting at $0.7/GB
Main features
Traffic billing, no limit on IP usage
100% real residential IP, invalid IP will not be billed
200 million+ real residential IP resources
Supports country, city, zip code, and ISP level positioning
IP duration can last several days, and the IP can be used continuously during its lifetime.
Support fingerprint browsers, emulators, proxy tools and other tools
Support SOCKS5, HTTP(s)
Allow multiple terminals to log in at the same time
No code required
Free download:
To learn about the Luna S5 Proxy setup tutorial, click here [Quick start ]to get started quickly!
USER GUIDE > Basic Knowledge> Mobile extraction tutorial
Mobile extraction tutorial
Lunaproxy supports two extraction modes: API extraction and account password extraction. API extraction requires adding the local IP to the IP whitelist, so add the IP whitelist first.
How to add IP whitelist
1.First enter the lunaproxy official website and log in, click Start Now
2. Click on IP Allow List
3. Enter your local IP into the add box and click Add. If the addition is successful, you can view it in the list below.
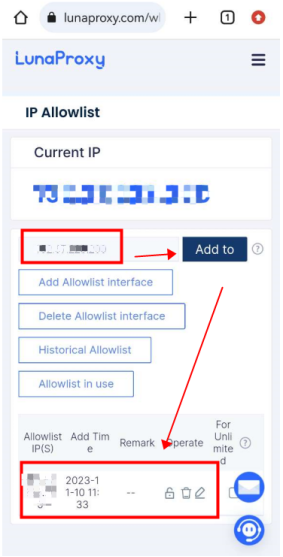
API extraction
1.Click API to enter the extraction page
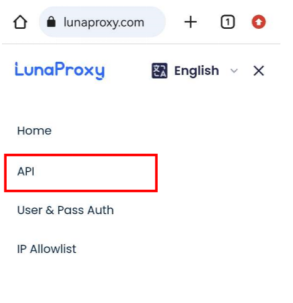
2. Choose the package you want to use
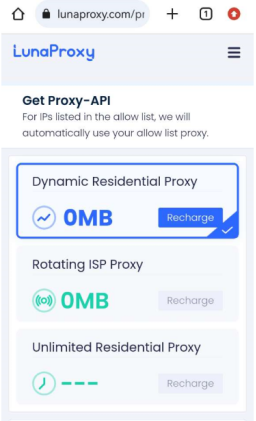
3. Select the number of IPs to be extracted, country, IP mode and other information, and click to generate an API link.
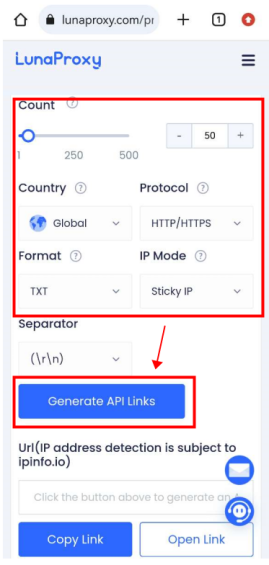
Account secret extraction
1.Click on Account and Password Authentication
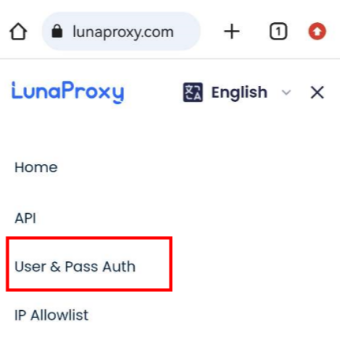
2. Select the package you want to withdraw
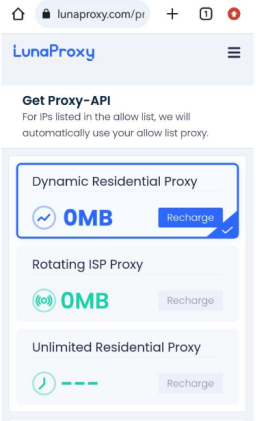
3. Select the extraction country and IP mode to see the test command. If you use a sub-account, click on the sub-account to select it.
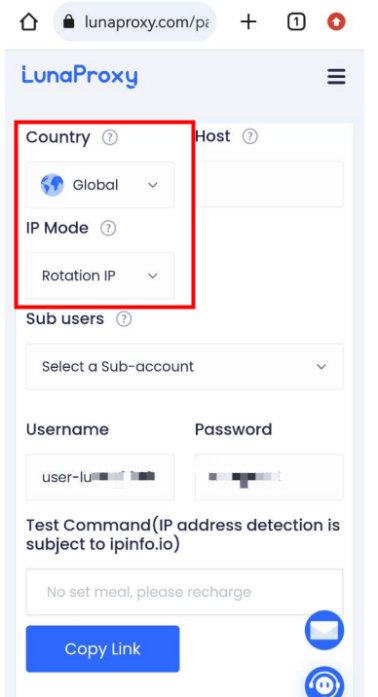
USER GUIDE > Basic Knowledge> Tutorial on adding and using sub-accounts
Tutorial on adding and using sub-accounts
1. In the personal center interface, find "Sub-account" in the left navigation bar, click to enter the sub-account management interface, and click to add a sub-account
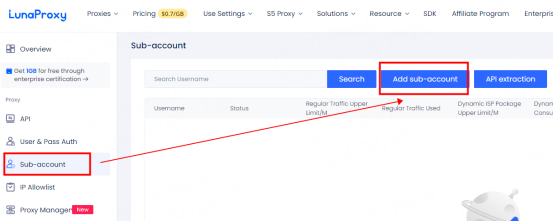
2. Set the sub-account name, password and traffic usage limit. The traffic usage limit cannot be higher than the current remaining traffic of the main account, and then click OK to set up successfully.
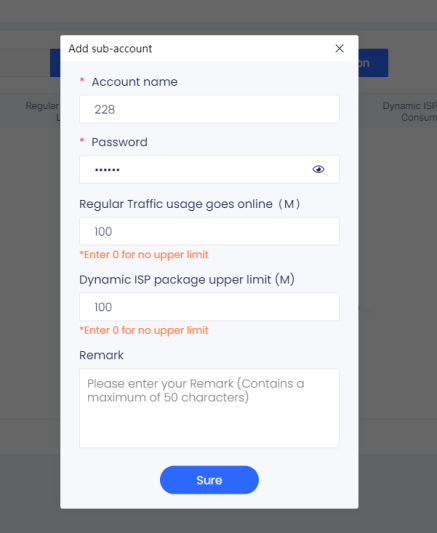
3. After the setting is completed, click Get Proxy - Account Password Extraction, then select the sub-account you want to use, and then click Copy Link
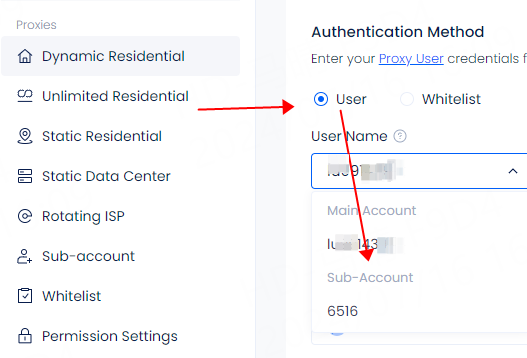
4. Open cmd, paste the copied link, and press Enter to test. If the test is successful, you can use it.

USER GUIDE > Basic Knowledge> IP whitelisting tutorial
IP whitelisting tutorial
IP Whitelisting allows you to create a list of trusted IP addresses from which you can access and use our residential proxies. Additionally, username and password authentication will no longer be required.
If you need to add a new whitelist, enter the personal center interface, click on the IP allowed list in the left navigation, enter your local IP in the input box, if you use other proxy tools, please fill in the proxy IP, and then click Add
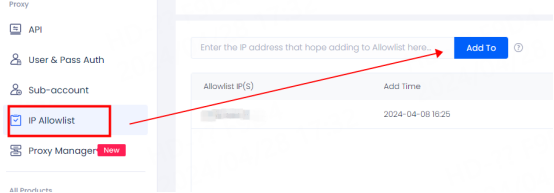
Notice:
1.Lunaproxy only supports adding IPv4 and does not support IPv6
2. If you use other proxy tools, please delete the newly added IPs in the whitelist after the work is completed, because these tools have the risk of consuming your traffic.
USER GUIDE > Proxy Tools> Google Extensions configuration proxy tutorial
Google Extensions configuration proxy tutorial
The browser Extensions is one of the tools for configuring proxy and is suitable for configuring various types of proxies. The following tutorial takes configuring LunaProxy dynamic residential proxy as an example.
1. First click on Settings - More Tools - Extensions in the upper right corner of Google
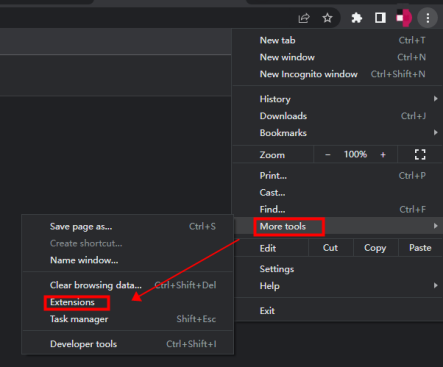
2. Drag the successfully downloaded plug-in into the Google extension and open it
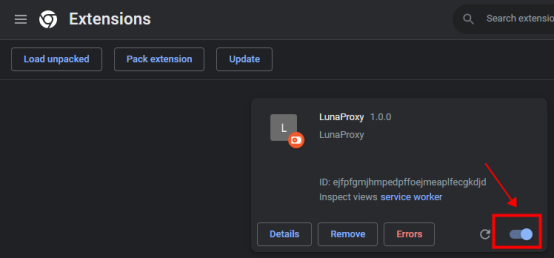
3. After opening, click the extension button in the upper right corner and click the LunaProxy plug-in
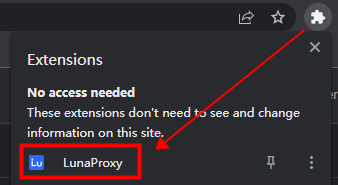
4. If you have a lunaproxy account and purchased a proxy, please click Add Agent. If you do not have an account, you can click Sign Up and go to the lunaproxy official website to register.
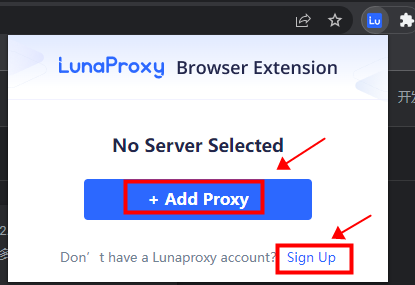
5. Click Start to configure the proxy
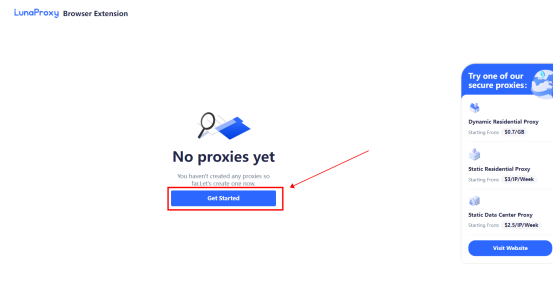
6. Select the proxy type, fill in the proxy information completely, and click Save to complete the configuration.
For proxy extraction tutorial, please view tutorial
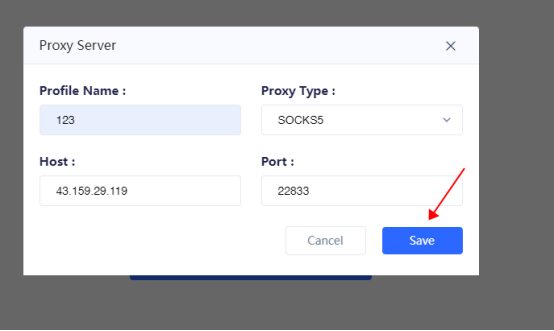
7. The configuration is successful. You can view the configured agents on the [My Proxies] interface, and you can also modify, delete or add proxy according to your own needs.
To check whether the proxy is valid, please check tutorial
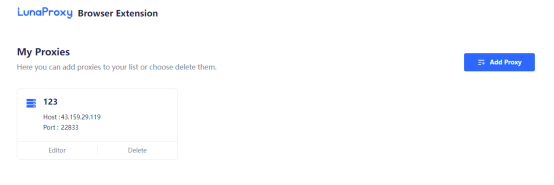
USER GUIDE > Proxy Tools> Shadowrocket
Shadowrocket
Integration of Shadowrocket with lunaproxy
1. Select the way the lunaproxy API is extracted
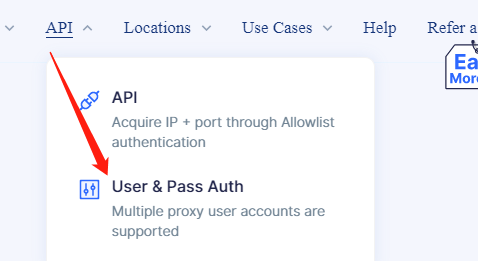
2. Select any country or a designated country, and here I choose "America"
3. Time can choose: 1min, 5min, 30min ", here I choose 30min
4. You can select the protocol format IP mode splitter default options as required
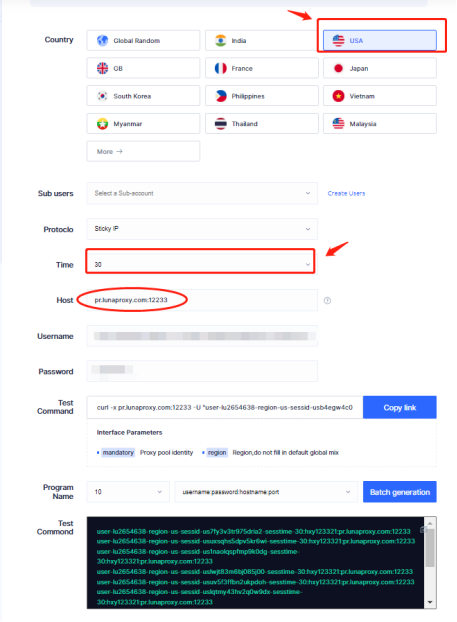
5. To install Shadowrocket, go to your AppStore and download the app to your iPhone or iPad.
6. To use our proxies with Shadowrocket, first, open the Shadowrocket application and then click on Add Server.
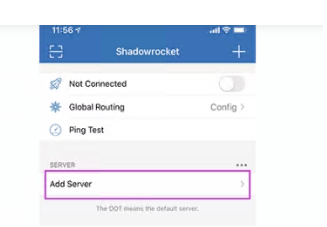
7. In the following window, click on Type.
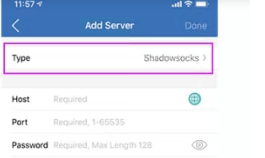
8. Choose HTTPS and go back to the previous screen.
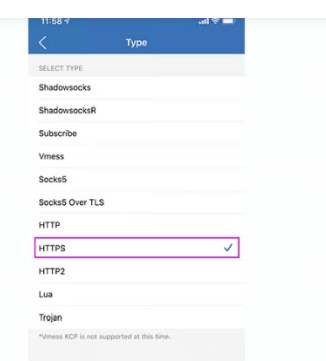
9. Enter the proxy and the authentication information. Enter the Host, and then enter the port number 12233. Don't forget to enter your credentials under the user and password. And don t forget to add customer-before your given username. When done, press the return arrow to return to the previous screen.
10. After you complete the proxy details, you will be able to open the proxy. To do this, please activate the switch under Unconnected.
11. If that is your first time using Shadowrocket, you will get an iOS prompt to add Shadowrocket to your VPN configurations. Click Add. You will need to enter your iPhone passcode to confirm.
12. And that is it. The toggle at the top of the app should now be activated.
13. You can easily test if the proxy is working by visiting icanhazip.com.
USER GUIDE > Proxy Tools> FoxyProxy
FoxyProxy
1. Click on Options.
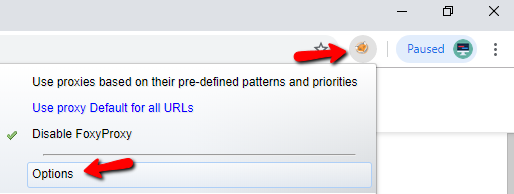
2. Click on Add New Proxy in the proxies menu.

3. Choose Manual Proxy Configuration.
4. Enter our terminal or IP address and port (e. g., random IP). Then, click Save.pr.lunaproxy.com:12233
5. Go to Proxy mode and select the Lunaproxy proxy from the drop-down menu.
6. To see if the proxy is working, check your IP on https://www.iplocation.net/.
Setup for Firefox
1. Click on Options.
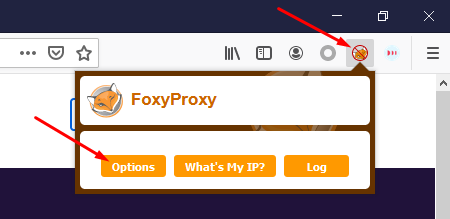
2. Select Add。

3. Select either Proxy Type HTTP or SSL (HTTPS), enter the Proxy IP address or DNS name, Port, Username and Password. Then, click Save.
4. Go to Proxy mode and select the lunaproxy proxy from the drop-down menu.
5. To see if the proxy is working, check the IP on https://www.iplocation.net/.
USER GUIDE > Proxy Tools> Proxifier
Proxifier
Step-by-step guide to integrating Luna Proxy with Proxifier:
YouTube Tutorial:https://www.youtube.com/watch?v=nrOO17TZ6xQ
1. Select any country or specify a country, here I choose "United States"
2. The time can be selected: 1min, 5min, 30min", here I choose 30min
3. Host, USERNAME, PASSWORD are all fixed.
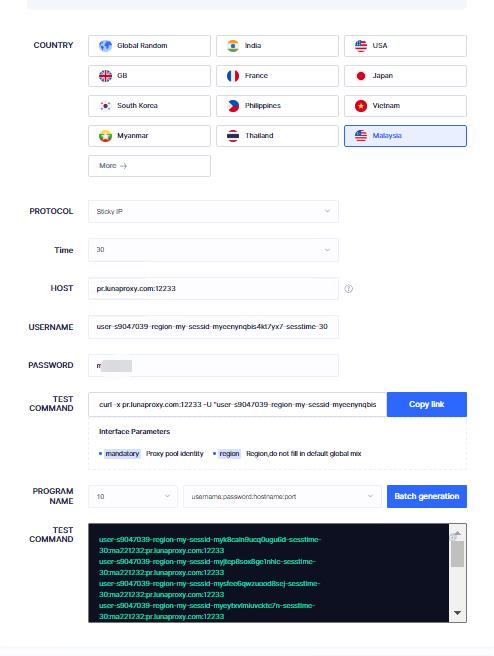
4. Next we open Proxifier
5. Click Proxy Service - Click Add
6. Select the proxy type "socks5" or "http(s)"
7. Fill in the lunaproxy proxy host: pr.lunaproxy.com; proxy port: 12233
8. Fill in the proxy account and proxy password.
9. Finally check the proxy, we can see that it is the IP after the proxy is successful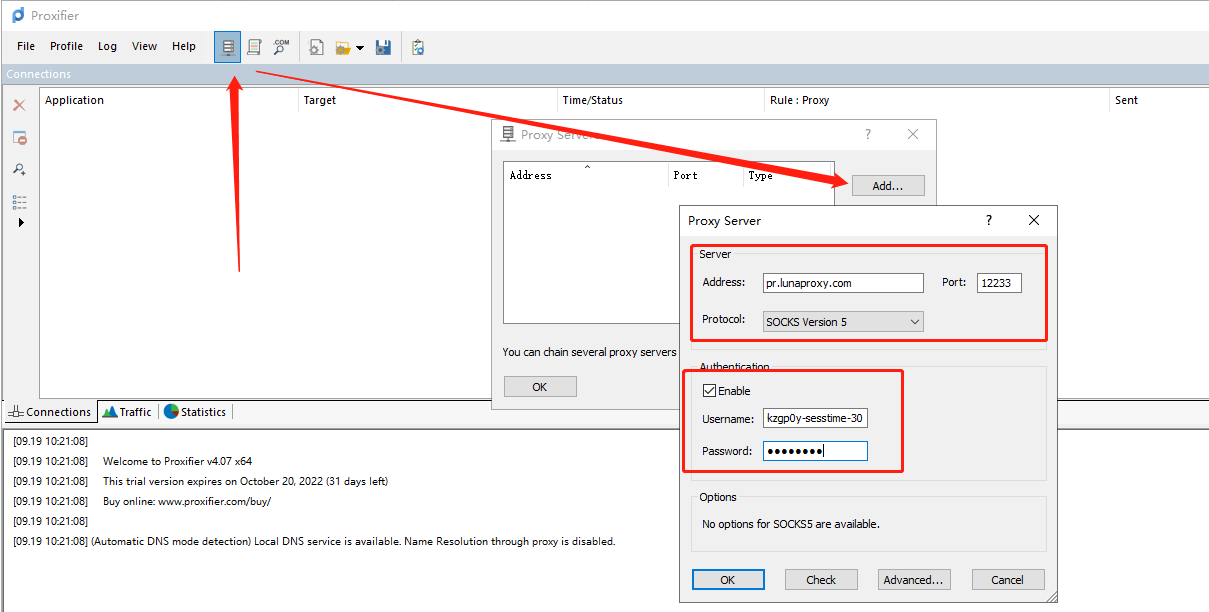
USER GUIDE > Proxy Tools> OpenBullet
OpenBullet
Step-by-step guide to integrating Luna Proxy with OpenBullet:
1.Open OpenBullet. Navigate to the Proxies tab.
2.Click Import and insert your generated proxy. If you did not allowlist your IP address in the Authentication Methods tab, you must enter your credentials. If you've already done that part in the Endpoint generator tab and imported the proxy with your credentials, you don't need to authenticate it again.
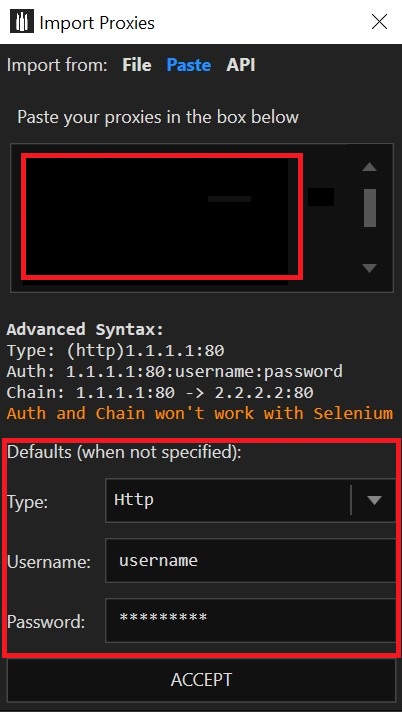
3.After completing the proxy settings, click Accept.
4.Click Check to see if the proxy is working properly.


